
Development environments for beginners
|
Greenfoot
Greenfoot [4] seeks to provide the first entry into Java object-oriented programming. This joint venture between the University of Kent and La Trobe University in Australia for a development learning environment allows rapid creation of two-dimensional graphics applications – in particular simulations and games. Targeted at secondary students from about 14 years of age, development of Greenfoot began back in 2003, with the tool under GPL starting in 2009.
Greenfoot programming is done in Java, with the development environment providing pre-built classes or objects. As a rule, each object is a visible entity in a virtual world (Figure 3) that students rotate, scale, and otherwise alter through prepared methods. Unlike Alice, these actions are done through direct input of Java code. The tutorials on the Greenfoot web page are only partially explained, so a Java book is a must. You need to interpret the created programs before running them, but that's easily done with a single mouse click on the user interface.
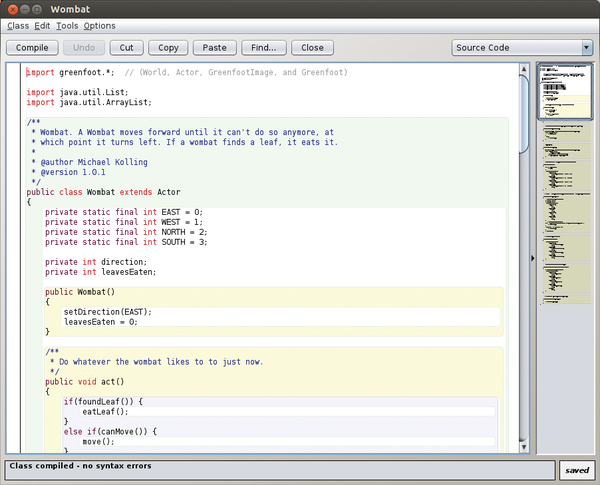 Figure 3: The Greenfoot editor provides not only syntax highlighting but also thumbnails on the right with which you can quickly navigate to desired code locations.
Greenfoot is based on the BlueJ Java development environment from which it inherits some of its functions. The editor highlights the components of the source code in various colors and provides an autocompletion function as you type (Figure 3). You can record music and sounds with a built-in sound recorder or import MP3 files. Because Greenfoot programming is done directly in Java, you can very easily develop programs further. Basically, all options are open to you, and you can even add external Java libraries. Additionally, projects can easily transfer to other IDEs, with the "naked" Java code residing in the project directory.
The Greenfoot developers make binaries available as DEB packages for Ubuntu and Debian. For other distributions, you have to go to an installation package that you start with java -jar Greenfoot-generic-221.jar . Once started, you first create a new scenario. The main window then opens with the outlines of a program (Figure 4). On the right is a simple class diagram to help you see the class relationship. Double-clicking a class opens its Java code in an editor.
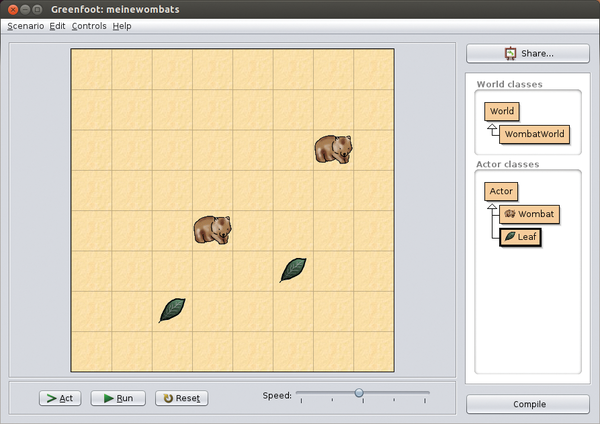 Figure 4: Greenfoot's main window shows a playing field with two objects of type Wombat and two of type Leaf.
Greenfoot distinguishes between World classes, which correspond to a square on the screen, and Actor classes, which are graphical objects in the virtual world. You can derive your own subclasses from these two classes and apply methods to them in Java code. For these, you can rely on default Greenfoot functions and methods, such as those to reposition the objects. You can easily import the few presupplied classes from a window. Right-clicking one of the classes in the class diagram applies a new object and, in the case of an Actor, places it in the diagram. Right-clicking an Actor opens the available methods or examines its current properties.
The Greenfoot makers provide learning material, including an introductory manual available in a few languages [5]. Students can get a number of tutorials, a reference manual, and further tutorials, including one on how to use Microsoft's Kinect camera with Greenfoot. Questions can be posted to a forum. The completed projects, known in Greenfoot as "scenarios," are available in the Greenfoot Gallery [6]. Other Greenfoot users or instructors can comment on and rate the scenarios. The programs presented there can also be run – with an installed Java plugin as a prerequisite – directly in a browser.
For teachers, the Greenroom [7] provides a separate platform for exchanging instructional and practice material. Furthermore, so-called "hubs" all across the world provide courses for instructors – for example, the current hub in New York can be found online [8].
Hackety Hack
If you want to learn Ruby, you should take a look at Hackety Hack [9], an instructional IDE distributed under an MIT license. This IDE provides the popular scripting language along with built-in exercises. Teachers can add their own exercises as text files using Markdown [10] format. Compared with the other IDEs, this is a rather young project, with its first stable project dating from 2010.
Hackety Hack comes as a 12MB program file that is easy to start. The main window consists simply of a barebones editor that takes newcomers by the hand by pointing to the Lessons button. Once you start a lesson, instructions appear in the right pane, and you can enter some practice lines in the left pane (Figure 5).
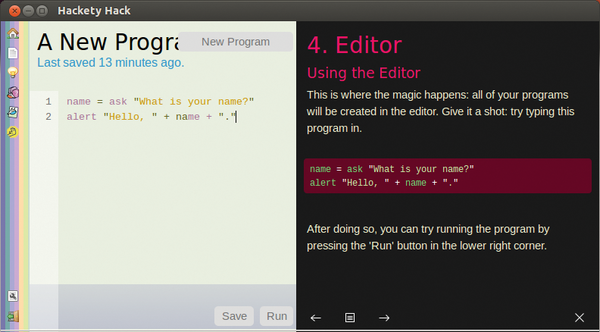 Figure 5: Hackety Hack consists only of a help window with an editor, which color-codes the various code entities.
Like the time-honored Logo programming language, Hackety Hack provides a paint pen known as a "turtle" that you can move around the screen using instructions. Hackety Hack also uses the Shoes [11] library, with which you can easily write user interfaces.
Documentation is currently limited to four exercises supplied with Hackety Hack to get you started. The lessons are easy to understand, but short, and leave a lot of open questions. You can put your own programs on the Hackety Hack homepage [12], although ratings and comments, as with Greenfoot, aren't possible. A forum exists for those wanting more help.
Allegedly, some sample programs come with the package, but they were missing in the test installation. Also, the editor had a bug in version 1.0 so that, when deleting a character, the one from the previous line occasionally was deleted as well.
« Previous 1 2 3 4 Next »
Buy this article as PDF
Pages: 6
(incl. VAT)
Buy Ubuntu User
US / Canada
UK / Australia
Related content
-
JavaScript, jQuery, and DOM model interaction

The JavaScript language has developed into an important programming language. We explain the basics and provide examples for accessing an open HTML page through the DOM interface.
-
Comparing game development environments

GDevelop, Godot, and jMonkeyEngine simplify game programming with pertinent libraries, game engines, and developer tools. They make it possible for both beginners and advanced programmers to create nifty games with minimal effort.
-
Coming to grips with programming in Ubuntu

The one thing computers were designed for is coding. Everything else is just icing on the cake.
-
Integrating network storage through the file manager

Web hosting providers usually give you FTP access when you need to upload data to their online storage. On Linux, a file manager is all you need to access network storage.
-
Creative Inkscape effects in practice

The Inkscape vector graphics program not only lets you work with pencil and ink lines, it can help you mimic the elegant brushstrokes of an oil painting. Our three easy-to-follow examples show you how.