
Marble virtual globe
|
Helper Helpers
Marble doesn't calculate these routes quite by itself; it relies on several specialized add-on modules that, in turn, consult other route planners on the Internet. In the drop-down menu under the route directions, you can switch to one of the other route planners. Not all of them provide directions, however, in which case the directions list will be empty.
To specify which services Marble should use for routing, click the wrench icon just above the directions list. Marble then shows you all the available route planners. If you don't want Marble to use a particular route, remove the check mark from it.
The available services depend on the mode of transport selected. A quick way to create a route is to right-click a map location and select Route from Here , then go to the end point, right-click and select Route to Here .
If you want to take a small side trip while traveling from A to B, you can click the Add Via above the directions to build a stop on the route. Marble then creates a third entry field, C and moves the original B entry into C so that you can add the side trip location (Figure 7). Any number of additional stops can be added in the same way.
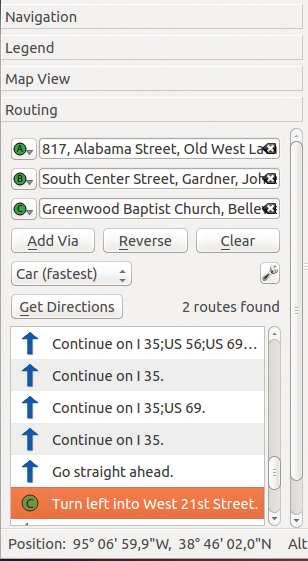 Figure 7: The route here starts in Lawrence, passes through Gardner, and ends in Kansas City.
You can do it even faster. Positioning the mouse on the blue line turns the pointer to a flag. Clicking creates a way station along the route. You can drag and drop to relocate the start, way station, and end points as much as you like. Marble adjusts the route accordingly.
To delete a location, click the X to the right of the routing entry field or right-click the green circle on the map and select Remove this destination from the context menu.
Downhill
Elevation profiles are useful for bike tours. If you have a route planned, click View | Info Boxes | Altitude Profile . The upper part of the map now shows the altitude profile. If you hover the mouse over it, Marble shows the exact altitude at each point and marks the location on the map (Figure 8).
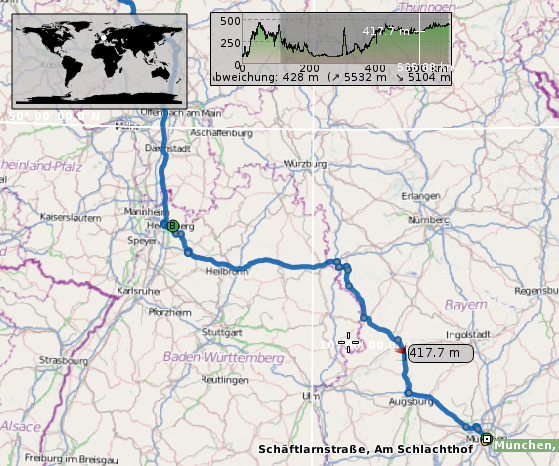 Figure 8: The location marked with the altitude profile is about 400 meters above sea level. The altitude marker is in gray on the map.
To make the return trip, simply click the Reverse button in Routing above the directions, in which case Marble reverses the route. As soon as you establish the route, save it as a KML (Keyhole Markup Language) file by clicking the disk icon. Both Google Earth and Google Maps use this file format. If you want to reload a route later, click the icon with the Open Route folder; to remove the blue line and the route, click the little red X symbol.
Buy this article as PDF
Pages: 4
(incl. VAT)
Buy Ubuntu User
US / Canada
UK / Australia
Related content
-
Gesundheit!: KDE 4.3.4 Code-Named "Cold"
The KDE Software Compilation 4.3.4 release freezes the features for the upcoming 4.4, hence the code-name.
-
Creating images containing GPS data

When you get back from a trip, you're usually bursting to tell everybody all about it and share your photos. Organizing your pics by location makes it easier to describe your adventures.
-
Software for DIY off-road navigation

Anyone doing off-road navigation needs special maps. You can create these maps in no time at all.
-
The very fast QupZilla web browser put to the test

QupZilla is a new Linux web browser that enters in an already crowded arena. But, QupZilla holds its own when it comes to speed and ergonomics.
-
Explore the night sky with Stellarium

What shines in the dark is often hidden by clouds. Stellarium provides a clear view of the stars plus a lot of astronomical data.