
Video compositing with Natron
|
Effective
For each effect, you must create a node that connects to the other nodes in some way. For example, if you are trying to build in a fade-to-black effect, the scene should include a black background and then slowly cut into it from the video. To do this, first click with the left mouse button on a free area of the drawing screen. This step ensures that no node is selected. Otherwise, Natron would just automatically connect the newly created node to whatever is selected. Now, click on the right mouse button and select Merge | Merge . As the name suggests, this effect can merge transferred material through inputs A and B and blend both.
The new merge node will appear in the preview. Next, you must cut the connection between ReadFFmpeg1 and the Viewer1 by clicking on the black line. Next, connect the output from Merge1 to the 1 input of Viewer1 . It is sufficient to drag the output with the mouse onto Viewer1 the node.
Using the same principal, you can now connect the input B with the output of ReadFFmpeg1 . Now the only part missing is the black background for input A . Another node appears on the workspace. Ensure that no nodes are selected and then click with the right mouse button and select Image | Constant . Connect the output of the node Constant1 to the input from A of the effects Merge1 . The result should look like what is shown in Figure 5.
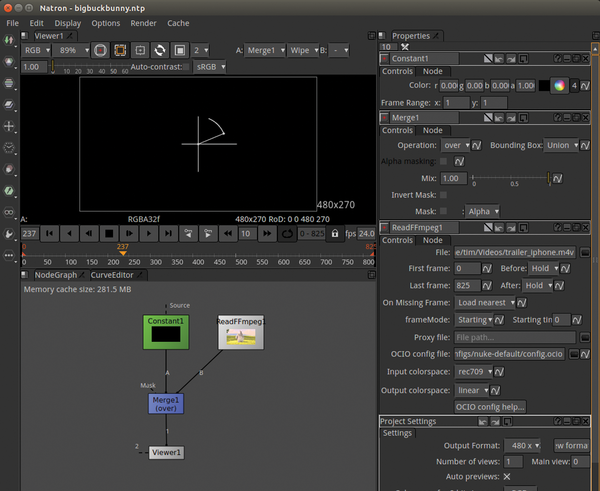 Figure 5: Merge1 mixes two clips, one after another. The setting of the effects will determine how this happens.
The Constant1 node delivers a black picture to the effect Merge1 . At this point, this leads on to the Viewer1 , which is why the preview now appears all black. If you would like to select a different color, click on the on the color wheel symbol within the settings of the node Constant1 .
This opens the color palette from Figure 6. As soon as another color is selected, you will immediately see a matching result in the preview. For this example, I'll stick with black (all of the settings of the fields r , g , and, b must be 0).
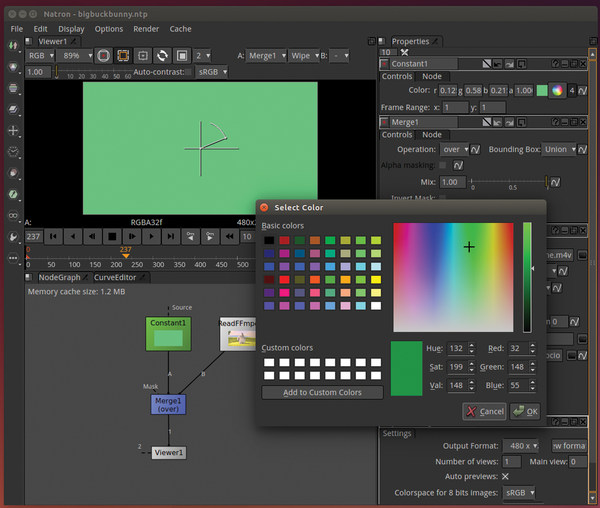 Figure 6: Natron directly displays any changes. Here, the newly selected color appears in the preview window.
Illusions
Now, you can apply settings to the effects Merge1 . If you do not find the appropriate area on the right side of the window right away, click on the effect in the NodeGraph tab. Natron then draws a yellow frame around its settings. In this example, only the regulator Mix is of importance. At the moment, it is set to 1 , whereby the node outputs the picture from the A input.
If you drag the slider to the left, Merge1 mixes the video image with its B input. If the value is 0 , then only the video will be visible. The settings that are carried out here are for the entirety of the scene and there is consequently no gentle fade.
To change this, go to the preview and make sure the orange-colored triangle is on the 0 in the timeline. Check that the Mix regulator is set to 1.00 in the merge node's settings. Merge1 should now only display a black picture. To the right of the Mix regulator is a symbol with a wavy line. Click on this and select Set Key from the menu. In doing this, the effect Merge1 will recognize that the first picture of the regulator Mix is set to 1 .
Now place the triangle on frame 100 in the preview. This is the point at which you want to be able to see the video. To set this up, pull the Mix regulator to 0 . By doing this, Merge1 will now have recognized two settings: On picture 0, Mix is set to 1 , whereas the Mix regulator on picture 100 is set to 0 .
All of these pictures that change settings are called keyframes , or keys for short. Merge1 automatically calculates the appropriate intermediate position for all the frames in between.
If you rewind the preview all the way to the beginning and then start playback, the video will slowly fade in from black. You can quickly jump between the two keyframes with the symbols below the preview that show a white triangle with a key. You can set as many additional keyframes as you wish as long as you select the appropriate frame and then shift the regulator.
To delete a keyframe, select it in the preview. Once this has been done, the small orange triangle will turn blue. Click on the right, next to the Mix regulator, click once more on the wavy line symbol, and select Remove Key . Following the same principal, you can also add all other keyframe settings, behind which a wavy line symbol exists.
Buy this article as PDF
Pages: 6
(incl. VAT)
Buy Ubuntu User
US / Canada
UK / Australia
Related content
-
Video effects and compositing with Natron

Elaborate video compositing, blue screen tricks, and other complex video effects normally only appear in high-priced programs like Adobe After Effects, Nuke, or Fusion. Natron is open source, free, and gives high-priced alternatives a run for their money.