
Snapshot
All major desktop environments provide programs for taking screenshots; however, their features usually pale in comparison with those of Shutter.
|

Kasuba Gyorgy, 123RF
All major desktop environments provide programs for taking screenshots; however, their features usually pale in comparison with those of Shutter.
In software manuals, multimedia presentations and technical documentation screenshots are de rigueur for illustrating various functionality and options. Every common desktop environment in Linux provides its own tool for creating them.
Unfortunately, programs like Ksnapshot are missing various functions, such as capturing menu hierarchies, thus requiring laborious reworking with Gimp to get the desired results. Shutter makes this task easier by providing all the required tools from the start.
You can find Shutter in the software repositories of all the major distributions. Because the program is constantly evolving, some repositories do contain outdated versions for installation.
Although the current source code is always available [1], the many dependencies of the program written in Perl make it advisable to resort to a prebuilt package [2].
After a successful installation, you'll find the corresponding starter in the desktop menu structure. Shutter is compatible with Gnome, KDE, and Xfce. Once called, the system tray will include a new icon that you can click without having to maneuver through untold menus.
Shutter starts up in an unspectacular window. At the top edge, you'll find the obligatory menu bar; under that is a row of buttons for quick access to the important functions. The main part of the window starts out empty and will later hold the screenshots.
The toolbar buttons let you capture the full screen, a window or subwindow, part of a window, a menu, or a freely definable area. You can also capture tooltips. Next to the buttons for full screen or window capture, you will find three little triangles that open a drop-down menu when clicked.
From this menu, you can choose which desktop interface you want to capture, resulting in toggling among them. When recording the window of an open program, you select it from the corresponding menu. This means you don't have to minimize, move, or close windows with multiple applications open in order to capture the desired one (Figure 1).
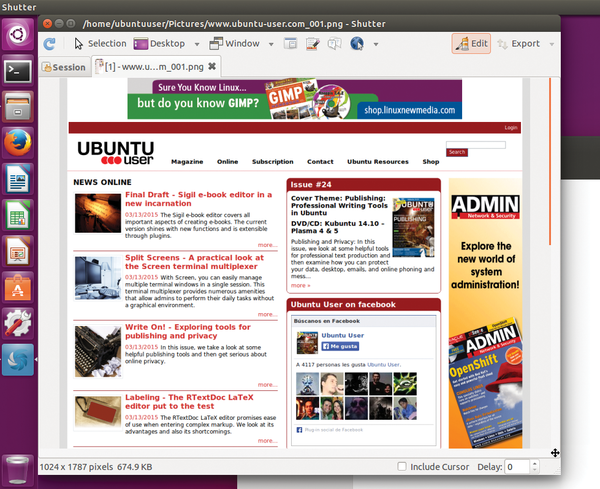 Figure 1: The main Shutter window focuses on the essentials without detracting from their functionality.
Another highlight of the software is the ability to capture screenshots from web pages without needing to open the browser and the actual page. To use this feature, you need to integrate the gnome-web-photo package found in most of the major distribution repositories.
You activate the module by clicking the world icon on the program's toolbar, which opens a dialog where you enter the URL of the web page. Subsequently clicking Capture at the bottom right of the dialog makes the software try the screenshot.
If this is not immediately successful because of a slow Internet connection, you can set the wait time by clicking the down arrow in the module's submenu. Shutter tries to capture the shot in the time specified and shows it in the session window as usual.
Unlike browser screenshots, the software captures the entire web page and not just the part that displays in the browser. (Figure 2).
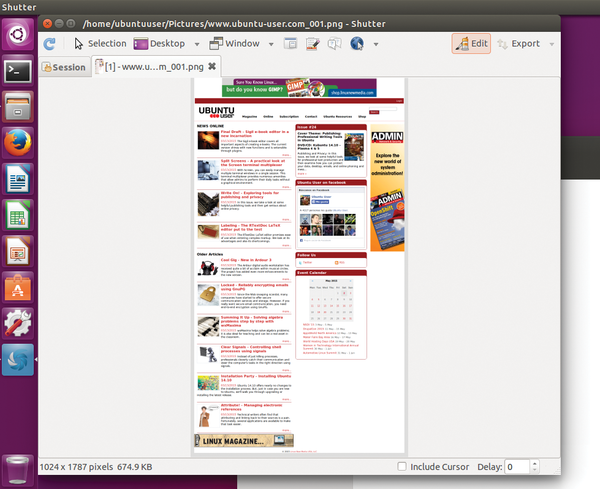 Figure 2: A web page screenshot captured by Shutter isn't limited to the visual area in the browser, but encompasses the entire page.
Pages: 3
US / Canada
UK / Australia

Some pictures call for a particularly skillful photographer – either that or a computer with gPhoto2. The gPhoto tool helps you create sequential shots that won't try your patience.

Load photos, videos, and music from your Android smartphone to your desktop using AirDroid and your browser.

If the default Ubuntu image viewer doesn't cut it for you, there are plenty of other excellent image viewing applications you can choose from.

Ubuntu's Software Center lets you install just about anything, including free software, purchased apps, and games.

A simple script is usually enough to automate a knotty task in Linux, but with some simple shell commands and a little effort, you can convert a simple batch file into a robust shell program.