
Pretty similar
Normal checksums are used to identify "identical" files. The ssdeep tool is used for finding files that are similar in terms of content.
|

Paul Cowan, 123RF.com
Normal checksums are used to identify "identical" files. The ssdeep tool is used for finding files that are similar in terms of content.
Checksums are a fine thing: Once created and saved, they make it possible to quickly detect the slightest changes to "hashed" files. They are often used with system checks and when installing new packages. The contents of a file to be checked are examined for correctness by comparing the checksum currently calculated from the file with the saved version.
However, in everyday life, there are now several cases where it isn't a matter of precise equality, but rather of similarity. Think, for example, about the different versions of a document, an image, source code, a compiled program, etc. In these cases, most parts of the files will be identical, and differences will only exist in a few places.
Here, similarity is the measure of the changes made to the files. Different versions of a file often differ only by a few bytes. With plain text documents, you could still find this out to a certain extent using household remedies such as wc , uniq , sort , and tr by separating the text into the words contained (tr ',.: ' '\n' ) and then sorting them (| sort| ) to display the frequencies of individual words using uniq . This works, for example, as follows:
tr <Plain_text_document> ',.: ' '\n'| sort| uniq -c| sort -n
Here, tr converts the input file into individual words, sort sorts them, uniq -c (for count) counts them, and sort -n generates an ascending list. The words, lines, and letters in a document can be counted using wc . You will normally use this instead of the second sort command.
Of course, this doesn't work with images or formatted documents – such as PDFs. Thankfully, however, a rather smart IT developer named Jesse Kornblum [2] has addressed this problem. Building on an algorithm developed for spam detection – spamsum by Andrew Tridgell – Kornblum first developed md5deep and later ssdeep . The md5deep tool [3] generates "normal" checksums, in keeping with md5sum , with some additional features. This piecewise hashing is the most important change. The feature makes it possible to evaluate identical parts of files separately from the changed parts – which is an essential feature of ssdeep .
Until now, ssdeep had only been available as a command-line program in the repositories of major distributions. Several options (see the "Important Options" box) control the exact behavior.
Important Options
The basic syntax of ssdeep looks like this: ssdeep <Options> <Files>
Here, Options refers to the options described below, and Files refers to the files to be edited.
Listing 4
Comparing RAW Images
$ ssdeep -gl Pictures/raw/_114013*
ssdeep,1.1--blocksize:hash:hash,filename
393216:i3MV51QTkmVuTcgNeMaxkKtV2ZQ6IRGiCrQOU2yA4nEzlzxPKRzE:i3w51QTgtoXKNIRGiC6Nn0cE,"Pictures/raw/_1140131.dng"
393216:OPdRgHYuDRqObkyj9cq5BBv40xVcrwSTQJP:2SfLjSV0xWIP,"Pictures/raw/_1140135.dng"
The primary application of ssdeep is quite simple, as shown in Listing 1. In the example, the plaintext file mypackage9.4.2015 is edited. As a result, ssdeep generates a line of text with four details separated by colons: the block size, the first and second hash and – separated by a comma – the (absolute) path to the edited file.
Listing 1
Application of ssdeep
# ssdeep mypackage9.4.2015
ssdeep,1.1--blocksize:hash:hash,filename
96:edryStcu92HHU/1sVKr6HTbToA63YCvsFFnm9Ux/cKCLyOLke2Dv:GryrKsVKr6HTQA6ImsXmeNcPngeqv,"/root/mypackage9.4.2015"
The reason why ssdeep needs two hash values is discussed online [5]. You will find a description about the ssdeep algorithm online also [4]. The principle of the context-triggered piecewise checksums is also discussed here.
ssdeep was originally designed as a forensic tool for editing large numbers of files. Checksums are calculated as rarely as possible – ideally only once – and then saved in a database in order to use (computing) time effectively.
They are created by the application of ssdeep and by saving checksums in checksum file (hash file ). You can then test any other file for these established checksums and determine how similar the existing files are to the established ones. Through the intrinsic error-friendliness of this method – because this is exactly what "fuzzy hashes" give you – you will see statements such as: File \emph{A corresponds to 78% of the xyz files and to 98% of the acd file.}
You won't normally need these features – represented by the -m and -k options – because it is usually possible to calculate the checksums on the fly with small file collections. However, ssdeep also suffers from a problem that all checksum tools have in common: The computing time increases proportionally to the growing file size.
It is also possible to use ssdeep without using hash files when experimenting or when just checking a few files. It is, for example, sufficient to directly compare .timeline files with each other to determine the similarities or differences between several versions of them (Listing 2).
Listing 2
Comparing Files
$ ssdeep -dl *.timeline
2015.timeline matches 1.timeline (90)
2.timeline matches 1.timeline (85)
2.timeline matches 2015.timeline (79)
3.timeline matches 1.timeline (82)
...
This example illustrates how ssdeep proceeds: First, 1.timeline is compared with the other files, then 2.timeline etc. ssdeep shows the similarity at the end of the line between the round brackets: 1.timeline and 2.timeline are 85% identical. That makes sense because 2.timeline is an edited version of the 1.timeline file…
By the way, ssdeep doesn't sort the results by similarity – you need to do that yourself. However, -l shows the file name output with the relative paths and thus improves the overview. The program ignores similarities below the threshold set by -t <threshold> .
When comparing multiple files, it is often better to group the output with -p (print grouped) rather than with -d . In this case, ssdeep always displays all the comparisons but separates them with blank lines.
The output with the -g option (grouped) is even more structured. The allocations are done in two steps here. For each file, identical versions are determined first and then similar versions. The output is in "clusters" (see Listing 3). "Cluster size" states how many elements the cluster contains.
Listing 3
Output in Clusters
...
** Cluster size 2
a/248_1000.png
a/f19036816.png
** Cluster size 3
a/f19075000.png
a/1706.png
a/f148203488.png
...
Incidentally, ssdeep always writes error messages and warnings to the stderr channel:
\$2>errors.ssdeep ssdeep ...
This makes it easy to redirect warnings related to short and missing files from the output without losing them.
Anyone hoping to be able to quickly sort their images or MP3 files recovered during data recovery using this method will soon reach the method's limits. Even if the images come from the same camera, are created in the same way, and are all JPEGs, the chances of finding the related files are not that good. In this case, you are better off using the method based on pHash [6] that digiKam implemented (Figure 1).
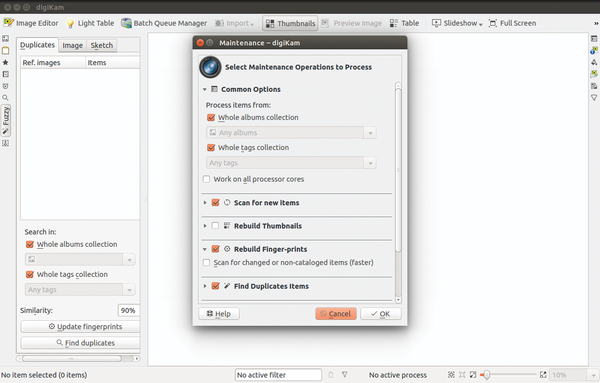 Figure 1: DigiKam implements a high-performance image comparison search with the fuzzy search.
It looks a lot worse if, for example, RAW photos or MP3 files need to be compared. The compressions used internally play a crucial role here and this unfortunately all too quickly results in the similarity being zero. The example in Listing 4 illustrates this.
Although the two files, whose names are very similar, come from the same camera (i.e., they are coded identically) and have the same block size, the internal differences are so great that ssdeep evaluates the similarity as zero.
It's even more difficult to compare MP3 files. The bit rates and other coding details are too different. Even files of equal size with identical contents are not usually recognized as similar.
Pages: 3
US / Canada
UK / Australia

A correct choice in an editing program can save you a lot of headaches when working with video clips. We compare several applications to help you choose the tool that's right for you.

If you don't have the right tools, comparing PDF documents for differences can be very cumbersome. We discuss five nifty tools that can help with this task.

Keeping an eye on possible changes to the filesystem can prove very beneficial. It can also help you to automate many processes.

The moreutils package expands the standard tools for the shell with useful and sometimes exotic tools.

For fast splicing and cool effects, you need a professional program. A flexible tool such as Flowblade would suffice.