
Cumulus Clouds
ownCloud makes it possible to operate a private cloud on an intranet of almost any size. All you need is a standard LAMP environment, which comes with almost every Linux server.
|

liu zishan, 123RF.com
ownCloud makes it possible to operate a private cloud on an intranet of almost any size. All you need is a standard LAMP environment, which comes with almost every Linux server.
Saving data in the cloud has become an everyday occurrence. However, the disclosures about regular surveillance being conducted by the NSA have caused many users to become concerned over who has access to their data. The easiest way to protect data from unauthorized third-party access is to set up a private data cloud.
A number of free software solutions have become available for constructing private cloud infrastructures. One of these is a software suite called ownCloud [1]. Because the suite works as a client/server application, established distributions are the most suitable for use in the server context. They guarantee straightforward operability and the stability required for use in a professional setting. The software itself is available in both community and enterprise versions. The enterprise version is compatible with third-party applications like Oracle, and it includes support offerings that are appropriate for commercial users.
With its brand new community version 9, ownCloud offers various installation options. According to the project it also cooperates with a large number of distributions that have corresponding software repositories and directions [2]. For the choice of a server during testing, I decided to perform a completely new installation.
However, I was immediately met with difficulties. Debian "jessie" v8.3 was my first candidate. A series of error messages interrupted installation of the server on numerous systems (Figure 1). With a brand new Ubuntu 16.04 "Xenial Xerus," installation proceeded without a hitch.
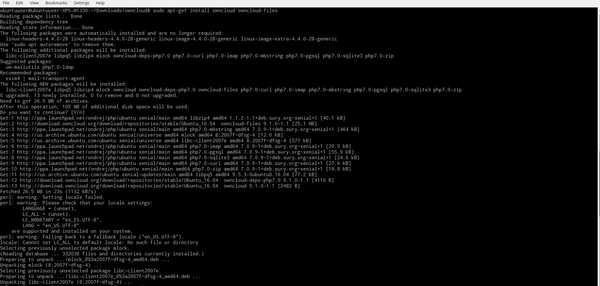 Figure 1: Problems that plagued the installation in earlier versions now seem resolved in Ubuntu 16.04.
It appears that technical difficulties that plagued earlier version were caused by incorrectly resolved dependencies associated with the PHP 5 server scripting language. There were packaging errors left over from the preceding versions of the ownCloud software [3]. However, the developers have made it such that even users of older versions of ownCloud who want to update to the latest version have to invest significant time and effort in order to do so. It is not possible to perform an upgrade that crosses over multiple versions of ownCloud.
If you want to update an old, series 7 version to the current version 9, you may run into a complicated update scenario populated by bugs [4] that are unworthy of professional-grade cloud software. Additionally, any mistakes made during the update process can potentially result in massive data loss. Therefore the ownCloud developers address the topic of performing updates at great length online [5]. It is important to know that no possibility for performing downgrades exists.
Upon closer inspection, installing ownCloud from the distribution repositories also proves to be problematic. For purposes of making installation on bulk storage easier, this piece of cloud software is already found in the archives of many projects like openSUSE and Ubuntu which we tested. However, the default repositories typically do not currently contain the new version 9 of ownCloud. That's why we resorted to installing the version offered by ownCloud.
In order to perform a clean installation of the various services, the first step is to add the package sources for ownCloud to the server and then update the repositories to the current version as shown in the three first lines of Listing 1.
Listing 1
Installing ownCloud
01 $ wget -nv https://download.owncloud.org/download/repositories/stable/Ubuntu_16.04/Release.key -O Release.key
02 $ sudo apt-key add - < Release.key
03 $ sudo sh -c "echo ,deb http://download.owncloud.org/download/repositories/stable/Ubuntu_16.04/ /' >> /etc/apt/sources.list.d/owncloud.list"
04 $ sudo apt update
05 $ sudo apt install owncloud owncloud-files
In order to keep track of which packages are available for ownCloud, check the list of packages in the terminal with:
sudo apt-cache search owncloud
As a final step, install the owncloud package, which contains and configures all of the dependencies and necessary services (Line 5). During installation of MySQL, the user should watch out for the request for a password for database administration to appear.
Restarting the system then starts the new services. In order to find out whether the web server is working properly, visit http://127.0.0.1 from you browser. Apache will appear with a test page.
Pages: 6
US / Canada
UK / Australia

Leading ownCloud developers, including the project founder Frank Karlitschek, became dissatisfied with the direction of the project, so they started Nextcloud, a fork of the code and a new company. The goal is to create a better balance among the company, clients, and users. We take a look at how Nextcloud is faring.

After the Prism and Tempora revelations, the writing's on the wall: Your data stored on public clouds isn't safe from the clutches of security agencies. Help can come only from a self-administered solution – yet Seafile provides a simple and ingenious approach.

Most cloud solutions for small networks are based on ownCloud or, less frequently, Seafile. Pydio is the third open source product trying to gain a foothold as a cloud solution.
A KDE project, the ownCloud initiative is a web storage app that is developed by the KDE community.