
Taking Stock
Staying on top of stock inventory levels will allow you to plan for capacity and profit. PartKeepr will help you out.
|

Alexander Podshivalov, 123RF
Staying on top of stock inventory levels will allow you to plan for capacity and profit. PartKeepr will help you out.
Planning ahead as a business person is the basis of commercial success. The more items you have in stock, the more important it becomes to maintain a current inventory overview. Manufacturers also have to stay on top of their parts inventories in order to figure out whether they have adequate quantities of every they need, or whether they are running out of certain parts. Linux and the free software PartKeepr bring organization to your inventory.
Because of the way it is constructed, PartKeepr is suitable for all inventories from small to large. However, this suitability depends on the presence of a professional environment based on LAMP (Linux, Apache, MySQL/MariaDB, PHP/Python/Perl). The LAMP software stack provides not only a database back end, it also lets an Apache web server issue queries and make entries on the company intranet from any workstation.
PartKeepr, formerly known as PartDB2, is available as free software under the GPLv3 license, and it comes with a large community of users and developers. The software is available in various forms on the project page [1]. In addition to ZIP and TBZ2 archives, there is also a virtual appliance for Oracle's VirtualBox. However, the virtual appliance does not host the current version of PartKeepr, plus it runs without a firewall. As a result, the virtual image, which is approximately 555MB, is suitable only for testing.
The software as such is not very demanding. There are no installation problems under Ubuntu 16.04 LTS . Lots of other inventory management solutions crash with the PHP 7 environment.
The current version of PartKeepr needs, as mentioned above, a functioning LAMP environment. First download PartKeepr as a ZIP file (around 71MB) from the website and decompress it in the desired directory [1]. Then move the folder with the decompressed data to the document root for your web server. As a rule, this will be /var/www/ . After this, activate the Apache modules userdir and rewrite :
# a2enmod userdir rewrite
Now change the Apache configuration and insert the lines from Listing 1 into the file /etc/apache2/apache2.conf with a text editor.
Listing 1
Add to apache2.conf
<Directory /var/www/partkeepr-1.1.0/>
  AllowOverride All
</Directory>
Next you should adapt the root directory by using administrator rights to copy the /etc/apache2/sites-available/000-default.conf file, as well as name your chosen virtual host. Using the text editor, then modify the DocumentRoot section so that it includes the path /var/www/partkeepr-1.1.0 . In order to access the site via an SSL connection, you should also modify the DocumentRoot section in the corresponding copy of the /etc/apache2/sites-available/default-ssl.conf file in the same way.
As part of the last step, modify the maximum run time of a script and enter the current time zone in the php.ini file. If you are using PHP 7, you can do this by opening and editing the /etc/php/7.0/apache2/php.ini file. If you are working on an older system that has PHP 5.6x on board, this file will be located in the /etc/php5/apache2/ directory. Once in the file, increase the value for the variable max_execution_time from 30 to 120 . In the date.timezone = line, enter the time zone for your location.
Next use root rights to restart the web server by typing service apache2 restart in the terminal. Now you can call the corresponding URL for the virtual host from the browser and attach /web/setup to the host (Figure 1).
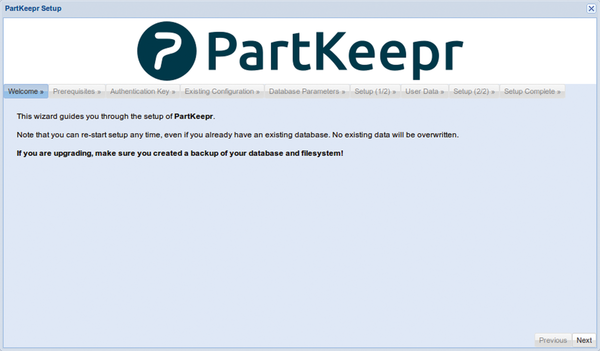 Figure 1: The actual set up of PartKeepr takes place in the web browser. The preparations are performed in the filesystem.
Once you click on the Next option in the lower left of the setup screen, the program will check to see whether all of the requirements are fulfilled. Under certain circumstances, it will display components that are missing or outdated, which you should then update. At this stage during testing, it was necessary to add several PHP modules as retrofits.
A single click on the Show Errors button yields detailed information on the missing modules and other problems (Figure 2). You can use the package manager to easily install these packages. Then you should restart the web server from the command line with service apache2 restart . Afterwards, check on the status again by clicking on Re-run checks within the browser.
 Figure 2: First the software tests to see whether the system has fulfilled all of the requirements. During testing, it was necessary to retrofit by installing some modules.
Authentication data goes into the additional setup tabs, and you must also configure the MySQL database. The name of the corresponding computer gets entered in the Database Hostname: field found under Database Parameters . Enter the name PartKeepr in the Database Name: and Database Username: fields. The password of your choice goes into Database Password: .
Then activate the option Show commands to create the database , which sits to the right of the entry fields, and copy the commands that are indicated to the clipboard. Switch to the terminal and log in to the database on the corresponding computer using mysql -u root -p with the original MySQL password. Copy the commands from the clipboard to the command line. Now the database has been set up with the password as specified. You can get out of the database interface by typing quit at the prompt.
Continue on to the next tab in the setup window. In this tab, the routine configures the system, a process that usually takes some time. Enter the data into the User Data tab that the software administrator will be using for authentication. When entering the password, make sure to enter uppercase and lowercase letters correctly. The configuration does not ask twice for verification.
After clicking on Next , the setup switches to a tab that suggests the possibility of securing the data via cron jobs. If you click on the Submit option in this window, you will land in the software's login screen. After entering the authentication data, the home screen for the program appears (Figure 3).
 Figure 3: The parts manager appears after login. Here it is already well accessorized.
Pages: 6
US / Canada
UK / Australia

Creating database applications with wizards and graphic editors – without SQL and programming – that's what the LibreOffice program Base, modeled after Microsoft Access, is all about.

Typically, educational software programs cannot accommodate multi-disciplinary learning. However, developers of OpenTeacher are changing the rules with the use of some very interesting concepts.

Once a regular part of every classroom, the good old world globe has been almost completely replaced by Google Maps. With the Marble program, the globe has made something of a timely comeback.

A database without a search function is like a car without an engine. The second part of our Base series is dedicated to implementing a database search.

Ubuntu's Software Center lets you install just about anything, including free software, purchased apps, and games.