
Masked Freedom
Extracting objects from an image is one of the most important techniques for image editing that exists. Gimp offers an entire series of these tools to help you do this.
|

Sergey Nivens, 123RF
Extracting objects from an image is one of the most important techniques for image editing that exists. Gimp offers an entire series of these tools to help you do this.
The term cutting has various meanings in the field sof photography and image editing. Photographers understand that it can mean images that have been taken with an open aperture so that they have less depth. This causes the theme of the image to appear sharp while objects in the foreground and background are blurred. They are pushed back and become part of the background.
In image editing circles, the term cutting frequently refers to cropping the desired object down to size. This procedure is easily handled by an image manipulation program. Difficulties do arise however when the term is used to refer to the extraction of an object from a current background so that it stands against a transparent background. This extraction function is important if you want to work on any type of collage. Therefore, if you want to extract an object from one image and place it in another, you will need to be able to use this function.
If you have ever tried to extract an object from an image, you probably know the problems that can occur during the procedure. Images taken with a digital camera almost always have areas in which the object and background seem to melt into one another (Figure 1). Closer observation reveals that there is no sharp delineation between the object and the background. Many of the details flow into one another. Automatic processes like color choice and magnetic scissors do not work reliably here. Another related problem is that the edges of the object that has been extracted need to be edited so that when added to a new image the object has edges that melt seamlessly into the new background.
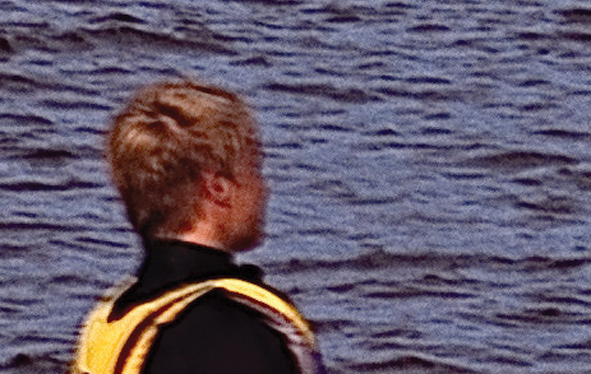 Figure 1: Although the image was developed from a RAW negative, the foreground and background are optically difficult to separate. In JPEG images, artifacts worsen the result even more.
The open source image manipulation program GIMP offers five standard methods for clean removal of objects. A further possibility is found in the GMIC [1] extension collection in the form of Extract Foreground [2] . Table 1 summarizes all of the options and states the advantages and disadvantages of using each. In addition, there is also the specialty Seamless Cloning tool (see the "Seamless Cloning" box).
Table 1
Standard Methods
| Methods | Advantage | Disadvantage |
|---|---|---|
| Integrated into Gimp | ||
| Selection | Especially simple and quick | Margins need to be reworked |
| Quick masks | Permits precision editing | Lots of effort |
| Erase | Quick, relatively precise, margins removed well | Limited application |
| Masks | Relatively precise, extensive possibilities | Lots of effort |
| Channels | Very good results | The most complicated method |
| Using GMIC as an Extra Tool | ||
| Extracting | Quick, often sufficiently precise | Margins need to be reworked |
The selections and the quick masks generate a precise selection of the object that is to be extracted and then transferred via copying and inserting into a new layer. There are basically two possibilities for working with selections. You should try to either create a selection with maximum precision, or use a rough selection. The first option corresponds to the selection method. The second represents the basis of a different procedure.
Generally, copying into a separate layer is available in all methods. If the object that is to be extracted has a shape that is not suitable for one of the geometric selections, then you should opt for the lasso, and thus freehand selection. A copy of the selected area is created with the usual key combinations Ctrl+C and Ctrl+V. The "floating" selection is then transferred via layer | to the new layer or via the first button in the layer dock to a new transparent layer. Alternatively, you can directly add the clipboard as a new layer with edit | insert as | new layer .
Seamless Cloning
With its Seamless Cloning tool, Gimp [5] provides you with a feature that is eminently practical. In order to use this tool, you select an object freehand and copy it into the clipboard. Then the tool should be activated in the target image so that the object can be inserted into the current image. The tool lets you move the object around on the background layer. Pressing the enter key anchors the object in place. At this point, Gimp uses the area surrounding the object to harmonize the brightness of the background layer with the contents of the clipboard so that a seamless match ensues.
However, the implementation of seamless cloning contained in the current Git Master does not yet work satisfactorily. Presently, areas that you want to paste in cannot have any holes and must consist entirely of a contiguous whole. Inserting long, thin areas does not work either. In addition, the paste in action has to be performed in such a way that all of the area appearing in the clipboard also appears in the image.
However, the biggest hurdle with respect to the practical use of this function is how slow it is. As soon as you transfer larger pieces, the insertion, or pasting, can only be performed with lots of computing time. If the relevant algorithm ever takes off and the developers are able to solve the issue, then Seamless Cloning would probably be a viable alternative to the methods we describe elsewhere in this article.
As a rule, you should rely on the lasso tool or free selection when using the selection method. One advantage to the lasso tool is that it allows you to connect larger areas with straight lines. Another advantage is that you can create a soft outline of the shape by pressing the left mouse button intermittently (Figure 2). When you finish drawing with the tool, the lines come together in a rough grid once the Control key is pressed simultaneously.
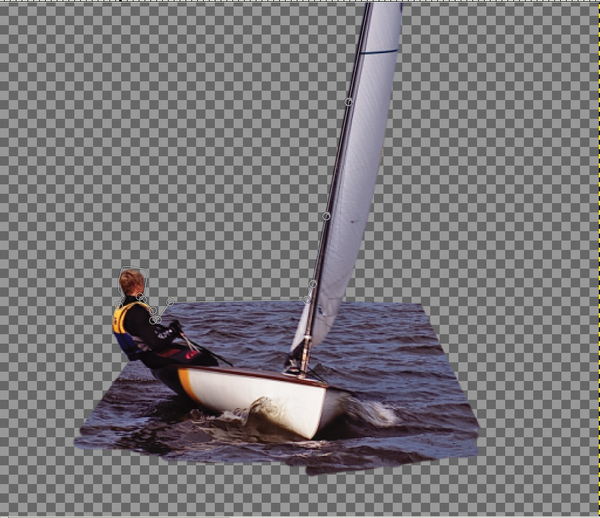 Figure 2: With the free selection tool, you can to use the click and free selection modes together with one another. Precision is not required. For detailed work, you can later apply the eraser.
If instead of the lasso, you choose the color selection tool, then the correct choice of parameters becomes very important. Figure 3 shows the numerous settings available in Gimp 2.9.3. It is easy to overlook the especially important selection after . This determines how Gimp should interpret the colors that have been used for the selection. The default setting Composite adds the RGB values even though Hue , Saturation , and Value are often the better criteria to use.
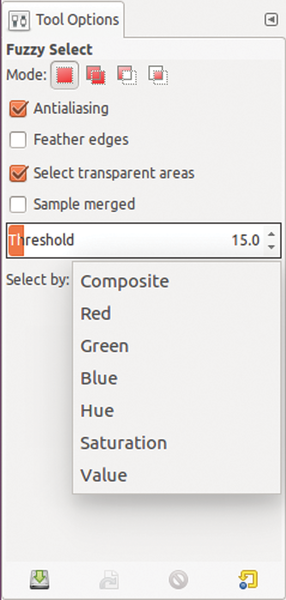 Figure 3: The program is designed to provide an especially large variety of selections. Optimized settings lead to very good results.
The "intelligent scissors" tool is an alternative to freehand selection. This tool has a useful extension, the Interactive boundary , in the previous version of Gimp 2.9. This extension makes sure that from the beginning, Gimp shows how moving a control point influences the line (Figure 4). It is often convenient to have this information since the intelligence for the scissors has not been around very long. It frequently results in errors, even when the borders are clearly visible.
 Figure 4: The magnetic and intelligent scissors make it possible to manually adjust selection lines that have been created automatically. However, the tool does not work very reliably.
Gimp knows lots of ways to correct the first, rough selection. You can supplement or reduce the selection by one selection by applying the customary techniques of holding Shift for adding and Ctrl for subtracting. Alternatively, the option Feather lets you soften margins. In case a selection has already been made, edges can be softened with Select | Feather … . You should remember in the process to define the double Radius for Gimp to use.
You correct the current selection of pixel values with Grow and Shrink . These options are also found in the Select menu. Typically you only need specify a few pixels that Gimp then uses for the entire selection. The script Remove Holes [3], which is already built into Gimp 2.9.3, also automatically closes almost all of the small holes in the selection.
Pages: 8
US / Canada
UK / Australia

GIMP by itself can already do a lot. With plugins, you can extend the free image editor with complex functions, most of which allow you to see the final results before you apply them.

If you want to remove areas from a motif inconspicuously, then plugins like Resynthesizer and G'MIC can help by providing the right tools.

Photivo closes the gap between RAW converters and easy image editing, thus making often required reworking in other programs unnecessary.

The Inkscape vector graphics program not only lets you work with pencil and ink lines, it can help you mimic the elegant brushstrokes of an oil painting. Our three easy-to-follow examples show you how.

Using MyPaint and a graphics tablet, you can create or trace drawings with the feel of real pens and brushes. All the necessary tools are included.