
Managing an Inventory with PartKeepr
|
Categories and Parts
You in-stock components are managed in the Part Manager category. When you start using the program, the Categories list, located to the left in the window, will be empty. This is where you create new categories that include all parts of the same type. For example, this could be an electronic components category, which would include things like resistors, diodes, or transistors. The individual groups can extend across multiple hierarchies. They subsequently appear in a tree view.
In order to create a new group, first click on the Root Category option and then on Add Category , which is located in the middle above the list. Enter a name and brief description for the new category in a free text field in overlapping windows. After saving the entries, a new group will appear underneath Root Category .
In order to create subgroups in this hierarchy, instead of clicking on the Root Category option, click on the instance found underneath; afterwards, click again on Add Category . Remove obsolete categories with Delete Category in the small buttonbar located to the far right above the list.
Once you have built your structure for managing components, start listing the parts you have in stock. To do this, click on Add Part to the right in the program window. A new dialog will open with four tabs that include Basic Data , Distributors , Manufacturers , and Attachments . This is where you enter detailed information for each component (Figure 5).
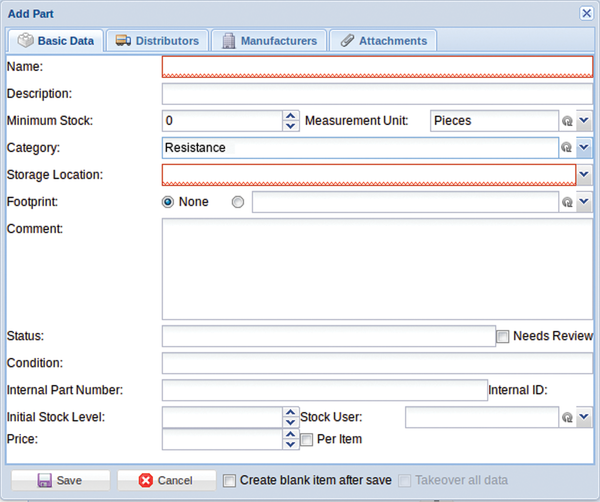 Figure 5: The dialog for the individual in-stock parts lets you link much of the data that you previously entered as independent sets when building the database.
In the Basic Data tab, you can collect data such as the actual label plus quantity, price, and a description. If necessary, you can also enter a definition for the condition and an internal parts number. Using the Category: and Storage Location: fields, you can link the article to a group of components and a storage location. When you click on the triangle to the right of each of these data fields, you will get a selection list for the data that has already been deposited.
The Distributors tab lets you link the entry to one or more distributors of the the corresponding parts. Click on Add and select the desired entry from the list. Then you can indicate the order number for the part, the packaging unit and the price of a single unit, and price per unit.
In the Manufacturers tab, clicking on the Add option lets you select the suitable entry from the list of saved manufacturers and enter the accompanying part number. You can include things like technical data, specifications, and the URL for a web site in the last tab, Attachments . If locally stored files exist, you can incorporate them, but the file size cannot exceed 12MB. After clicking on Upload , the software will accept the desired data.
You can take a picture of the parts with a webcam by clicking on the camera icon button. These pictures will then be available in the tab as a Thumbnail View to help identify parts.
Uniformity
PartKeepr is primarily intended for use with electronic components inventories. Some of these, such as CPUs or integrated circuits, have standard contact strips and grids for assembly. These components get soldered together or they are plugged into a suitable socket. Respectively, these are called Ball Grid Array (BGA) or Dual In-line Package (DIP).
PartKeepr's Footprint menu makes it possible to include the footprint for each item you list. In the dialog for each part, select the footprint in the Footprint: selection field. The individual entries are listed centrally via the Edit | Footprints menu. The dialog here corresponds to the dialog for creating categories.
Due to the wide array of existing units of measure in the field of electronics, it is easy to forget what size goes with what unit. Here you can call up a list of predefined units via Edit > Units . The program will display the appropriate prefix for each unit in the right hand area when you click on one of the entries in the list to the left (Figure 6). This helps prevent possible confusion that could be caused by incorrect interpretation of units.
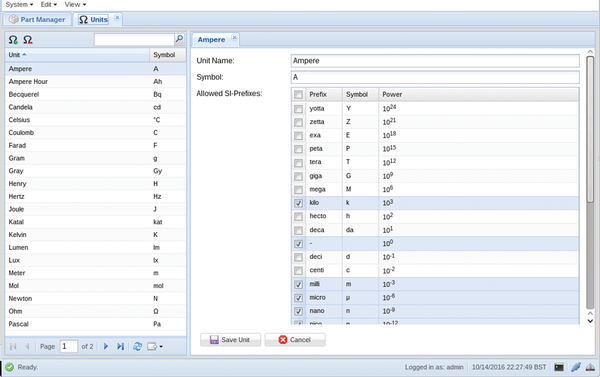 Figure 6: In order to maintain an overview of the dimensions that each entry represents, you can manage the units in the software.
If you find that some items you need are missing, these can be added by clicking on the list's Add Unit option. Delete a unit you no longer need via Delete Unit . You can manage quantities of the units saved in the system for in-stock items in Edit | Part Measurement Units . If necessary, this is where you can add units using the Add Part Measurement Unit option.
« Previous 1 2 3 4 Next »
Buy this article as PDF
Pages: 6
(incl. VAT)
Buy Ubuntu User
US / Canada
UK / Australia
Related content
-
Getting started with LibreOffice Base

Creating database applications with wizards and graphic editors – without SQL and programming – that's what the LibreOffice program Base, modeled after Microsoft Access, is all about.
-
OpenTeacher, a new concept in educational software

Typically, educational software programs cannot accommodate multi-disciplinary learning. However, developers of OpenTeacher are changing the rules with the use of some very interesting concepts.
-
Marble virtual globe

Once a regular part of every classroom, the good old world globe has been almost completely replaced by Google Maps. With the Marble program, the globe has made something of a timely comeback.
-
LibreOffice Base

A database without a search function is like a car without an engine. The second part of our Base series is dedicated to implementing a database search.
-
Software management in Ubuntu 13.10

Ubuntu's Software Center lets you install just about anything, including free software, purchased apps, and games.