
OpenTeacher, a new concept in educational software
|
Starting Out
You first need to set up basic preferences for working with the program in the File | Settings menu. The settings dialog in OpenTeacher is unusually rich in offerings because the software is designed to be very flexible in providing a variety of exercise categories for serving different target audiences. At the bottom edge of the window are several tabs branching off into submenus. You can maximize the program window to get a better overview. Otherwise, you might not see the options available in the tab bar.
To begin, go to the bottom right of the window and use the mouse to make sure that the Advanced mode is selected. This first step is important because the Advanced mode is the only one to access all of the options that OpenTeacher offers. Then, you will find the essential parameters in the Words lesson tab. These allow you to define methods of quizzing for vocabulary tests. For language exercises, in which the software offers audio pronunciation of phrases, you should activate the option for English in the Pronunciation tab in the Voice name (language) drop-down.
With the help of checkmarks, you can also define how locations or words should be pronounced. The modifications you make in the settings dialog are automatically saved and activated as soon as they are made.
Preparing a Lesson
To create the first lesson for learning vocabulary, click on the big Create words lesson button in the main window of the program. This step will bring up an easy-to-use menu in a new tab where you can then make lists of vocabulary words and phrases.
OpenTeacher shows the corresponding alphabets in three tabs, Symbols , Greek , and Cyrillic , on the right side of the window. When creating question and answer lists, you can easily integrate foreign language symbols into your vocabulary files by means of a mouse click. It is not necessary to manually call up special symbols (Figure 2).
 Figure 2: Creating a lesson in the form of a list.
After you draw up a lesson, you should save it by clicking on the Save as button. At this point, I encountered a strange design decision. The standard format for saving is preset to HTML, which makes it possible to open a file saved in this format on another computer that does not have the software installed. The lists can then be displayed in a slightly processed form in the browser (Figure 3).
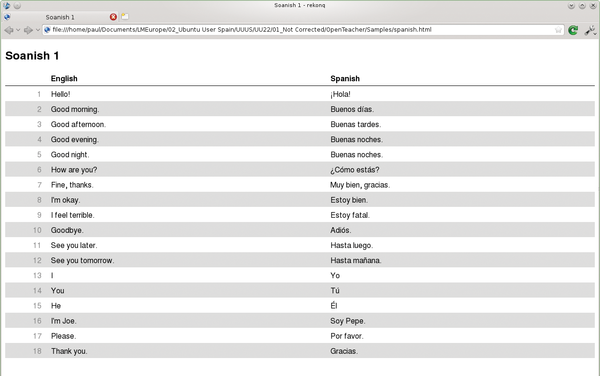 Figure 3: Lessons prepared in OpenTeacher in HTML format can be displayed and printed from any computer.
However, a file stored in HTML format cannot be reloaded and used in OpenTeacher. Therefore, the most suitable file format to choose from the save dialog is the Open Teaching – words format from the Filter: selection field.
Files saved in this format can be used at any time and, of course, can be converted to HTML format if necessary. You can print your word list using the Print button. Printouts can be helpful when reviewing longer lists for spelling mistakes.
Buy this article as PDF
Pages: 5
(incl. VAT)
Buy Ubuntu User
US / Canada
UK / Australia
Related content
-
Free software and Linux in India

With BOSS Linux, the Indian Ministry of Communication and Information has developed its own Linux distribution. The system is gradually establishing itself in the local public administration as the successor to Windows XP.
-
Development environments for beginners

Visual programming IDEs ease entry into software development through intriguing programming concepts, simple commands, and special help facilities. We show you five cool candidates.
-
Exploring math with GeoGebra

GeoGebra breathes life into dry numbers. With a few clicks, you can discover @#the beauty of polynomials and functions.
-
Marble virtual globe

Once a regular part of every classroom, the good old world globe has been almost completely replaced by Google Maps. With the Marble program, the globe has made something of a timely comeback.
- Netbook Makeovers, Cloud Censorship, and a Lucky Backup