Fresh Cuts
A correct choice in an editing program can save you a lot of headaches when working with video clips. We compare several applications to help you choose the tool that's right for you.

©Joanna Croft, sxc.hu
A correct choice in an editing program can save you a lot of headaches when working with video clips. We compare several applications to help you choose the tool that's right for you.
Editing vacation videos in Linux was still somewhat of a nightmare just a few years ago. Existing programs could be counted on one hand and most of them were difficult to operate. Things have changed, at least as far as quantity, and many open source tools are now vying for attention.
But what about quality? To find out, we tested seven popular editing programs: Auteur, Flowblade, Kino, LiVES, OpenShot, PiTiVi, and Cinelerra. The makers of the popular Kdenlive and the professional Lightworks were working on new versions as this issue went to press, so they will be evaluated in a later issue (see the "Stragglers" box).
Stragglers
Lightworks has played a role in such movies as Notting Hill , The King's Speech , and Pulp Fiction . In 2009, the EditShare company swallowed up Lightworks and announced that it would produce a free, open source version of the editing program. A Windows version is already available on their homepage [12]. The Linux version is getting delayed, unfortunately. At press time, its test phase was still going on behind closed doors.
The free Linux version isn't allowed to process MPEG videos for licensing reasons; unfortunately, the current HD cameras fall into that category. The Windows version, therefore, is available in a Pro version that not only handles MPEGs but also provides additional functions, such as creating 3D videos. When a Pro version would be available for Linux had not been determined at press time. In any case, Lightworks targets professional users, which is reflected in the functionality as well as operation geared toward advanced editors.
Another popular editing programs for Linux is Kdenlive [13]. Through the years, more and more advanced functions have been added. So, now you get analysis functions, such as RGB Parade or histograms, and Kdenlive can also apply audio material to multiple scene captures.
With Kdenlive, you control effects on demand via keyframes. You also get a powerful title generator, a tool for creating stop-motion animation, and a wizard for creating DVDs. The user interface's rich functionality can be overwhelming for video editing amateurs, however.
Anyone searching the depths of the Internet will likely find additional video editing programs, but they might be temporarily on hold or even officially scrapped.
Except for Kino, all the tested programs have the same operational concept: They arrange clips on a timeline and apply effects from there. Existing video material is initially imported and ends up in a small video repository consisting of a list in the simplest case.
A preview function helps in selecting the correct clip and monitoring the final result. A vertical line in the timeline marks the exact position of the clip. Most programs also provide a trimming function for transitions between clips. In some cases, a function for controlling effects through so-called keyframes is included. These useful helpers mark each point in the video where changes in effects occur. The software handles the transitions between the keyframes automatically, enabling smooth blends.
The finished product ends up as a single video file that you pass on or burn to DVD. The tools call this exporting function "rendering."
On January 31, 2011, Neil Wallace published the first version of his editing program Auteur [1], and the next version appeared only a week later. Since then, the project has been on ice. Nevertheless, Auteur still runs on current distributions. It helps that the software is written entirely in Python.
The user interface is clear and tidy. In the upper left corner, the Sources window collects all the clips. The middle pane is the preview window, and the timeline hums along at the bottom (Figure 1). A wizard takes up the right-hand pane to help you get started. Once you've imported a clip, unfortunately, you cannot remove it again; this correction was destined for a follow-up version that never appeared. Auteur is principally intended for high-resolution material. During testing, it couldn't handle videos from an AVCHD camera.
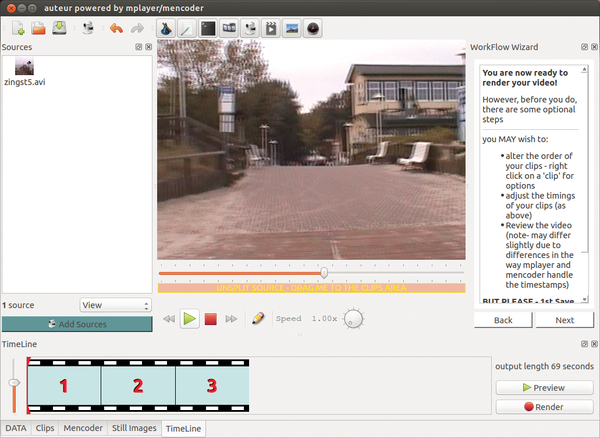 Figure 1: Auteur provides a tidy user interface but minimal functionality.
If you want to use only part of a clip, you need to open it in the preview pane, find the place to cut, then use the pencil tool as precisely as you can. Because Auteur lacks a single frame preview, finding the exact cutting point can take some patience. Just the same, the program allows for speeding up or slowing down the preview and using a controller to find the approximate position.
Although the clip is in the timeline, processing there can be Sisyphean. To cut a video in the timeline, you left-click it. Then, while it's playing, you can stop it at the desired location and use the appropriate button to make the cut. Removing a clip from the timeline automatically moves the adjacent clips so that no gap exists.
The timeline has several controls providing different views of the assembled video. Whereas Timeline helps to estimate the length of each clip, the Clips control simply views them as a row of thumbnails. Effects and transitions are missing completely, which is why Auteur is used mainly only for arranging and cutting clips.
The editing program also doesn't care about resolution. The preview simply moves the video into the pane, so that the clip often appears compressed or squeezed. In rendering videos, Auteur simply uses the dimensions of the largest clip, with the actual work done in the background by the Mencoder tool derived from the MPlayer media player. You can still make corresponding setting adjustments as desired before rendering.
Adam Williams tinkered with Cinelerra starting in 2001 [2]. Updates appeared only rarely, because of his stated emphasis on stability. Contrary to his assertion, Cinelerra didn't shine and continually crashed during our tests.
The program's user interface is crammed with features (Figure 2). An introduction is included, but it exposes many flaws and admits to being outdated. Because Cinelerra doesn't belong to a distribution, you have to compile it. In our case, it worked only with Ubuntu 12.04.
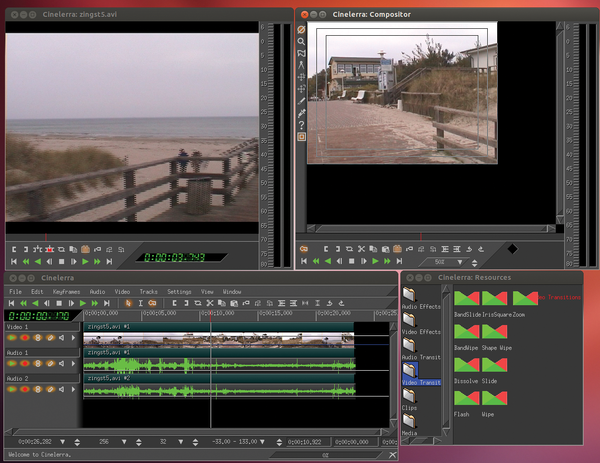 Figure 2: Cinelerra's composition and functionality is mainly targeted at advanced video artists and professionals.
After startup, many windows appear (similar to GIMP) that unfortunately cannot be merged into a single main window. On the other hand, you can distribute the windows across multiple monitors. Cinelerra assembles clips in the Resources window, which also includes all the effects.
A video from an AVCHD camera didn't test well with Cinelerra 4 and MPEG-4 material showed defined block artifacts. Cinelerra also provides a recording function, accepting DV cameras, Video4Linux2 devices, webcams, DVB receivers, or your desktop; you can simply create screencasts and edit them directly.
You can arrange clips on any number of tracks in the timeline window. Cinelerra has separate tracks for video and audio material. That said, you need to be scrupulous about which track you've selected and remains active. In practice, you could accidentally edit the video but not the associated audio.
Clip previews appear in the separate Viewer window. Here you can trim clips with a few mouse-clicks; a single frame preview helps in exact positioning. Alternatively, you can grab a clip by one end in the timeline and shorten it, which unfortunately doesn't provide a preview. You can save these shortened clips as separate videos on demand. Both in clips and on the timeline, you can set bookmarks that you can navigate to quickly. This way you can easily get to key scenes in complex projects.
Operating in the timeline can be anything but intuitive. If you want to add a clip at a certain point, you first open the preview, then move the vertical timeline bar to the desired position in the video and use the appropriate button to intersperse the clip. The timeline has two modes: To extract a piece of a clip, first switch to marking and edit mode, then select the snippet in the timeline and cut it.
Simply pull effects and transitions from the Resources window to a track or the transition between two clips. To apply an effect to part of a track only, mark it first in editing mode. Cinelerra clearly identifies the effects underneath each track.
On the track, you have the opportunity to use a magnifier icon to open the settings, while the separate Compositor window shows your changes in real time. Cinelerra always applies the effects in their full intensity on the track. To mitigate the impact, use a separate control. You can maintain the settings and effects through keyframes.
The intensity on the track is marked by a white line that you can pull like a rubber band. The Compositor window operates like a movie screen, with each track as a separate projector. In this way, you can freely arrange the videos on the screen and resize or superimpose them at will. Again, the process is controlled by keyframes. This approach enables the kind of picture-in-picture and bluescreen effects you might recognize from the news.
Cinelerra imports numerous video formats but gives preference to the .mov QuickTime format. To create a DVD, you have no choice but to convert these files through an external program first. As compensation, Cinelerra provides the "render farm" feature to use multiple computers for rendering.
The relatively young and little-noticed Flowblade [3] is, like Auteur, written entirely in Python and is only about 18MB in size. Its extremely uncluttered user interface at first glance gives the impression of a simple program for beginners. On closer view, the functionality noticeably approaches that of Cinelerra and Kdenlive. See also the Flowblade workshop in this issue [4].
The main window provides a small media and effects management pane in the upper left, a preview pane in the upper right, and the timeline at the bottom (Figure 3). The video clip frames are limited to five, with four additional audio clips. Flowblade provides multiple timelines on demand, but you can't nest them, so they are rarely useful in practice.
 Figure 3: Flowblade is a hit in regard to its clear interface and functions, but less so with its nonintuitive editing modes.
The program accepted HD videos without complaint during testing, although it was a bit more hesitant about DV material. Flowblade automatically creates gapless transitions between clips. To create gaps, such as when blending two clips, you need to switch to another mode.
The cutting tools do exemplary work. You can trim a clip loaded in the preview pane with a few mouse-clicks, and a single-frame preview helps in finding the exact position. Removing a clip from the timeline removes any gaps. You can even "roll" cuts with the mouse. Annoyingly, you have to activate each of these tools explicitly: Simply grabbing a clip with the mouse might not achieve the result you want.
Advanced users can switch the monitor to a Vectorscope or RGB parade and thereby analyze the video's color components, although the thumbnail will disappear. The main window can be adjusted only to a certain minimum size, so Flowblade won't run successfully on small netbooks.
Flowblade assembles effects in Filters , which always work on entire clips, and in Compositors . The latter mixes two video tracks in a certain way to achieve transitions and picture-in-picture effects. Flowblade is still missing a bluescreen function.
You control compositor effects with keyframes. Flowblade unfortunately displays their positions through settings on a separate timeline, but it's a minor point, because the timeline indicators are synchronized and you can jump comfortably from one keyframe to another. Canned profiles make it easier to determine the video output. Flowblade 0.6.0 creates videos only in MPEG2, MPEG4, Theora, and lossless MPEG2. The actual encoding occurs via Ffmpeg in the background, and advanced users can always set their own parameters.
Like Auteur, Kino's development has been on ice for some time [5]. The last version is from 2009, but it is still found in a lot of distributions. Kino differentiates itself from its competitors in several ways. For example, it focuses on editing DV material, while not being able to do much with high-resolution HD videos from current camera models. It also provides a rather unusual user interface, which is aimed primarily at beginners (Figure 4).
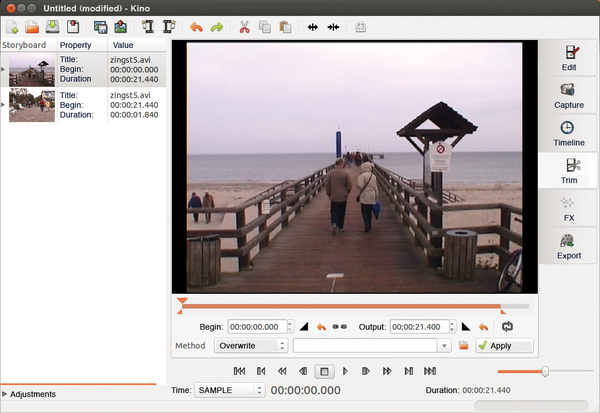 Figure 4: Kino provides the essentials for getting started in video editing, but is limited to DV material.
Imported videos are collected in a vertical list on the left-hand side of the window. Kino automatically detects scene transitions and creates separate clips for each scene, which works amazingly well with vacation videos with calmer shots. The completed video consists of all the clips in the list, in the order from top to bottom.
You can change the order using drag-and-drop. Although the preview in the middle pane shows only the entire video, the viewing possibilities lack nothing. Using the appropriate buttons, you can jump from clip to clip, and the single-frame preview provides precise positioning. You can even get a "shuttle" slider to set the output rate. Once you get used to it, this function helps you find the appropriate point in the video.
Kino distributes further editing functions across multiple panes. For example, a number of tools can be found on the Trim pane, and effects and transitions are available on the FX pane. The tools may not be self-explanatory initially but can be learned rather quickly.
To shorten a clip's beginning or end, you just click it in the list and move the two triangles into position, and that's it. The few provided effects are standard, such as reverse playback or a simple wipe. Many effects cannot be fine-adjusted, but at least the preview is real-time.
Kino exports the completed video preferably in DV format or as a sequence of frames. You'll need external programs for other formats. For example, the Mjpegtool creates Mpeg2enc files from the upcoming MPEG2. Alternatively, the editing program can push the results back to the camera over a Firewire connection.
At first glance LiVES [6] doesn't distinguish itself much from its competitors. Apart from the usual editing functions, LiVES also provides a timeline. Additionally, it provides some special functions for VJs and video artists who want to show videos with real-time effects at events, mix them, and present them on a projection screen. Thus, you can assign keyboard shortcuts to certain effects to be used in performances, or you can use joysticks or MIDI controllers. LiVES is capable of streaming videos over the network to other LiVES installations. On demand, you can also have the application capture the resulting artwork made during the event for subsequent editing on the timeline.
The number of functions does add complexity, however. Additionally, its developers have given little attention to user-friendliness. The program has two modes: In Clip mode, you can shorten the videos and apply effects (Figure 5). In Multitrack mode, you can subsequently arrange them on the timeline (Figure 6).
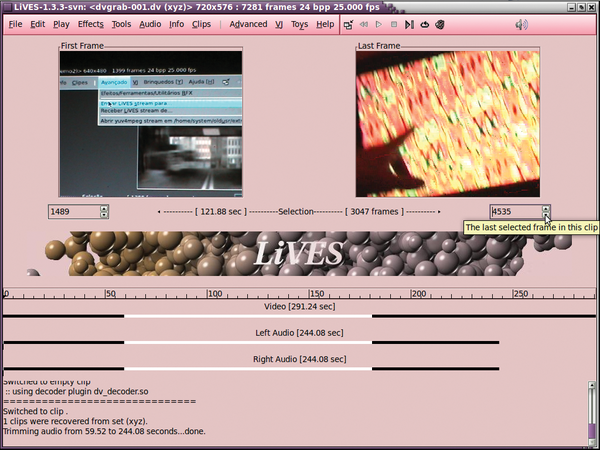 Figure 5: Clip mode lets you edit and apply effects in LiVES.
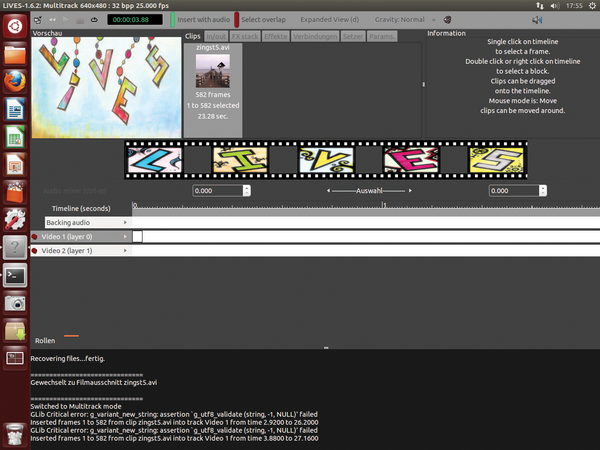 Figure 6: To arrange multiple videos in LiVES, switch to Multitrack mode.
The software converts each imported video into a sequence of PNG images, which speeds up applying effects, but the resulting video eats up plenty of space. For example, a one-minute video can swell from 240MB to 1.6GB.
LiVES not only imports videos from the hard disk, via Firewire or an analog TV card, but it can also read DVDs or tap into YouTube. Unfortunately, the program doesn't provide media management; it simply collects all the clips in the Clips menu.
The playback controls are hidden in the upper right corner of the menu bar. There are no single-frame previews. To select only part of a clip, use the text entry fields for the appropriate values or use the white bars to move them together. Alternatively, you can open a preview window. You can set the beginning and ending frames with the controllers, but some trial and error is involved in getting it right. Unlike the other programs, trimming the beginning of a clip involves marking the section and using the corresponding function to remove it.
The user interface changes completely in Multitrack mode. At the upper left is the preview, and to the right is a kind of overview of the loaded videos that show the effects next to the clips. At the bottom is the timeline onto which you drag-and-drop the clips.
If you inadvertently double-click a clip, LiVES switches to Clip mode without warning, and all the changes made in Multitrack mode are lost. To move a clip on the timeline, grab and hold it with a left-click. The pointer switches to a movie icon, and you can then drop the clip where you want it.
Applying transitions is equally nonintuitive. On the timeline, you first activate the tracks you want to include in the transition. You then define the range in which you want the effect applied by moving a small gray slider at the top of the timeline.
Finally, you can drag the transition to the timeline, upon which a window opens for making the appropriate settings. As in other programs, removing a clip closes the gap between the remaining clips. The audio track (there's only one) is synchronized with the video track.
The program provides numerous effects, thanks to the Frei0r collection. Among them are funky examples for video artists, such as the "strudel" effect. You also can expand the effects through plugins, for which the developers provided the so-called RFX interface. The built-in title generator doesn't really deserve the name. You can only enter text, give it RGB color values, apply a font, and set the position in pixels.
You can convert the video on the timeline into a single clip and export it to a file. LiVES transmits the export to an external tool so that you can apply all the popular video formats. The LiVES manual is comprehensive but outdated in many ways [7].
Jonathan Thomas wasn't happy with existing video editing programs, so he created his own. The resulting OpenShot [8] quickly blossomed into a popular tool among Linux users. A detailed article about this tool can be found in this issue [9].
OpenShot's user interface proves to be simple and clear. As with other programs, the media management is at the top left, with the preview pane to the right, and a timeline at the bottom (Figure 7). You can expand the two default tracks to as many as you need.
 Figure 7: OpenShot has gained popularity especially among newcomers.
In the timeline, the clips are "magnetically" assembled edge to edge. This feature applies to a single track only. If you want to intersperse a clip on a second track, all you can do is manually move it to the first track. This can be annoying in that the timeline scale can only be increased to a maximum one second.
To make an accurate cut, you must carefully pull the timeline bar to the proper location and press the cut button. You can always add markers to the timeline so that you move quickly to them. Trimming a clip works only on the timeline. To do this, switch to the cutting tool and pull the handle ends. Alternatively, you can open the clip properties with the right-click context menu and enter the runtime in seconds. An accurate frame cut may not always work.
For effects and transitions, you can drag-and-drop on or between clips in the timeline. Right-click a clip to choose still further effects, such as rotating the clip 90 degrees. Fine-tuning effects only works if you right-click the effect or clip and then open the Settings context menu. There, you'll typically find a few controls but no preview. Thus, you might have to open the settings several times to get the effect to match your expectations.
OpenShot provides a simple title generator. You can type the text, move it to the correct place, and then set the formatting using a layout template. If suitable, you can export the title to Inkscape first. If you have the Blender 3-D program installed, it's possible to create animated 3D lettering; however, OpenShot presents some limits on how far the animation can go.
When exporting, you simply set a profile, such as DVD or Web , and make three settings. Advanced users can make more adjustments, if not to all aspects of the code. On demand, the software loads the completed video to YouTube.
For a while, Ubuntu provided the PiTiVi [10] program by default, but now it's available, as in all other distributions, from the package manager. The user interface is extremely tidy and strikingly along the lines of OpenShot. Media management is on the left, the effects are in the middle pane, the previews are on the right, and the timeline is at the bottom (Figure 8).
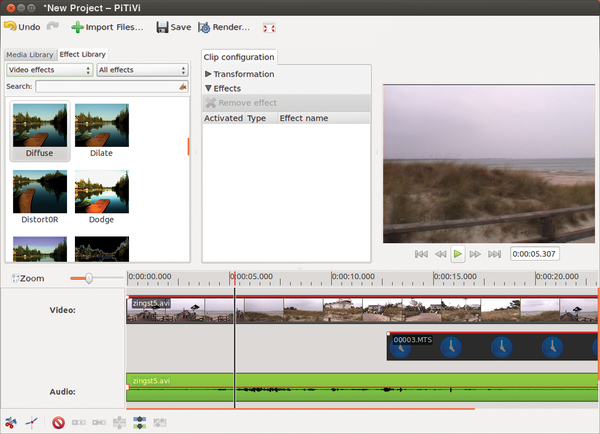 Figure 8: PiTiVi resembles OpenShot in concept and functionality.
During testing, PiTiVi read AVCHD videos without protest but then didn't play them in the preview. You can drag-and-drop videos easily to the timeline. A practical feature is that, if you move a clip under an existing track, it automatically creates a new track for it. PiTiVi also provides "ripple editing," whereby trimming a clip moves the subsequent clip right up against it, leaving no gaps.
A single-frame preview unfortunately is not provided; however, if you zoom in on the timeline to its maximum, you can easily move the timeline vertical bar to the exact place. PiTiVi synchronizes the clips to their audio material. This feature saves time, especially if you have captured a concert with multiple cameras. Trimming a clip works only in the timeline. You simply move to the end of the clip and compact it; however, no preview is provided, so you may be flying blind at first. You do at least get thumbnails on the timeline for orientation.
You can adjust the brightness and audio volume through rubber band controls. Double-clicking a line creates a control point that you can move independently. In this way you can, for example, fade a clip slowly in and out. Because lines don't have soft curves, you might have to use multiple control points to get a smooth fade. PiTiVi calls these points "keyframes." Unlike keyframes from other editing programs, they affect only brightness and volume, and effects are not part of them.
Effects apply to single clips only. For transitions, you need to assemble effects via the rubber band controls first; however, you can create a "crossfade" transition by simply overlapping two clips on a track. Independent of the effects, the software lets you modify and adapt the clip sizes, scaling and positioning in the completed video, either directly in the preview pane with mouse movements or through corresponding numerical values. You can also assemble clips into groups and move or apply effects to them as a group.
When rendering, the editing program relies on Ffmpeg, thereby creating a format of your choice; however, by default, only three of the formats are suitable for the web. If you want to create videos for other occasions, you have to set the frame rate, resolution, an so on yourself.
All of these video editing programs seem put a lot of weight on effects – the more the better – but simple editing functions and an intuitive user interface are still on track. Apart from Flowblade, Cinelerra, and the hopelessly outdated Kino, none of the programs provided quick and accurate clip trimmings. Simple drag-and-drops rarely worked as expected. Those who have worked with Windows editors might consider the Linux software to be a return to the Stone Age.
Auteur would be the ideal program for amateurs who simply want to cut and rearrange material. Its fussy operation and several small bugs render it useless in the end, however. Hopefully the developer will pick up where he left off to improve it.
Cinelerra's functionality targets professionals and it almost plays in that league. Unfortunately, its usage pattern is complicated, especially in regard to applying effects.
Flowblade is convincing with its numerous editing tools, with even roll cuts possible. Operation could be a bit more intuitive, however, and its limit of five video tracks in light of all the flexible effects you can apply seems outdated. Thus, Flowblade is recommended above all for ambitious beginners and advanced users for which Kdenlive or Cinelerra appear too cluttered.
Kino seems extremely stable, provides mature tools, and can satisfy editing novices with its simple operation. Unfortunately, the program supports only the outdated DV format. If you still have a DV camera or want to rework older material, you should definitely give Kino a chance.
LiVES is aimed primarily at VJs, video artists, and others who like to experiment with effects. Although its confusing user interface needs some tweaking, it remains a fairly powerful tool. You can speed things up a bit with keyboard shortcuts.
OpenShot appeals to beginners with its clearly structured and intuitive user interface. The comprehensive help can clear up any questions. You'll need some patience, however, to get an accurate cut in the clips.
PiTiVi promises on its home page to provide a user interface that beginners as well as professionals would be pleased with. Ultimately, the functionality serves simple projects only. Beginners should consider it, however, because of its comprehensive and clearly written instructions [11].
Infos