Editing videos with OpenShot
What do you do with short video clips that you've collected over the years on your smartphone, mobile phone, or digital camera? Some are minutes and even just seconds long. No problem. Like other programs for editing videos for semiprofessionals, OpenShot [1] allows you to put videos together from clips, photos, and audio files.
If you want to release an OpenShot edited video on YouTube right away, the tool provides a special feature for selecting the ideal properties for high-quality output. OpenShot even warns you about missing codecs so that you'll know exactly how to install the missing components. (Also see the "Installation" box.)
OpenShot also has a lot to offer in terms of effects. It provides many fancy effects for the transition between clips, and you can use functions to intersperse three-dimensional animated text into the video. For variety's sake, you can, for example, convert a video into a living charcoal drawing.
A Choice of Profiles
You start a new OpenShot project with File | New Project . Use the ensuing Create a Project dialog to enter the project's name and folder location. Particularly interesting is the added choice of a Project Profile .
A "profile" is OpenShot's idea of setting the defaults for playback and export characteristics. Don't set the bar too high here, however. The general rule is the higher the quality, the greater the chance of a jerky output in the preview pane. The profile setting, however, has no bearing on subsequently exporting the video – you can specify these settings later on.
Project profile settings include the frame rate and the width and height of the video. The online help recommends selecting a profile from the outset to match the output size and desired quality of the product. To get the best quality, a more powerful computer works best.
To set the properties of a profile in the profile manager, you can use the Profile tab of the OpenShot preferences. Here you can apply standard or existing profiles or create new ones. Unfortunately, the standard profiles provided by OpenShot cannot be altered.
Drag and Drop
Next, you need to add files for your project. Apart from videos, these can be photos and audio files. OpenShot supports all common formats. Once you use File | Import Files to import a few clips or tracks, you'll see them in the upper left under the Project Files tab.
For better project oversight, you are advised to store these files in folders early on. Use the right-click menu in Project Files to create these folders, then right-click on Move File(s) into Folder to move a selected file into one of them. You can then open and shut the folders to get a better organizational grasp of the project.
The bottom half of the OpenShot window is where the actual work on the project shows up (Figure 1). The timeline initially includes two tracks on which you can organize your files. If you want more tracks, click the plus sign above the timeline to add each one to the top of the stack. To place a file on a track, simply drag and drop it there. You can mix different data types on a single track.
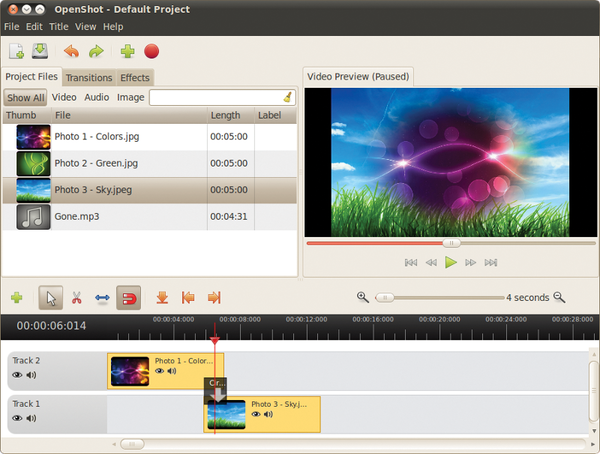 Figure 1: OpenShot includes all the functions a semiprofessional would need.
For a first impression of the project, use the built-in video player. This way you can use icon buttons to hide or mute tracks or their contents. To edit a clip that's already on the track, use the right-click context menu when you select the clip. For example, you can rotate, duplicate, or animate a clip for a zoom effect. You can customize the content of any track further by selecting Properties from the right-click context menu. The Clip Properties dialog that opens has all the functions you need, for example, to shorten the length of the video or its playback speed, or change its size or audio volume (Figure 2).
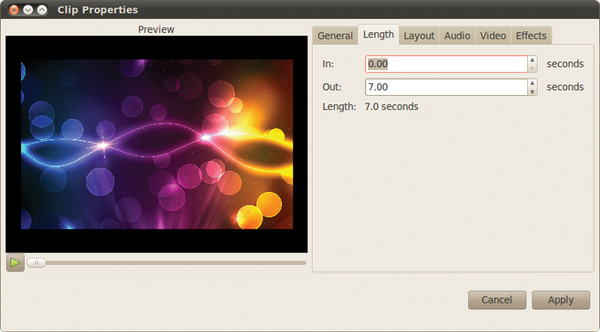 Figure 2: Clip Properties provides some fundamental editing opportunities.
Image Sequence
A rather inconspicuous, but nonetheless powerful, feature is the ability to automatically import image sequences. You can use it to import numbered images and create a slide show with them.
The image files need to be in the same folder and have the same names that include consecutive numbering. From a practical viewpoint, shots from a digital camera are already consecutively numbered.
Click the File | Import Image Sequence menu item or press Ctrl+I. In the dialog that opens, choose the images to import along with the file name pattern (e.g., myfile_5d.png , to indicate files beginning with myfile_ and sequentially numbered with five digits and ending in .png ). The dialog describes the file naming pattern when you click Import Image Sequence (Click for Instructions) .
An even easier approach is to open the folder in a data manager, select the files, then drag them into the Project Files ; OpenShot recognizes the pattern automatically. Both methods have the same results and the image sequence appears like any other file in the project files. From there, you can drag it onto the track as usual.
Transitions
A special strength of OpenShot is handling transitions that connect two clips. On the Transitions tab, you will find more than 50 different transition effects to spiff up your video (Figure 3). To use an effect, all you need to do is drag the transition between two overlapping clips (Figure 4).
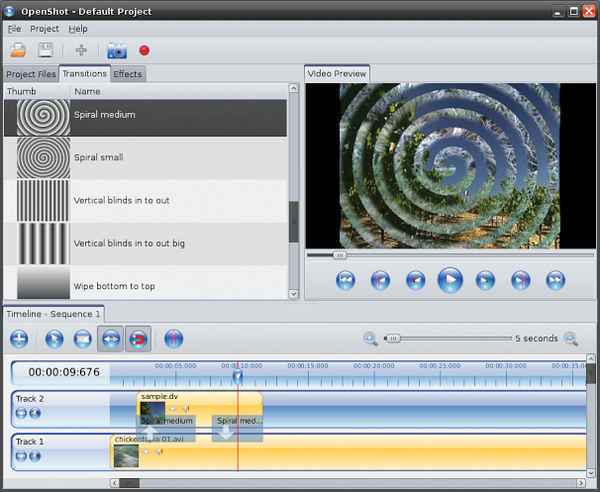 Figure 3: OpenShot provides more than 50 transition effects.
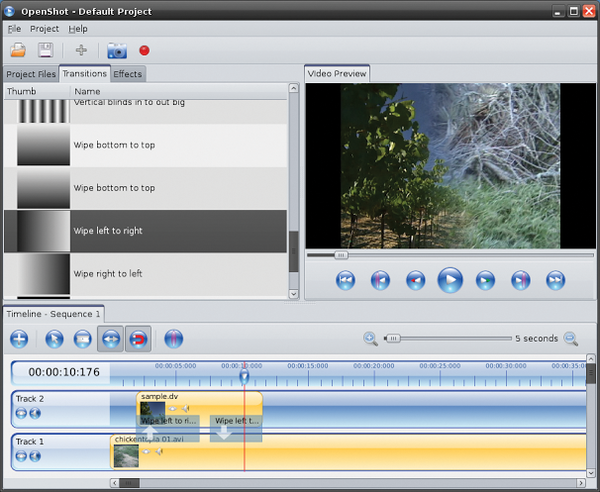 Figure 4: Blue boxes show the transition between clips.
OpenShot also lets you make detailed adjustments, even to transitions. By right-clicking a transition and choosing Move Transitions , you can move all of the transitions in millisecond increments. If you want to move transitions to the left, enter a negative value. Alternatively, you can call up the transition properties with a right-click to open the Transition/Mask Properties dialog to provide a tool.
The Type property lets you convert a transition to a mask. A mask covers only a section of the clip. This function is worth experimenting with to do some manual fine-tuning.
Showmanship
To effectively embed clips into a video, OpenShot provides numerous visual and audio effects on the Effects tab that you can apply with a right-click to a clip. Next to the small preview icon on the timeline track is a symbol indicating that the clip has an effect applied.
Apart from the usual adjustments such as brightness and contrast, OpenShot includes, for example, an effect that converts a clip to a kind of living charcoal drawing or a cartoon (Figure 5). You can also add audio effects identified by a musical note symbol.
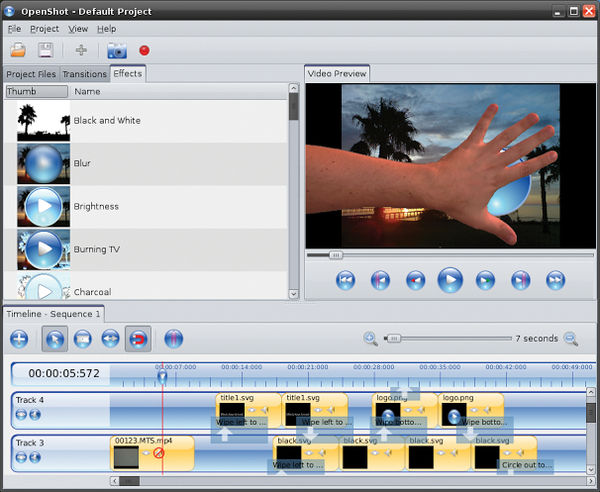 Figure 5: You can effectively stage your video clips with effects such as converting it to a "living" charcoal drawing.
To adjust an effect, right-click the clip and choose Clip Properties . On the dialog of the same name, change to the Effects tab to adjust the parameters. With multiple effects, you need to adjust the parameters for each separately.
Titles
With OpenShot, you can insert simple or animated text in a clip. The functions for it are from the Title | New Title or Title | New Animated Title menu items.
The New Title item is for adding simple two-dimensional titles that are separate project files and can be added as any other file on a track. On the Title Editor dialog under Start here: , choose a template for text position, font, and color. Then, you can click Create new Title and give the title file a name that will appear in the list of files. The software then asks you to enter the title text.
You can adjust the titles after creating them. Right-click the Project Files tab and choose Edit Titles (Simple) . If you have the Inkscape [3] vector graphics editor installed, you can use Edit Titles (Inkscape) , because OpenShot translates the text to SVG graphics.
Another special OpenShot feature is title animation, which you can open with Title | New Animated Title . With help from Blender software (that needs to be at least version 2.62), you can apply elaborately animated content that, for example, explodes or flies into the frame. You can even create scrolling Star Wars-like credits [4].
In the Animated Title Editor , you will find a wide selection of templates for the text (Figure 6). Here, you can choose a template (1), view its preview (2), set its frame rate (3), and modify the 3D settings (5).
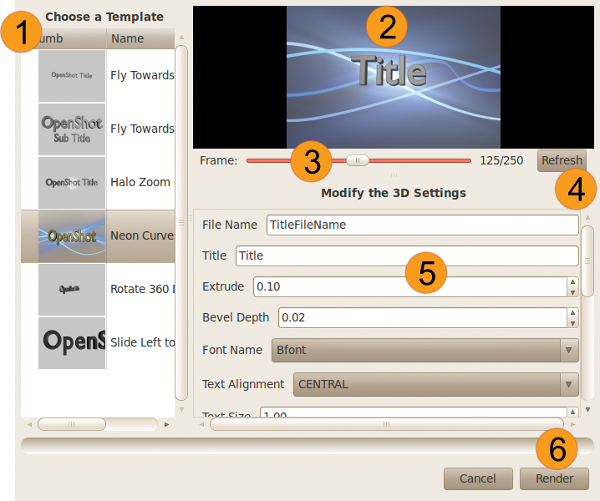 Figure 6: Thanks to Blender rendering software, you can embed animated text into a project.
In the settings, you can add the title text in the Title box and other parameters applicable to the effect, such as font name and bevel depth. To see how the settings will apply, click the Refresh button (4) to get a preview. You can then optimize based on the results.
Once everything is set to your satisfaction, click the Render button (6), which, even more than for a preview, is process-intensive enough to noticeably slow results on a weaker computer. You always have the option of canceling the operation.
Exporting
With a finished project, the final step is to shape it into an acceptable format. Use the File | Export Video menu item to open a dialog to set the export parameters. Here, OpenShot has a clear advantage. In its simple and advanced versions, the dialog provides everything you need to set the video in its best format.
The Profile parameter is where you set the destination of the video. Whether the destination is Blu-ray, DVD, or the web, OpenShot makes it easy to choose the right setting without worrying about bit rates or codecs. Experts can use the Advanced tab to select detailed drop-down list items that OpenShot provides (Figure 7).
 Figure 7: The extensive export options let you optimize the final result to its desired purpose. The software informs you of any missing codecs.
Depending on the selected profile, you can choose further options. For example, if you want to optimize the video for YouTube, choose YouTube-HD . You can define the video quality further with the Quality parameter.
If a relevant software package for export is missing, OpenShot will download the package based on the settings, making it easier to install it. This is a great help, especially with codecs.
Conclusion
OpenShot is a mature tool for a small video workshop at home. The simple export design makes a potentially complicated task much easier. Effects and animated titles encourage experimentation to provide a far from boring experience.
Installation
You can install OpenShot in several different ways. Ubuntu users can run sudo apt-get install openshot . When installing the latest version, it's recommended to download the appropriate repository first. Listing 1 shows this approach. For older versions of Ubuntu 8.04 through 9.04 and Fedora 11 through 13, the matching installers are online [2]. Alternatively, the source code is available there, too.
Listing 1
Downloading the Repository
$ sudo add-apt-repository ppa:jonoomph/openshot-edge
$ sudo apt-get update
$ sudo apt-get install openshot openshot-doc
Infos
- OpenShot: http://www.openshot.org
- OpenShot download: http://www.openshot.org/download/
- Inkscape: http://inkscape.org
- Blender: http://www.blender.org