Python-based framework for functional testing
Functional testing involves verifying application behavior against given design specifications. For graphical applications, this process usually means performing specific user interactions with its interface, such as moving the mouse, clicking buttons, typing character sequences, and comparing the resulting application state and outputs against the expectations. When Unity – the flagship user interface of Ubuntu – was growing in complexity, the need for a practical automated testing suite appeared.
The first versions of Autopilot were embedded into the Unity source, as its sole purpose was for testing the shell. Now, after many development cycles, Autopilot has blossomed into a multi-purpose functional testing framework for any graphical user interface.
What Exactly Is Autopilot?
Autopilot is a Python-based automated testing tool for graphical interfaces running on GNU/Linux systems [1]. The tool enables developers to perform input operations (with mouse, keyboard, or even touch gestures) on the application just as a normal user would, but automatically. By using application introspection, Autopilot later can assert whether the final application state equals the expectations.
Tests can be written and run in suites with multiple use-case scenarios. For example, one test can automatically be run multiple times in the case of a single monitor or multiple monitors, if those are available. After a test is finished, the environment under test can be cleaned up according to your needs. That way, before the next test is executed, you have a clean state with which to start anew.
Inside, Autopilot is build on the python-testtools module, with its tests frequently making use of the python-testscenarios package. Currently, the framework is able to introspect not only the Unity desktop shell but also any existing Qt 4.x, Qt 5.x, and GTK 3.x application of interest. Introspection lets you access the internal state variables of the interface – such as, which elements are focused, which checkboxes are toggled, or which UI flags are set. For all of these toolkits, Autopilot tests are written in a similar manner with only smaller differences.
Autopilot has no graphical interface, only a command-line interface. In return, it offers features such as failure test case video recordings, which make it more convenient to analyze what went wrong during a failing test.
Autopilot is under constant development, so please take into account that some details may change in the newer releases. This article is based on the current state of Autopilot version 1.2 (based on revision 100). Please consult the current documentation for the most up-to-date details [2].
Installing Autopilot
Autopilot as a standalone package is available in the official Ubuntu "universe" package pool from Ubuntu Quantal 12.10 onwards. But, using the latest Autopilot snapshots from the official Autopilot PPA is recommended, because those are most up to date. All you have to do is add ppa:autopilot/ppa to your repository listing and fetch the python-autopilot package. This package provides the basic essentials for all Autopilot work.
sudo apt-add-repository ppa:autopilot/ppa
sudo apt-get update
sudo apt-get install python-autopilot
If you want to test GTK+ and Qt applications, you will also need to install the platform-specific Autopilot packages (Listing 1).
Listing 1
Autopilot Packages
sudo apt-get install autopilot-gtk libautopilot-gtk0 # For GTK+
sudo apt-get install autopilot-qt                      # For Qt4
sudo apt-get install autopilot-qt5                     # For Qt5
Because Autopilot is purely Python based, it also can be built manually for non-Ubuntu-based GNU/Linux systems, but, in this case, you must resolve dependencies yourself. So, the Python packages for modules such as testscenarios, testtools, dbus, ibus, gobject, xdg, etc. must be installed beforehand. The source code can be downloaded directly from the packages from Launchpad or fetched straight from the repositories source trunk by using Bazaar (lp:autopilot) [3].
If Ubuntu is being used as the reference system, starting out by downloading the Unity source code is best, because it includes good reference test code for Unity itself; it's a good way of learning the test constructs. Every code should be accompanied by tests, either unit-tests or functional-tests using Autopilot, where applicable. So, a lot of good reference code is available for different user behavior.
Running Autopilot Tests
The rules for running Autopilot tests depend on the framework version used. Since version 1.2 and higher, you can run tests from any directory you want simply by executing Autopilot from the test directory you want to use. I will concentrate on this version. If the given directory has no Autopilot tests present, it will try to use one of its built-in paths instead; usually, it's /usr/lib/python{version}/dist-packages/ .
As an example, consider executing the Unity Autopilot tests. A running Unity environment is needed for this to be possible (Unity 6.0 or later). After Autopilot is installed and the Unity source tree downloaded, you can proceed by either listing the available tests, running all tests, whole suites, or running only single test cases. You can also provide some additional parameters. For example, you can tell Autopilot to do video recordings of the desktop for all failing tests, output test results to selected directories, or you can give information on what output format is to be used for the final log (plain text or structured into XML). Listing 2 shows a few examples.
Listing 2
Test Parameters
01 bzr branch lp:unity      # Fetch Unity source, here we use Bazaar
02 cd unity/tests/autopilot
03 autopilot list unity     # List all available Unity tests
04 autopilot run unity      # Run all available Unity tests
05 autopilot list unity.tests.test_switcher # List all tests from the test_switcher suite
06 # And we can run either one specific test (like below) or run just one test suite
07 # We can be as specific as we want!
08 autopilot run unity.tests.test_switcher.SwitcherTests.test_switcher_move_next
09
10 # Run all autopilot tests, write log output to /opt/aplogs/ directory, record and save
11 # videos of failing tests to /opt/apvids
12 autopilot run -o /opt/aplogs/ -r -rd /opt/apvids/ unity
More possible options can be found in the autopilot command-line help text (autopilot --help ).
After executing an autopilot run command, Autopilot will automatically start executing the selected test cases. During this process, the mouse pointer can be seen moving, windows will open, and key combinations will be entered according to the needs. Until the test is finished, moving the mouse or using the keyboard can break the test case. Once the test or tests are finished, you are presented with a final test report, which normally is written to standard output if not specified otherwise (Figure 1).
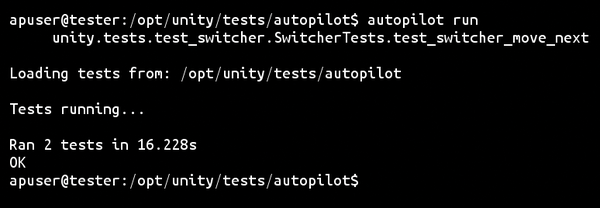 Figure 1: Autopilot output if the tests succeeded.
In case of failure, you will be informed which test failed on which assertion in which place exactly (Figure 2). Besides that, the log always includes detailed steps performed during the test, including the test cleanup actions. Also, if requested before run-time, a failure video recording of the desktop will be saved to the selected location. The recording is made using the recordMyDesktop application, so you have to make sure the app is installed beforehand [4].
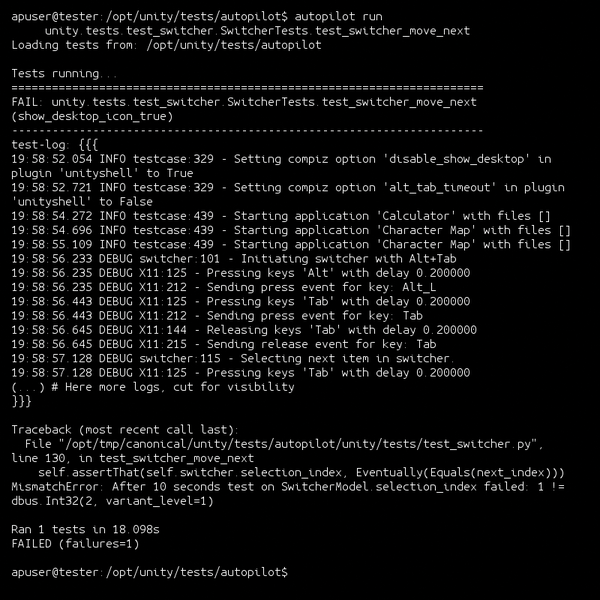 Figure 2: Autopilot output if a test has failed. You can see a detailed log of what actions were performed, what assertion failed, and the output of the test program, if available.
A test can be run more than once automatically if there are different scenarios defined for the given suite. Unity uses scenarios for testing multi-monitor cases, different Unity settings, etc. Running non-Unity Autopilot tests is done in exactly the same way. The only difference is in how such tests are written, but even those differences are almost unnoticeable.
Writing Autopilot Tests
An Autopilot test is basically nothing more than a class deriving from the AutopilotTestCase class defined in autopilot.testcase . One test class can have many distinct tests defined inside as methods of the class, each of them starting with the test_* prefix. This way, Autopilot tests can be structured into groups of tests (so-called test cases), which can be run all at once or separately, as needed.
I'll start with the basics. In practice, every Autopilot test is divided into four stages. The Test Setup stage handles preparations of the environment for starting the test; this can involve things such as starting up the application under test or navigating to the components that will be tested. Test Actions include which input events should be send to the application to mimic user interaction. Test Assertions assert the state of the application (or its components) to verify whether the application under test performed as expected. And, finally, the Test Cleanup phase cleans up the environment after the test; this stage is usually defined during test setup.
Test setup should be performed at every beginning of a test or in the respective setUp() method of the test case class. Preparations should be accompanied by cleanup routines using the self.addCleanup() method of AutopilotTestCase. This way, Autopilot is instructed on what to do after the test is finished to return the environment to a clean state, ready for the next test.
self.dash.ensure_visible()
self.addCleanup(self.dash.ensure_hidden)
When the application under test is a GTK+ or Qt application, the application also needs to be started during the test setup stage (usually in the setUp() method). This is not necessary if Autopilot is used for testing the Ubuntu Unity shell.
Test actions can be either input events performed by Autopilot or any other operations performed as part of the test. Autopilot tests can emulate user mouse events and keyboard events by using the self.mouse and self.keyboard members of AutopilotTestCase. Some of the most common functions used by Autopilot are listed in Table 1.
Although many more user interaction methods are available, these are the most frequently used; however, to perform functional testing, the behavior of the application under test must be asserted according to expected behavior. Test assertions can be done at any moment, even during the test.
Because Autopilot is built on top of the standard Python unit test tools, it provides all the test assertion methods available by unittest and testtools modules, and more. Most of the usual assertions are done by using the self.assertThat(foo, Equals(value)) construct. Such an assertion checks the value of the foo expression and then checks it according to the matching operator, passed as the second argument. This operator can be Equals() , GreaterThan() , LessThan() , and others. Autopilot also offers an additional useful operator called Eventually() . This operator is helpful when a property does not switch to the expected value instantly, but instead a time lag occurs. The Eventually() operator polls for the correct value for a short while before failing:
self.assertThat(application.is_focused, Eventually(Equals(True)))
When an assertion fails, Autopilot stops the execution of the test, cleans up the environment, and creates a detailed log regarding the failure.
Testing Ubuntu Unity with Autopilot is straightforward; the Unity source code provides many helpers to ease this task for QA members and developers. The difference in testing GTK+/Qt applications is that besides deriving from AutopilotTestCase, you also need to derive from specific introspection enabling class for the given toolkit. For GTK+, this is GtkIntrospectionTestMixin; for Qt, use QtIntrospectionTestMixin. Those classes provide the implementations for the self.launch_test_application() method for starting the application under test – in a way enabling state introspection.
Applications started using this method to enable checking the state of their components and their states without having to rebuild the program. An exemplary GTK+ 3.0 test class can be found in Listing 3. Testing Unity is even more straightforward because of much better introspection bindings. Work on enhancing them for other toolkits is in progress.
Listing 3
test_gtk_examples.py
01 from autopilot.testcase import AutopilotTestCase
02 from autopilot.introspection.gtk import GtkIntrospectionTestMixin
03 from autopilot.matchers import Eventually
04 from testtools.matchers import Equals
05
06 import gettext # We can use gettext to make our tests locale independent
07
08 class GtkExampleTests(AutopilotTestCase, GtkIntrospectionTestMixin):
09
10     def setUp(self):
11         super(GtkExampleTests, self).setUp()
12         # Here we test gedit, the text editor
13         self.app = self.launch_test_application('gedit')
14         gettext.install("gedit", unicode=True) # In case we have a non-EN locale
15
16     def test_clicking_new_document_starts_new_edit_tab(self):
17         """Test if clicking the 'New File' button in the toolbar starts a new tab."""
18         btn = self.app.select_single('GtkToolButton', name='FileNew')
19         self.mouse.move_to_object(btn)
20         self.mouse.click(button=1)
21
22         documents = self.app.select_many('GeditTab')
23         # Assert that we have 2 tabs open
24         self.assertThat(lambda : len(documents), Eventually(Equals(2)))
25         # Assert that they have correct names, e.g. Untitled Document 1 etc.
26         self.assertThat(documents[0].name, Equals(_('Untitled Document %d') % 1))
27         self.assertThat(documents[1].name, Equals(_('Untitled Document %d') % 2))
Autopilot provides a built-in useful graphical tool for viewing properties of running applications (Figure 3), which can be started by executing the autopilot visualization application. All shown properties can be accessed by Autopilot tests by using the application.select_single() and application.select_many() methods of the handle returned by self.launch_test_application() .
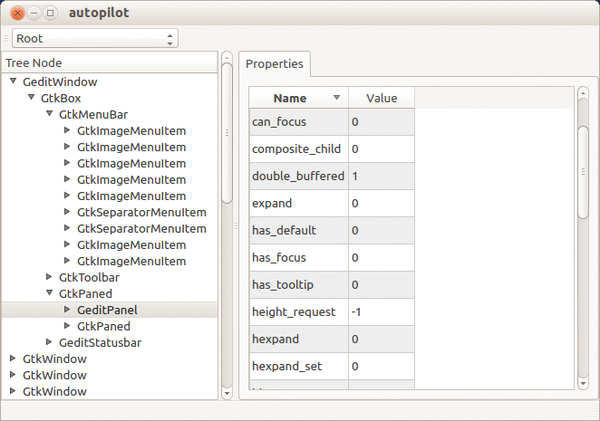 Figure 3: Autopilot introspection visualization application.
As mentioned previously, you can also have multiple scenarios defined for a given test case. The same test will be executed for every defined test scenario in the selected environment, making it easier to test the same behavior under different conditions. To define the scenarios for a test case, you must provide a scenarios list variable containing tuples for each one. Those tuples, besides containing the name, should provide a dictionary of variable combinations defining a given scenario (Listing 4).
Listing 4
Defining Scenarios
scenarios = [
  ('show_desktop_icon_true', {'show_desktop_option': True}),
  ('show_desktop_icon_false', {'show_desktop_option': False}),
]
Final Word
Autopilot offers many features beyond what I've described in this article, features such as keybinding support, helpers for property assertions, multi-monitor support, and others. Additionally, Autopilot has been tested to run on ARM devices, so potentially it can be used for testing Python-enabled mobile devices. Development still continues and is open to all user contributions. So, get ready and start testing your applications right away!
Table 1
Common Autopilot Test Control Functions
| Function | Description |
|---|---|
| self.keyboard.type("String") | Type in the given string one character at a time. |
| self.keyboard.press_and_release("Ctrl+a") | Press a given key combination in the given order and then release them in the opposite; modifiers such as Ctrl, Shift, Alt, Super, etc. can be used. |
| self.mouse.move(x, y) | Move mouse to the x and y position on screen. |
| self.mouse.click(button) | Click with the mouse at the current mouse position; optionally, an additional button parameter can be provided, defining the button used. |
| self.mouse.press(button) | Press the mouse button. |
| self.mouse.release(button) | Release the mouse button. |
| self.mouse.move_to_object(button) | For many objects, using the convenient method of moving the mouse to a selected object is also possible. |
| self.start_app(application_name) | Starts an application of the given name. The started application first must be registered as a known application; Autopilot defines some by default. After starting, a cleanup routine for the started application is automatically prepared, closing all application windows after the test. |
| self.start_app_window(application_name) | The same as self.start_app() , but the cleanup routine only closes the single window that has been opened. |
| self.register_known_application(name, desktop_file_name, process_name) | Registers an application for future opening through self.start_app() . |
Infos
- Autopilot: https://launchpad.net/autopilot
- Autopilot Online Documentation: http://unity.ubuntu.com/autopilot
- Bazaar VCS: http://bazaar.canonical.com
- RecordMyDesktop: http://recordmydesktop.sourceforge.net