Reading Scripts
With a small script, you can convert large amounts of scanned text into PDF files that you can then browse with typical Linux tools – all thanks to OCR.

Lead Image © aquaaqua, 123RF.com
With a small script, you can convert large amounts of scanned text into PDF files that you can then browse with typical Linux tools – all thanks to OCR.
To take full advantage of digitized printed text, you need to put it into a form that allows searching. Pure conversion to bitmaps doesn't work. If the layout differs from the original, saving it as ASCII might be a way. However, if you want to preserve the original, PDF is the first choice for preserving the Optical Character Recognition (OCR) information. You can then search the text with a common Linux tool such as grep .
Many GUI scanning and OCR applications have tools working in the background, including shell command versions. In this way, you can create your own tools that meet your needs, with the foundations coming from Scanimage and Tesseract. Both tools can be found in the Software Center or are just an apt-get install away on the command line.
To begin, install the libsane and sane-utils [1] packages. It's not necessary to start the Sane daemon. In normal operation you need only bring up the program in a terminal. The package manager installation sets up a sane or scanner user in /etc/passwd in a corresponding group.
To add the user who needs access to the scanner, in the corresponding line in /etc/group , change the line to look something like this:
scanner:x:115:saned,harald,monika,copier
The instructions for Sane provide ample guidance as to which software supports a scanner. In some cases, you need to extract a Windows driver file and apply it to the Linux machine. Many newer scanners support Sane software directly. You can find a good description for installing a scanner on the web.
After configuration, test the functionality with:
scanimage -T
During the scan, the status bar should move and the terminal output should show the results (Figure 2).
 Figure 2: If the configuration works, the test run should show a positive outcome.
If everything works up to this point, the hardware integration is complete. You can find the most important scanimage options in Table 1. If you have a scanner with an automatic document feeder (ADF), the scanadf tool is worth a shot.
Table 1
Important scanimage Configuration Options
| Option | Action |
|---|---|
| -L | List of available devices (see Figure 1) |
| -A | List of all available options |
| -d <device_name> | Device name of the scanner |
| --mode <mode> | Scan mode (lineart , gray , or color ) |
| --resolution <dpi> | Resolution in dpi, available values in -A output |
| --depth <value> | Color depth (1 [black/white]; otherwise, 8 or 16 ) |
| --brightness <value> | Brightness (-100% through +100% ) |
| --batch | Batch processing (for ADF) |
| --batch-count <count> | Number of pages to scan in batch mode |
| --batch-start <start-page> | Start page for batch mode |
| --batch-increment <increment> | File name increment (for double-sided documents, increment is 2 ) |
| --batch-prompt | Press Return before scanning |
| --format <format> | Format of output file (PNM/TIFF) |
| -T | Test run |
| -p | Display progress counter |
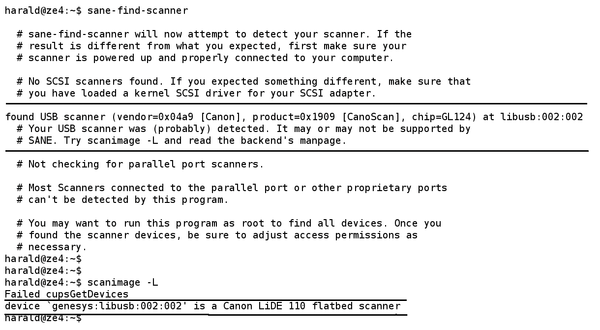 Figure 1: Searching for and finding the connected scanner with sane-find-scanner and scanimage -L.
The steps needed to scan a document are perfect for crafting a script. Listing 1 performs the following tasks: scans the documents, saves it in a TIFF format, reads the text from the TIFF files (OCR), and invokes an editor for manual correction of the result. For this to work, you will have to install Tesseract first with:
Listing 1
Shell Script
01 #! /bin/sh
02 SCANNER="genesys:libusb:002:002"
03 TXTLANG="eng"
04 EDITOR="gedit"
05
06 echo -n "Project Name: ";
07 read PROJECT
08 if [ -z $PROJECT ];
09 then
10   exit
11 fi
12 scanimage -d $SCANNER --batch --batch-start 10000 --batch-prompt --resolution 600 --mode lineart --format=tiff
13
14 for TIF in out*.tif; do
15  echo "Reading $TIF"
16  TXT=$TIF.tif.txt
17  tesseract $TIF $TXT -l $TXTLANG
18 done
19
20 cat *.txt >> $PROJECT.txt
21 $EDITOR $PROJECT.txt
22
23 PAGES=$(ls -l out*.tif | wc -l)
24
25 for TIF in out*.tif; do
26  echo "Converting $TIF"
27  PDF=$TIF.tif.pdf
28  if [ "$TIF" = "out10000.tif" ]; then
29   convert $TIF output.pdf
30  else
31   convert $TIF $PDF
32   pdftk A=output.pdf B=$PDF CAT A B output output-1.pdf
33   mv output-1.pdf output.pdf
34  fi
35 done
36
37 recode UTF8..ISO-8859-15 $PROJECT.txt
38 a2ps -o $PROJECT.ps $PROJECT.txt
39 ps2pdf14 $PROJECT.ps $PROJECT-text.pdf
40 pdftk A=output.pdf B=$PROJECT-text.pdf CAT A B output $PROJECT.pdf
41 okular $PROJECT.pdf
42
43 echo -n "Delete auxiliary files ? (j) ";
44 read delete
45 if [ "$delete" = "j" ]; then
46  rm $project.ps
47  rm out*.tif
48  rm out*.pdf
49  rm out*.txt
50  rm output.pdf
51  rm $output-text.pdf
52  rm *~
53 fi
sudo apt-get install tesseract-ocr
Now all that's left is to convert the TIFF file to PDF format. Finally, the script creates a PDF file from the result of the OCR run and combines the two documents. The result is a PDF file that you can search using pdfgrep or the viewer.
The scanimage call in line 12 prepares for batch processing. The number of scanned pages remains open. You enter each line followed by Enter. To abort the process, use Ctrl+D. In the example, I needed to do that after two pages. The filename begins with 10000 , so you can avoid errors in sorting the filenames that subsequently appear.
Creating the scans with a resolution of 600dpi is useful when the originals contains unreadably small type; the scans should be black and white. The script saves the image files in TIFF format (Figure 3).
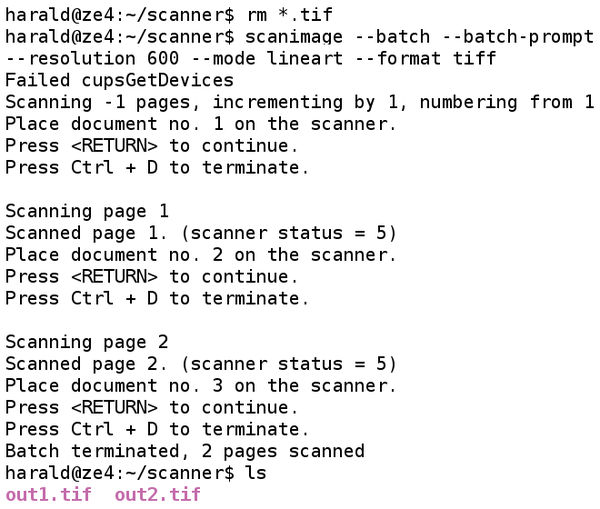 Figure 3: The scan output is in TIFF format in this example.
Some older models work especially slowly with a resolution above 600dpi. These devices often read the pages piecemeal and stop to save them before moving on. This delay might lead you to think that Scanimage has hung, with the only solution being to kill the process, but that's not the case. The progress indicator (specified with the -p option) gives you the bigger picture. Only when the indicator has not changed over the course of some minutes (Figure 4) should you abort the process. Furthermore, my test required the -d <device> option, because redirecting the output would have returned an error message about CUPS devices not being found in the target file.
 Figure 4: The progress indicator helps with older scanner models to get a better idea of how the task is going.
No clear favorites stand out among the OCR programs. Tesseract is an effective tool for everyday use. My tests used some sample text (Figure 5) that showed the strengths and weaknesses of the program. The scanned file was in TIFF format with a resolution of 600dpi. Scans of magazine articles, manuals, and book pages returned fairly indistinguishable results. Thus, a good strategy is to use both OCR programs for the shell script.
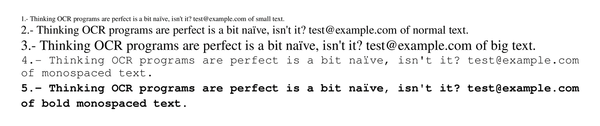 Figure 5: Some sample text exposes the strengths and weaknesses of Tesseract.
Development of Tesseract began back in 1985. The software outputs plaintext files. The package includes utilities with which you can introduce new fonts (cntraining , mftraining ). The Tesseract OCR run appears in line 17 of Listing 1.
Tesseract currently handles the following languages: Dutch (nld ), English (eng ), French (fra ), German (deu and deu-f ), Italian (ita ), Portuguese (por ), Spanish (spa ), and Vietnamese (vie ). The scan expects images in TIFF format. Figure 6 shows a run. Tesseract recognizes special characters very well.
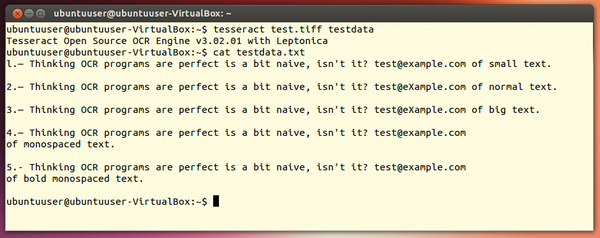 Figure 6: Tesseract evaluates special characters and numbers in many cases.
The powerful Convert program from the ImageMagick package helps create PDF files from TIFF files. It not only provides the ability to process other formats, but it also modifies other image file properties through shell commands. The command on line 31 of Listing 1 is enough to create a PDF file.
You can use PDFtk [2] (install with sudo apt-get install pdftk ) to combine PDF files. Line 32 shows how you apply the software. Other features of the program are disassembling, rotating, encryption/decryption, and modifying PDF files.
Generating a PDF file from a text file involves several steps. Most distributions use UTF-8 as the character set in the shell. Because many conversion tools are based on the ISO-8859 character sets, the first step is to use Recode [3] to convert the text data (line 37). The program also converts ancient character sets from the 1970s.
With Enscript [4] or A2ps [5], both of which are available in the Ubuntu repositories, you can create a PS file as an intermediary step. These programs differ mainly in their output forms, and they currently work only with the ISO character sets. You can see the call to A2ps on line 38. The call to Enscript would be similar. In the last step, the script creates a PDF file from a PS file via Ps2pdf14 from the Ghostscript [6] package (line 39).
In the last step, the script assembles the scanned documents and the extracted text. This creates a document that provides the content and the opportunity to search through it with Linux tools.
You can scan documents and extract text from them without much fuss with shell tools. The sample script provided here already gives a functional result. With a bit of shell know-how, you can expand upon this script and customize it to your taste, for example, with the Unpaper [7] tool, which is also available in the repositories.
Infos