In Command
Some pictures call for a particularly skillful photographer – either that or a computer with gPhoto2. The gPhoto tool helps you create sequential shots that won't try your patience.

Some pictures call for a particularly skillful photographer – either that or a computer with gPhoto2. The gPhoto tool helps you create sequential shots that won't try your patience.
The powerful gPhoto2 command-line software allows direct control of DSLR cameras from a PC, enabling automated continuous shooting. You can also use it for recording time-lapse videos on microscopes and telescopes watching the night sky.
GPhoto2 accesses the camera through the libgphoto library with a USB connection. Whether installing gPhoto is worthwhile depends on the kind of camera you have. The gPhoto homepage [1] lists over 1,600 supported models, but this means only that the program can read the image memory. For more demanding tasks, such as the remote control functions described below, support is essentially limited to Canon and Nikon DSLRs.
GPhoto2 can be found in the repositories of all the major distributions and can, therefore, be easily set up with the corresponding package manager. Under Ubuntu and its derivatives, choose the gphoto2 package and install it with the Apply button.
Connect the camera with a USB cable to the PC and turn it on. This usually opens a file manager window on the screen that shows the contents of the camera's memory card. Unfortunately, this prevents gPhoto2 from having exclusive access to the camera such that the program balks at it. Therefore, before you can work with gPhoto2, you have to unmount the camera's memory card. In Ubuntu, you can do this in Nautilus by right-clicking the memory card icon and selecting Unmount from the context menu (Figure 1). After this preparatory work, the camera is available exclusively to gPhoto2.
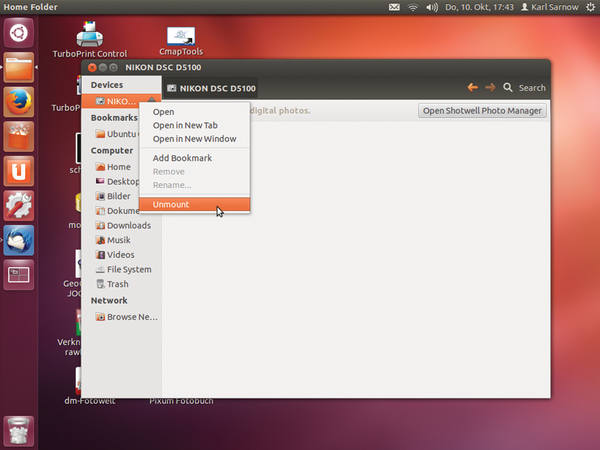 Figure 1: The context menu of the camera memory card lets you unmount the card so that gPhoto2 can have exclusive access to the camera.
For your first photo, open a terminal window and change to the directory where you want gPhoto2 to store it. Then, enter the following command:
$ gphoto2 -I 2 -F 2 --capture-image-and-download
The -I parameter sets the time interval in seconds until the next shot. The -F option sets the number of frames. This example therefore takes two photos every two seconds. The --capture-image-and-download statement completes the action and ensures that gPhoto2 stores the image in the target directory. You can find a complete list of parameters in Table 1.
Table 1: GPhoto2 Parameters
| --auto-detect | Lists the detected camera models |
| --camera | Name of the camera, as detected by --auto-detect |
| --capture-image-and- download | Captures and saves the image with the selected camera settings |
| -F | Total number of frames |
| -I | Interval between shots |
| --list-config | Lists the camera settings |
| --get-config | Returns the current value and possible camera settings |
| --set-config | Stores the value of a camera setting |
When executing a command, gPhoto2 uses the current camera settings. This can be a blessing as well as a curse. If you turned on autofocus, for example, the camera won't manage to focus clearly, and the photos will be blurry. If you use gPhoto2 for astronomical recordings and connecting remotely from the comfort of your living room, you may not know that the camera is trying in vain to focus, and your whole photo shoot can turn into a wasted night.
Hence, you should avoid any automatization (exposure time, aperture, focus) with gPhoto2 and take shots manually. With a command executed properly, you get a rundown of the events in the terminal window (Figure 2).
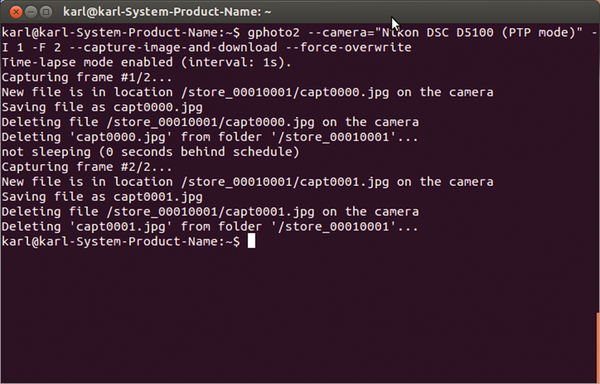 Figure 2: GPhoto2 logs the actions you execute.
However, it's not always clear that your camera is actually performing these tasks. If your camera is not one of the supported ones listed on the gPhoto2 homepage, you may have a lot of trial and error. Particularly well supported are the DSLR cameras from Canon and Nikon [2]. The author's Olympus E410 DSLR wasn't supported for capturing, but gPhoto2 could read the images.
If you connect more than one camera to the PC, you can control them independently from gPhoto2. The gphoto2 --auto-detect command provides a list of the detected cameras. You can use the displayed name to control the camera with:
$ gphoto2 --camera="displayed_name" --capture-image-and-download
If you open a separate terminal window for each camera and record the image in separate directories, you can get a parallel series of frames from each camera. Figure 3 shows the process.
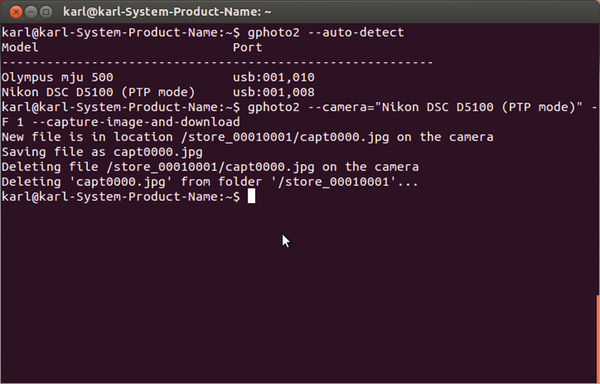 Figure 3: GPhoto2 recognizes a Olympus 500 and a Nikon D5100. By opening each in a separate window with two different image directories, you can capture images with the same name that gPhoto can then delete.
With the parameters --get-config and --set-config, you can have gPhoto2 read and set the camera settings. To learn which settings you can change for your camera, use the gphoto2 --list-config command to operate the unmounted camera. It provides a list of all the possible configuration parameters to choose from, although you probably wouldn't use most of them for a shot.
The values for sensitivity, aperture, and shutter speed are the most useful to avoid – for example, the infamous "brightness pump" of time-lapse photos. The first command below lists the settable ISO speeds and the current value.
$ gphoto2 --get-config /main/imgsettings/iso
$ gphoto2 --get-config /main/imgsettings/iso=2
The second command sets the third level (0, 1, 2) of ISO sensitivity. In the case of a Nikon D5100, that corresponds to ISO 160. You also can control aperture value and shutter speed (Table 2).
Table 2: Important Camera Settings
| /main/imgsettings/iso | Use the ISO value |
| /main/capturesettings/f-number | Set the f-stop |
| /main/capturesettings/shutterspeed2 | Shutter speed in fraction of seconds / second |
GPhoto2 works with various photography applications. Darktable lets you register for "tethering" and provides a highly convenient GUI for camera control, allowing you to configure your settings with mouse clicks instead of through the console. Gtkam also provides a GUI for gPhoto2, with which you can take shots directly from GIMP and edit them.
All these solutions have a handy feature in common. If the camera supports Live View mode, you'll see the image directly on your computer monitor. Because the images are typically larger than on the camera's monitor, gPhoto2 provides convenient focusing in critical situations, such as with a telescope or microscope.
GPhoto2 is ideal for making a series of shots. This applies to time-lapse photography as well as to astronomical single shots that you later combine as a sequence.
A good example of a time-lapse application of gPhoto2, including the resulting video, can be found in mathematician and photo hobbyist David Clark's blog [3].
A rather painful restriction applied to the Nikon camera I used in my test. Nikon doesn't support so-called bulb mode for long-term exposures that you can invoke in gPhoto2 with the -B or --bulb parameters. Using bulb mode with the Nikon D70 or D5100 resulted in an error message informing me that long-term exposures were not supported.
The gPhoto2 programmers are clearly not supported enough by the camera manufacturers. Apparently, Canon DSLR cameras don't have the same trouble [4], but I couldn't check that myself.
The powerful gPhoto2 software significantly unburdens the photographer from long continuous shooting. Taking astronomical photos with many hours of exposure time divided into 30-second intervals can be a cinch.
Live View mode of the newest DSLRs provides an easy and reliable sharpness control on the PC, on a screen much larger than that of the camera. You can have the PC monitor take over the poor visibility positions, such as you would get on a telescope.
The integration of gPhoto2 with Darktable, Gtkam, and GIMP provides a relatively easy working relationship. Unfortunately, only Darktable supports tethering and has a convenient GUI for remotely controlling series shots.
Darktable, although a powerful tool, has a relatively steep learning curve, so if you value stability during photo shoots, it's probably best to stay with gPhoto2 and its command-line operation.
Infos
The Author
Karl Sarnow has been a fan of personal computers since his TRS-80 Model 1. A teacher of mathematics, physics, and computer science early in his career, he created networking concepts for Linux and corresponding applications for schools and training. Since his retirement, he has been devoted to his hobbies of photography, travel, and astronomy.