Guidance
When you get back from a trip, you're usually bursting to tell everybody all about it and share your photos. Organizing your pics by location makes it easier to describe your adventures.

© sans5 - freeimages.com
When you get back from a trip, you're usually bursting to tell everybody all about it and share your photos. Organizing your pics by location makes it easier to describe your adventures.
Classifying your photos begins as soon as you get home from vacation. A good approach is to create a virtual map showing the stages of your trip embellished by photos of specific locations. With the right know-how and tools, you can quickly create eye-catching results.
To assemble the map with images, you need the proper information, such as timestamps, geographical longitude and latitude data, and viewing angles and directions. Linking objects with this data is called geotagging, which makes it easier to work with media data.
Information for geotagging comes from digital camera or smartphone sensors. A GPS module is already a standard feature of many mobile devices. You can purchase a digital camera with GPS for a few hundred dollars. The sensor data that the devices collect usually ends up automatically in the Exchangeable Image File Format (Exif) file for each photo [1].
As the past few months have shown, intelligence services have been tapping personal profiles from this metadata to find out where photographers are and even what technical equipment they are using; therefore, it's best to use this function with care or even deactivate it in times of continued digital surveillance.
Using appropriate interfaces, you can read the Exif files of digital images any time and modify them as you like. Image viewers like Geeqie [2] can display the Exif file data (Figure 1). Command-line programs include Exifprobe [3] and Exiftran [4], which you can use for rotating JPEGs by taking into account the image orientation.
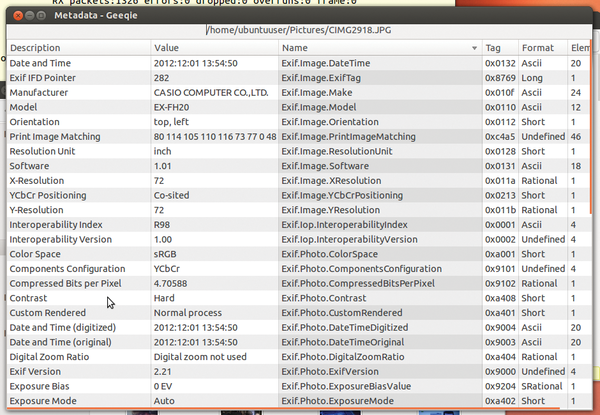 Figure 1: The Geeqie image view provides the Exif data for an image.
The comprehensive ExifTool [5] Perl program also includes a personal development library. Moreover, Pyexiv2 [5] and its successor, Gexiv2 [6] are a boon to Python developers. The Python Imaging Library (PIL) [7] uses similar methods that are unfortunately undocumented and, therefore, must be used with caution.
The tools named bring some amazing things to light these days. They provide the camera manufacturer name, the device's ID code, and firmware version, as well as image size, aperture, and flash exposure time.
The list of items you need to create a geographic map consists of three things: the stages of the trip, the waypoint coordinates, and the photos taken at each waypoint. A text file with the location names is enough to nail the stages of the trip when creating the map.
A Global Positioning System (GPS) is the best way to get the waypoint coordinates. These give you the latitude and longitude, timestamp, and altitude measurement. This recorded data can provide the route profile that you can store in a route planner, such as GPSies [8].
As previously mentioned, digital images have metadata in so-called Exif tags. Table 1 shows the specific entries you can use for geolocation ("GPS tags"). You can find a more comprehensive overview of the Exif elements related to GPS in the TIFF Tag Reference [9] and on Exiftool author Phil Harvey's website [10].
Table 1
Tags for Geodata
| GPSInfo | Main tag |
| GPSLatitudeRef | North or south latitude |
| GPSLatitude | Latitude value |
| GPSLongitudeRef | East or west longitude |
| GPSLongitude | Longitude value |
| GPSAltitudeRef | Above or below sea level altitude |
| GPSAltitude | Altitude value |
You can tell if an image already includes geodata by clicking on the corresponding image view entry or using the ExifTool and grep programs on the command line, as follows:
$ exiftool -s <imagefile> | grep -i gps
The command tells ExifTool to show the Exif tag name in the first output column, and then grep filters the output based on a case-insensitive (-i ) pattern search for gps .
No output means that the file contains no geodata. Figure 2 shows a successful search for an image's coordinates data. The GPSMapDatum entry shows the geodetic survey data used by the GPS receiver, such as WGS-84 or Tokyo .
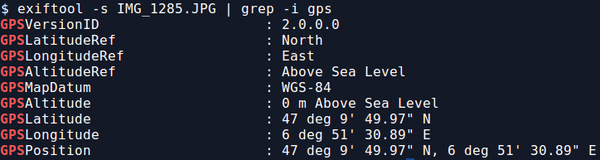 Figure 2: Output of an image's geodata using the ExifTool.
Because the (GPSAltitude ) above sea level was not indicated in the example, using the following command:
$ exiftool -GPSAltitude=493 <imagefile>
you can modify the metadata to set the altitude to 493 meters above sea level, for example.
If the information isn't included with the image and no digital route data exists, you can add it manually. Usually, a Geonames.org query [11] is good enough. This database contains all available names of locations, regions, and countries and is full-text searchable over the web.
With multiple identical place names, a search list appears with further selections. Each reference includes a Google Maps reference, a short description and the coordinates. Figure 3 shows the results for Vaumarcus, Switzerland, the location of the DebConf 2013 conference.
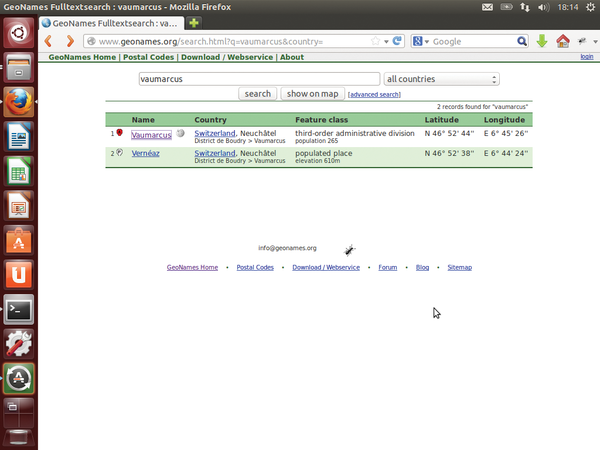 Figure 3: Full-text search for a location name in the Geonames.org web browser.
Another option is OpenStreetMap and its Nominatim [12] (Latin for "by name" or "explicitly") service. It is used, for example, in Wikipedia to match locations with coordinates. Figure 4 shows an example.
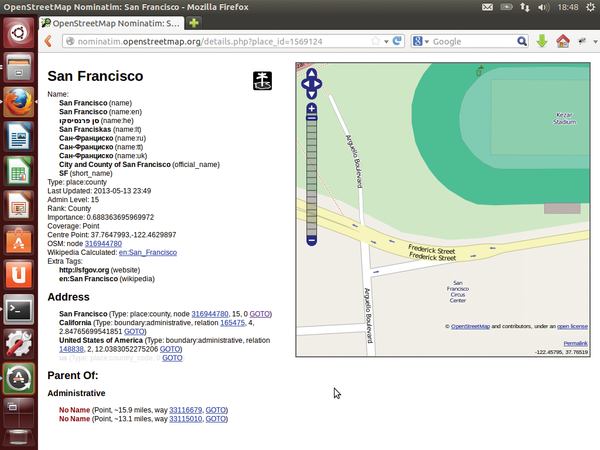 Figure 4: Nominatim search results complete with map.
You can find previously recorded travel routes (commonly known as GPX tracks) on the GPSies, Waymarked Trails [13], and BBBike[14] websites. GPSies actually provides only traveled routes, with their ratings and detailed descriptions. Waymarked Trails includes inline skater and mountain bike routes along with trails and biking routes (Figure 5). BBBike provides a comparison of up to eight map variations with routes and variable background overlays (Figure 6).
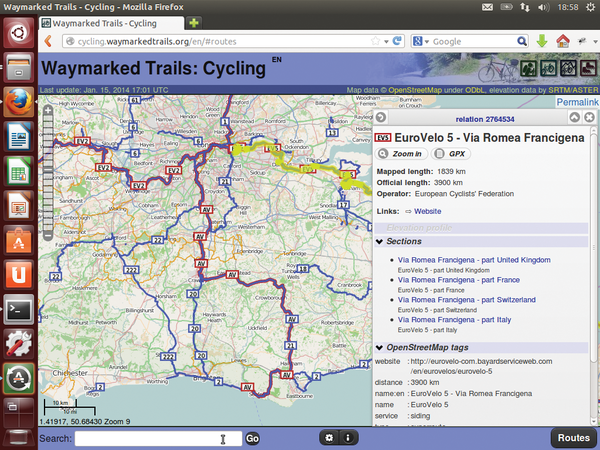 Figure 5: Waymarked Trails bike routes around London.
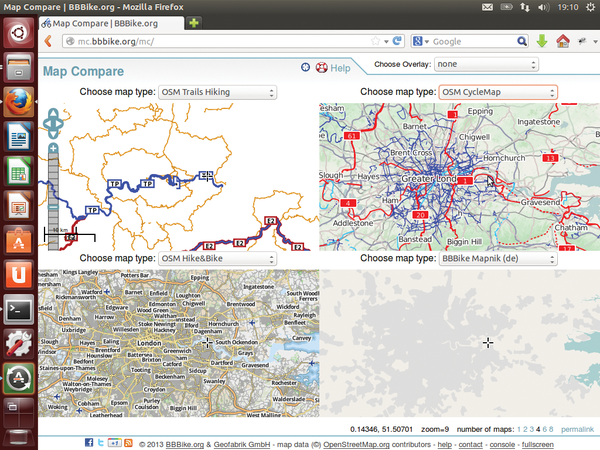 Figure 6: BBBike lets you compare maps and activities.
These websites allow interactive waypoint marking on the map using the browser. You can then assemble the route and export it as a text file in GPX format [15], which is an XML format used for storing and sharing GPS data.
To combine all the ingredients, you can use, among other things, GottenGeography [16] and QLandkarteGT [17], both of which are packaged for Debian, Ubuntu, and Fedora. With GottenGeography, you first choose the desired map type, which OpenStreetMap currently provides as MapQuest, Mapnik, Cycle Map, and Transport Map. You can also use the geographical relief maps known as "Maps for Free Relief."
Next, locate the matching map region by dragging the mouse or using the text field above the map. GottenGeography uses the above-mentioned Nominatim to resolve the search for the correct geographic location.
Using the Images tab, load the photos created along the route. If the image already has GPS data, GottenGeography immediately shows it at the corresponding map location. If it doesn't, move the photo to the correct location and save it. This process will also record the Exif data.
Finally, add the GPX track for the route. Using the GPS tab, load your GPX file and select the desired route color (red in Figure 7). GottenGeography then rates the GPX track and makes it public.
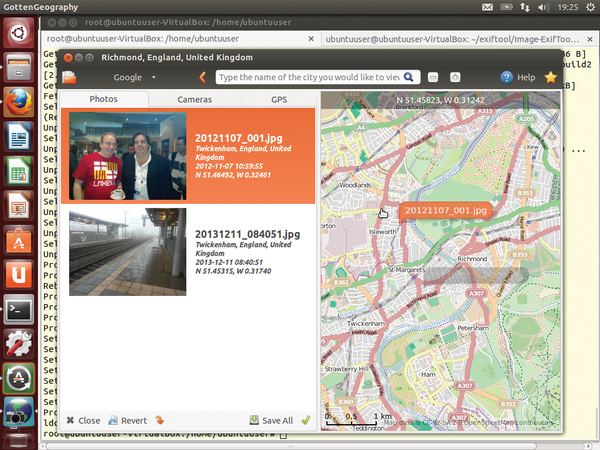 Figure 7: View of a complete route in GottenGeography.
If GottenGeography strikes you as too simplistic, you can also use tools like QLandkarteGT, for example. It can't import any GPX tracks as files as yet, but you can save the displayed map as an image to communicate with various GPS devices. Thus, you can upload routes, as well as modifications of previously recorded routes, to the navigation device.
To provide an engaging presentation of your vacation trip along with digital images and some GPS data, all you need is a bit of know-how and the right tools. Once you understand how the various techniques interact, you can produce fantastic results. l
Infos