Marble virtual globe
Marble is one of the educational programs of the KDE Software Collection; it is therefore in the repositories of all the major distributions. Many distros install the virtual globe by default, but not Ubuntu. Because Marble is a KDE program, during installation it will drag in a large amount of KDE libraries, adding up to nearly 100MB. Given the enormous size of modern hard disks and high-speed Internet connections, this is not really a problem, and it means you will also have these libraries installed if you want to use other KDE apps later.
Although Marble looks somewhat unimpressive, it provides more than just a world globe. You can plan a trip inventory, set the altitude profile for a bike tour, or even fly over the moon.
Rolling
After startup, Marble shows the Earth image on the right side of the screen, as in Figure 1, with a universe of stars as its background. At the bottom right edge, you'll find the navigation bar. You already may be familiar with this from Google Maps. The arrows at the top are for rotating the globe. The plus and minus slider lets you zoom in and out. The scale ruler is at bottom left, and the Altitude in the bottom status bar shows the distance from Earth of the view.
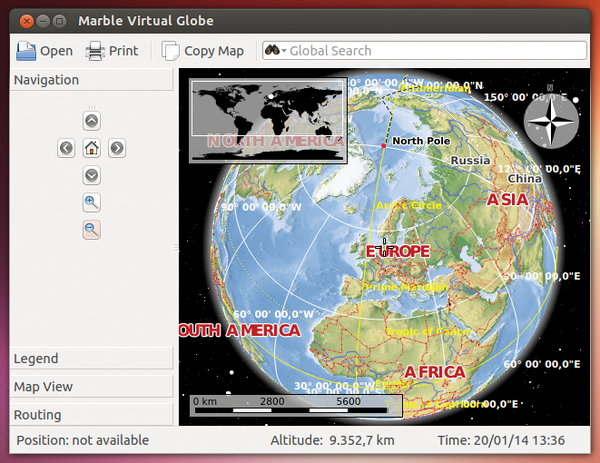 Figure 1: The Marble main window shows the globe and provides additional functions on the bottom left.
Instead of the navigation bar, you can use your mouse. Moving the mouse across the globe image turns it into a hand pointer so that you can grab and rotate the globe. The mouse wheel lets you zoom in and out. Be careful how you wield the mouse; too much movement can start the ball rolling too fast. The middle of the screen shows a small white crosshair (which, depending on the background, can be hard to detect). Where the crosshair lands on Earth is shown on the stylized world map in the upper left, and the position appears as a white dot. Double-clicking another region of the world will quickly take you there.
Sundown
When you click a city or some other location, Marble displays a window with information about the geographic point (Figure 2) from the Geonames service [1]. If the point appears beneath the compass or another element, you need to rotate the globe somewhat.
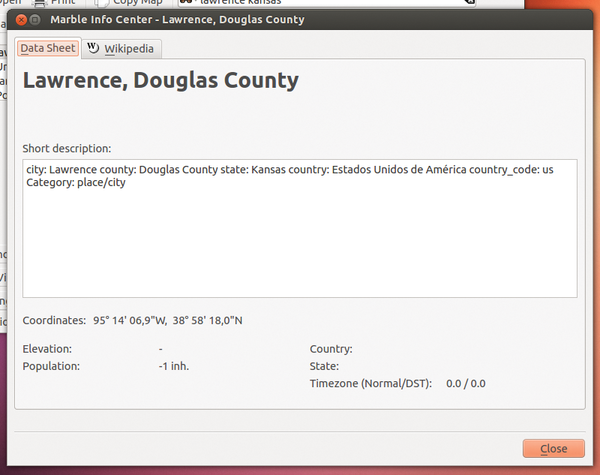 Figure 2: Information in this window comes from the Geonames service.
If the boxes for additional information bother you, click View | Info Boxes on and off to lock and unlock the info boxes. Or, you can drag-and-drop them to another place. To reach the navigation bar at the bottom right, you need to move the pointer to the edge, where it turns into a hand. You can toggle the crosshair display with View | Crosshairs .
The background stars are not just window dressing but are a true representation of the night sky. If you wish, you can turn them off with View | Stars . You can also deactivate the simulated surrounding atmosphere with View | Atmosphere , which appears as a halo around the globe in Figure 1.
Moonstruck
Marble usually shows a topographical map that you'll likely recognize from your school atlas: rivers are blue, plains are green, large cities appear as small squares. At the bottom left of the main window, on the Legend tab, you'll find the descriptions for all the symbols and colors. Here, you can remove elements from the map. If city names are a covering up a feature you want to see, remove the checkmark before Populated Regions . If you want to remove the latitude and longitude indicators, deselect Coordinates .
You can add more global maps, such as road maps, by clicking the Map View tab at the bottom left and choosing another map type. A road map appears when you click OpenStreetMap (Figure 3). As the name indicates, the data comes from the OpenStreetMap project [2]. You'll need an Internet connection to access the maps.
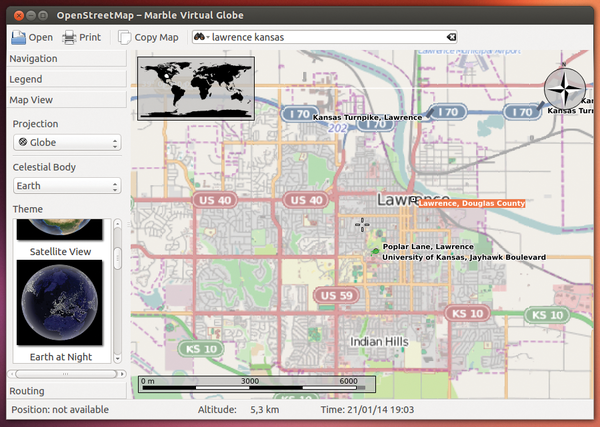 Figure 3: Marble projects the "flat" road map from OpenStreetMap on the rounded globe, which can lead to some distortion or blurring of text.
Navigating to a spot can take some time until Marble resolves it. The same goes for maps that show average rainfall. Satellite View doesn't show a current world picture but dates back to pictures published by NASA [3] in 2004. In this view, you can also see cloud cover, which you can remove with View | Clouds .
Finally, Marble shows not only the Earth but the moon. In Map View , you can click the Earth drop-down list and change to Moon . You can also use File | Download Maps to get additional maps, including quite a few exotic ones, such as historical globes, a map of climate zones, and even representations of Saturn and Mars. Once you choose a map, click Install , and it will become available in Map View .
Searching
If you're searching for a particular place, enter its name in the Search field in the upper left of the main window. Marble begins building results as you type and, as soon as you press the Enter key or choose a suggestion, a list of all possible locations appear and marks them on the globe.
The search results might come up with odd results at times. For example, Marble found several instances of Lawrence – apart from the hometown of Ubuntu User – all in different parts of the US (Figure 4). Clicking an item in the search list takes you immediately to the location, while maintaining the zoom status.
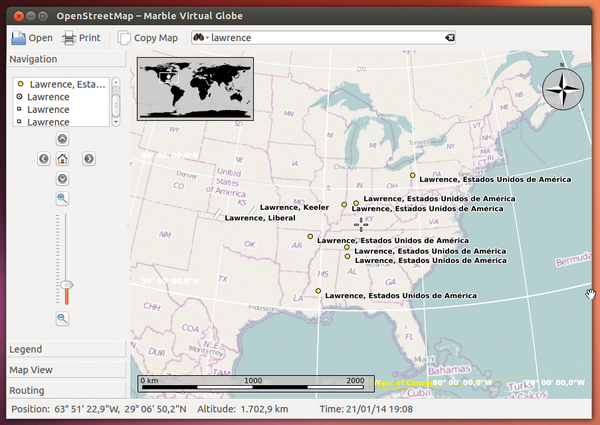 Figure 4: Lawrence is everywhere….
Clicking the house icon in the navigation bar returns you to the default view, which can be useful, for example, if you happen to land in the Sahara. The default location is about 10,000 km above Europe (as in Figure 1). To set another default location, go there in the main window and click Bookmarks | Set Home Location .
Bookmarks
In Marble, you can set bookmarks for frequently visited sites, which can be useful if you have a relative in Sydney or your geography teacher is covering a particular region of the world.
To set bookmarks, navigate to the desired spot and set an appropriate zoom level. From the main menu, select Bookmarks | Add Bookmark . Marble opens a window where you can specify a name for the bookmark in the topmost field. Wait a second before you enter a name, because Marble first suggests a name based on the geographic coordinates.
In the background, Marble also searches for the country to which the location belongs. If it finds it, Marble proposes that name instead.
To create the bookmark, just click OK . Then, Marble marks it on the map with a little yellow star (Figure 5). If the markers bother you, simply remove them by clicking Bookmarks | Show Bookmarks .
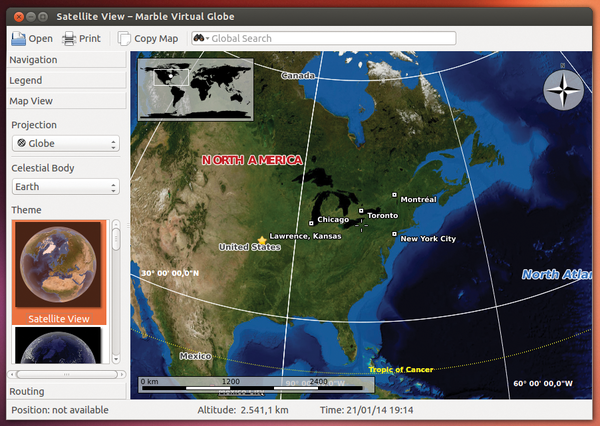 Figure 5: The yellow star marks the bookmark position. You would use pins on a real map.
You'll find all bookmarks listed in the Bookmarks menu under Standard . If you click a bookmark name, it immediately takes you there. The list can become unwieldy if you have too many bookmarks defined. You can solve this problem by organizing them into groups.
To create groups, open Bookmarks | Manage Bookmarks . On the left of the new window, you will see a list of folders.
At first, the only folder available is named Standard . Opening this folder displays all its bookmarks to the right, which you can then highlight, Edit , or Delete .
You can add a new folder using New . If a folder is already selected, the new folder becomes its subfolder. If you add another bookmark, you can drop it into one of these folders. The folders show up in the main menu as items under Bookmarks .
On Your Way
To show the route between two locations, go to the Routing tab at the bottom of the sidebar. In the A field, enter the starting location, upon which Marble lists all the matching places below it. If you click on one of them, Marble will mark it on the map.
You can alternatively enter a bookmark name in the entry field by clicking the green circle with the A in it and select the bookmark under Bookmarks . If you choose From Map , your point turns to a crosshair, and you can select the starting point location from the map. Marble then picks the nearest town and drags it into the A entry field. Marble also marks the starting point on the map with a green A icon, which you can always drag and drop to another location. As soon as the starting point is established, specify the ending point in the B field in a similar way (be sure you select the correct Lawrence).
The next step is deciding which mode of transport to adopt. In the drop-down menu under the B field, you can choose Car, Bike, or Pedestrian. With a car, you can be specific about shortest or fastest . They are not the same: A roundabout highway route can take you someplace faster than a shortest route. Try both ways if you're not sure.
Clicking Get Directions sets the route in motion and draws a blue line between the two points. Change to a road map (using View | OpenStreetMap ) so that highways are delineated and side streets are marked (Figure 6).
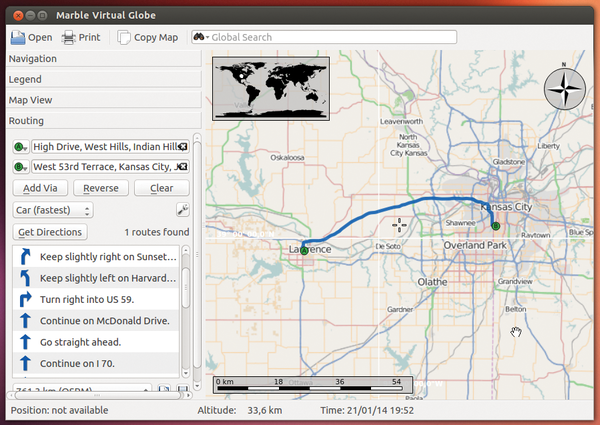 Figure 6: The selected route is displayed in blue; any alternative routes would be marked in gray.
Helper Helpers
Marble doesn't calculate these routes quite by itself; it relies on several specialized add-on modules that, in turn, consult other route planners on the Internet. In the drop-down menu under the route directions, you can switch to one of the other route planners. Not all of them provide directions, however, in which case the directions list will be empty.
To specify which services Marble should use for routing, click the wrench icon just above the directions list. Marble then shows you all the available route planners. If you don't want Marble to use a particular route, remove the check mark from it.
The available services depend on the mode of transport selected. A quick way to create a route is to right-click a map location and select Route from Here , then go to the end point, right-click and select Route to Here .
If you want to take a small side trip while traveling from A to B, you can click the Add Via above the directions to build a stop on the route. Marble then creates a third entry field, C and moves the original B entry into C so that you can add the side trip location (Figure 7). Any number of additional stops can be added in the same way.
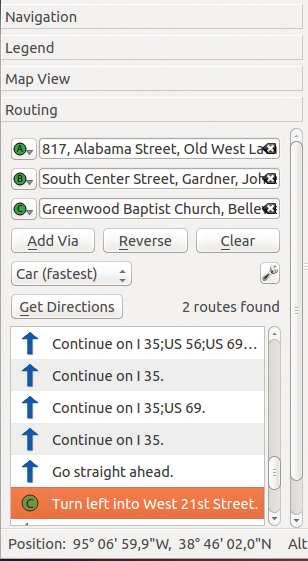 Figure 7: The route here starts in Lawrence, passes through Gardner, and ends in Kansas City.
You can do it even faster. Positioning the mouse on the blue line turns the pointer to a flag. Clicking creates a way station along the route. You can drag and drop to relocate the start, way station, and end points as much as you like. Marble adjusts the route accordingly.
To delete a location, click the X to the right of the routing entry field or right-click the green circle on the map and select Remove this destination from the context menu.
Downhill
Elevation profiles are useful for bike tours. If you have a route planned, click View | Info Boxes | Altitude Profile . The upper part of the map now shows the altitude profile. If you hover the mouse over it, Marble shows the exact altitude at each point and marks the location on the map (Figure 8).
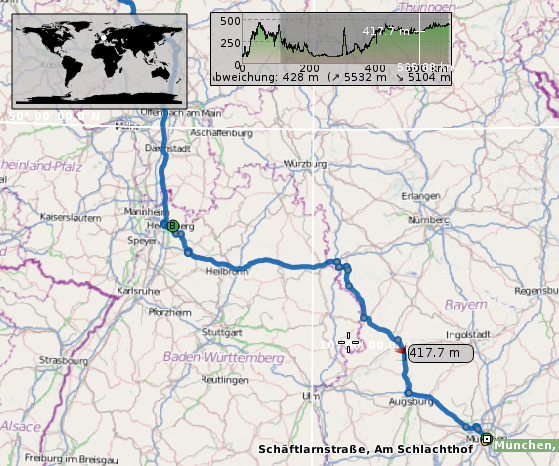 Figure 8: The location marked with the altitude profile is about 400 meters above sea level. The altitude marker is in gray on the map.
To make the return trip, simply click the Reverse button in Routing above the directions, in which case Marble reverses the route. As soon as you establish the route, save it as a KML (Keyhole Markup Language) file by clicking the disk icon. Both Google Earth and Google Maps use this file format. If you want to reload a route later, click the icon with the Open Route folder; to remove the blue line and the route, click the little red X symbol.
Keeping Your Distance
The map scale at the bottom left corner of the map provides a first estimation of distances. To get a more exact distance between two spots, right-click the first location and select Add Measure Point , then right-click the second location and again select Add Measure Point . Marble draws a red line between the two points and labels it with a distance.
More of the same will add further measure points, and Marble will show the total distance in an inset map in the upper left. You can remove the last measure point by right-clicking anywhere in the map and selecting Remove Last Measure Point from the context menu. Remove all the measure points by selecting Remove Measure Points from the context menu.
Using the File | Export Map menu item, you can save the current image as a PNG or JPEG file. Alternatively, use Edit | Copy Map to copy a screenshot of the map to the clipboard and use it as you please.
If you simply want to apply only the geographic coordinates in another application, right-click the map location and select Copy Coordinates , which copies the coordinates to the global clipboard.
Viewpoint
Marble provides still more functions. For example, it can tap into additional information sources from various online services. If, in View | Online Services , you select Wikipedia , Marble adds the W symbol at certain locations. Clicking the symbol opens the corresponding Wikipedia article.
If your system has a GPS receiver or you're racing the FlightGear flight simulator across the globe, Marble can show your current location on the map. The Location tab includes all the necessary functions. You can also actively participate in creating maps by clicking Edit | Edit Map to open the map in an external editor.
More details for these functions are available online in the (somewhat outdated) Marble documentation [4]. The webpage also provides access to a users forum and FAQ.
Infos
- Geonames: http://www.geonames.org
- OpenStreetMap: http://www.openstreetmap.org
- NASA Blue Marble Project: http://earthobservatory.nasa.gov/Features/BlueMarble/
- Marble handbook: http://marble.kde.org/documentation.php