Adding new functions with GIMP plugins
GIMP developers don't integrate many complex functions into GIMP itself; rather, these elements are stored in external plugins. Thus, the GIMP code base can remain lean. Additionally, there's always the chance that not even core team programmers use the plugin interface to add enhancements. For simple extensions, the scripts written in Script-Fu often suffice, but they don't provide preview capabilities and are limited in their execution speed.
Script-Fu also provides a challenge even to experienced programmers with its Scheme dialect as a Lisp variant. Plugins, on the other hand, can be written in C, C++, Python, Lua, Ruby, Perl, and other languages. As binaries, they are nonetheless bound to specific GIMP or operating system versions and need to be updated along with them.
Moreover, some of the plugins may lack some fine-tuning so they might crash from time to time – especially with larger images. When this happens, an error message will identify the problem, and the crash usually will not affect GIMP's stability, even though the error message may suggest otherwise. If you want to create your own plugin, GIMP developers provide a three-part How-To page [1], although they still have some catching up to do with new GEGL developments.
GIMP looks for plugins in the home directory under ~/.gimp-2.8/plug-ins/ and in the system directory under /usr/lib/gimp/2.0/plug-ins/ . For GIMP to be able to run the extensions, you need to set the execution privileges to chmod +x ~/.gimp-2.8/plug-ins/* . The system-installed plugins using the package manager already have the proper privileges.
The Plug-in Browser (Figure 1) from the Help menu provides information about all available plugins and tells you where the extension is located, with <Image> representing the image window.
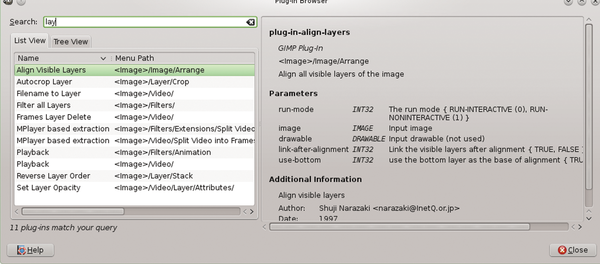 Figure 1: The plugin browser displays all the current plugins with their versions and a short description.
Installing Plugins
Developers deliver many plugins as source code so they can easily be integrated into many platforms. Unless the documentation tells you otherwise, you should install gimptool-2.0 along with GIMP to enable the plugins (see the "Tip" box for more information).
Tip
Because compiling and libraries are easy to handle in Linux, plugins can be quickly created, but they cannot be created as easily in Windows. If you need to use GIMP in Windows, the GIMP Extensions Pack for Windows [2] can help with many fully compiled plugins.
To install the C source plugins, proceed as follows. First, install the required libraries and tools for the build process using
$ sudo apt-get install build-essential libgimp-devel
at the command line.
Next, compile the plugin with the following command (although some developers prefer using the three-way command ./configure && make && make install instead).
$ gimptool-2.0 --install plug-in.c
Using --build instead of --install builds the plugin without installing it. Using --install-admin installs the plugin system-wide in /usr/lib/gimp/2.0/plug-ins/ (requires superuser privileges). Other compiler and linker options include --cflags , --libs , and --prefix=<prefix> or --exec-prefix=<prefix> . The --uninstall-bin <plug-in> or --uninstall-script <script> options uninstall a plugin or corresponding script.
Popular Plugins
Some plugins are especially popular among GIMP users because they provide especially useful functions. One of the most important and powerful plugins is G'MIC [3]. The scope of functionalities of this tool is so immense that the article in the GIMP Handbook (January, 2014) can only begin to scratch its surface. G'MIC not only includes many different functions for editing images but also implements new layer modes not included in the GIMP kernel. G'MIC is itself an interpreter for its own scripting language for image editing.
To manipulate RAW images, GIMP usually defers to UFRaw [4]. Some of the other specialized file formats, such as the OpenRaster format used for MyPaint, can be integrated through plugins [5]. Even the WebP format promoted by Google has its corresponding plugin [6].
Considered almost indispensable is the Layer Effects [7] plugin that provides classic effects such as inner and outer shadows and halos for transparency layers. Although usually developed for text layers, the Layer Effects performs create great visual effects on other layers as well. The plugin is available for Script-Fu or, preferably Python, because it works faster and has a preview feature.
Of equal importance is the GIMP Animation Package (GAP) [8] [9] that was developed for editing videos and creating larger animations. This is a comprehensive package that requires a bit of training to use. You might be better off for small animations with the Advanced Animation with GIMP [10] package.
Plugins for Enhanced Effects
Several plugins reimplement existing GIMP tools, however, they always offer enhancements or expanded functionality. For example, tools normally act globally when they set an image's contrast. If they find a totally white pixel (255,255,255) and a totally black one (0,0,0) in the image, they'll reasonably interpret these as the maximum image contrast.
The human eye, however, interprets closely positioned contrast differences as more strongly contrasted than ones that are farther apart. The "Adaptive Contrast Enhancement" method takes this into account so that a completely different contrast distribution can occur in the image. The gimp-ace2 [11] plugin implements this method.
The unsharp mask (USM) option in the Filter menu under Improve … is the most often used tool to improve image sharpness. The Advanced Unsharp Mask (AUMASK) [12] feature provides a better version of this tool (Figure 2). Under Output mode: , you set how the plugin shows the results, as a new image, mask, or deltas. The Mask options set how AUMASK works, and the other parameters set the strength. With Export as new layer , you can render the result as a new layer while leaving the original layer unchanged.
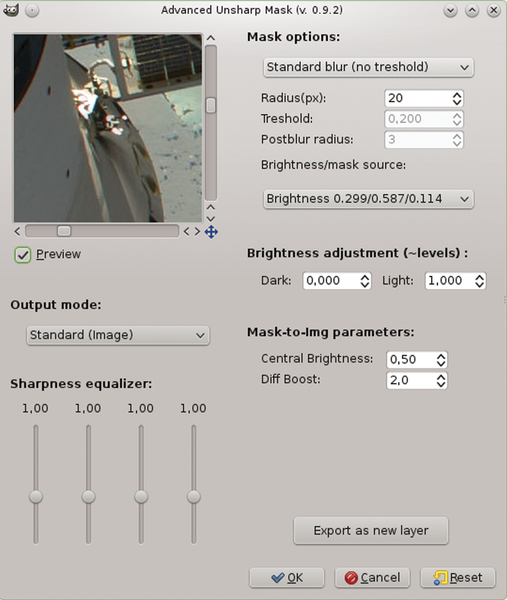 Figure 2: The Advanced Unsharp Mask, with a "synthesizer" and enhanced settings, allows better control and results than the standard USM.
Focus Blur [13] has just the opposite result. This type of blur simulates or controls the depth of field (DOF) [14] according to an algorithm that is based on the human eye, and it can lead to some quite convincing results. It requires much more processing power than the standard Gaussian blur, though.
This plugin's special feature is the fact that the exact course of the blur is set with a mask (Figure 3), which naturally affects other areas as well. The weight of the mask is controlled by Focal depth and Peak Radius for Shining .
 Figure 3: Focus Blur tries to simulate human eye perception. The blur can be adjusted using a self-defined "Use Depth map" mask.
Beautify
The Beautify plugin [15] installs in the Filter menu, under Beautify . It has three entries: Border (for various surface simulations, similar to Decorations ), Beautify… (for different color and character filters), and Skin whitening… (for editing skin tones). The plugin actions can also be performed manually but are presented in an orderly way with many variations, which makes work easier. Many of these actions modify the current layer, so it's best to test them on a transparent layer (for frames and effects) or a layer copy (for other actions) whose opacity can be adjusted. You can combine actions or apply them consecutively on the same layer.
The Border menu has three entries. Rip Border… edits the current layer by overlaying it with a same-sized pattern, Simple Border (Figure 4) works similarly, but it enhances the image with a simple picture frame. The image thereby is not reduced in size, but increases in total image size to the width of the frame. Many more frame shapes are available in Decorations in the Filter menu.
 Figure 4: Many more effects and frames are available.
With Texture Border (Figure 5), you can apply a third group of overlays in the current layer that, for example, resemble splintered glass or folded, faded, or soiled paper or peeling paint. The texture quality is quite high so you can use the textures for larger images.
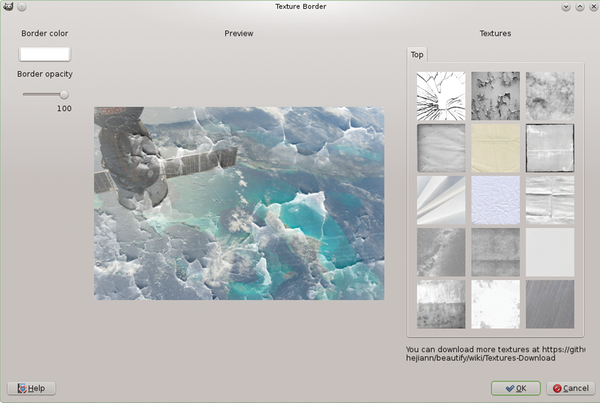 Figure 5: Beautify combines the filters in multiple windows, and each filter provides previews that can be adapted (left) and even combined.
These functions operate directly on the image layer. It's often a good idea, therefore, to copy the current later (with Ctrl+Shift+d) or generate a new working layer (with New from visible ) before applying the functions. The Reset button always undoes all the actions; a step-by-step Undo is not possible. The windows collects the tools onto the following six tabs:
- Basic: Basic operations that adjust the images in subtle ways.
- LOMO: Produces LOMO (lomography) effects in various combinations (see Figure 6). The HDR effects simulate them but only with limited success.
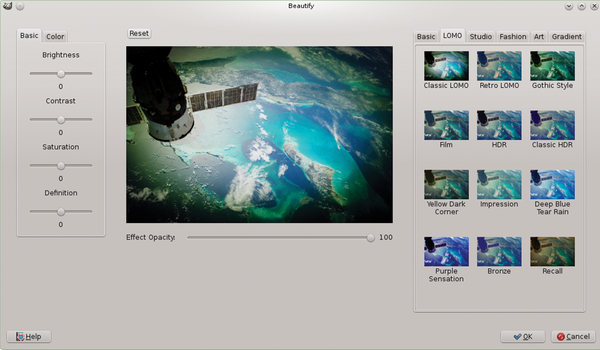 Figure 6: LOMO effects emerge with distinct vignettes and relatively intensive and dark colors.
- Studio: Many color modifications, some of them in special modes (HSV, LAB), from "Elegant" to "Cold."
- Fashion: Adorns images with different light reflections or water drops.
- Art: Allows an "artistic" transformation of images, such as a line drawing or relief. The line drawings are of particularly good quality, often better than what other filters can produce (Figure 7).
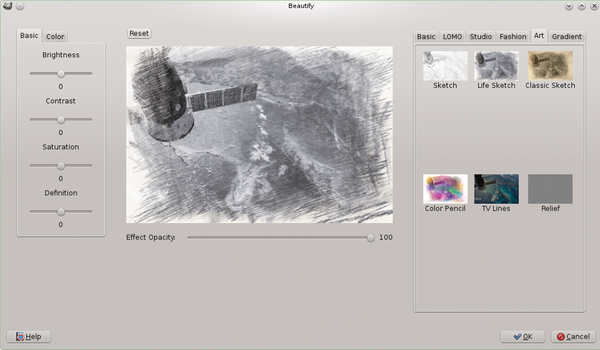 Figure 7: Beautify creates line drawings of high quality.
- Gradient: Superimposes various color gradients on the image.
The second menu item, Beautify… , contains a comprehensive tool for quite diverse and different manipulations. When loading the tool, GIMP first generates a set of previews for the various effects. You can then use them on your current layers.
The Skin Whitening… (Figure 8) menu item is used for lightening skin tones (the plugin's author is Chinese, where light skin stands for youth and beauty). Before using the filter, make a careful white balance, again working with a layer copy. It can also be a good idea to select a smaller image region to work with.
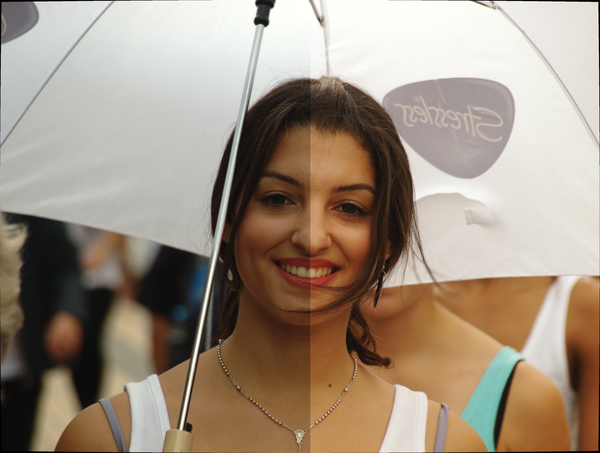 Figure 8: The effect of the "Whitening" pattern ranges from subtle to over-the-top but can improve images throughout.
Batch Converter
GIMP is designed to work on individual images. If you want to work on many images with the same tools and settings, two plugins are available: DBP (David's Batch Processor) [16] and BIMP (Batch Image Manipulation Plugin) [17]. Both plugins provide an extensive array of preset tools that work on images in sequence based on the same settings. You can find DBP (Figure 9) in the Filter menu under Batch Processing… . You can choose from a small selection of standard tools, such as for rotating, scaling, and sharpening images.
 Figure 9: DBP is simple and clear but without many features.
BIMP goes a step further (Figure 10). Apart from the usual tools, the plugin allows you to use your favorite GIMP functions and apply them to the loaded images, with the desired parameters set in advance. (See the "Installing BIMP" box for installation details.)
 Figure 10: BIMP provides more manipulation opportunities than DBP. Especially interesting is the ability to use a freely selected function.
Installing BIMP
You won't find BIMP in every repository. Fortunately, installation is really easy. First, unpack the archive, in the directory of your choice, for example $HOME/Downloads/BIMP , and run
$ make
$ make install
to install the plugin for your user. Or, you can do
$ make
$ sudo make install-admin
if you want to install the plugin system wide.
You can largely ignore warnings. You'll then find the plugin entry in the File menu under Batch Image Manipulation… .
RAW images are easily managed by GIMP with the UFRaw plugin. For large numbers of images, however, using UFRaw on each one is a cumbersome process, because each image must first be loaded manually with the desired settings made in advance. Thus, a special version of the program, ufraw-batch , is available on the command line to work on any number of RAW images automatically.
The ufraw-batch -h command gives you a summary of options. Some especially interesting ones include --exposure=auto for automatic exposure corrections and --black-point=auto for automatic determining of black points, which is often a good idea. The --wb=camera command uses the white balance of the particular camera, and --wb=auto determines it on its own. The best choice depends on the image.
The --base-curve= switch takes one of the following arguments: manual , linear , camera , custom , or the name of a previously loaded and defined curve. This setting controls the "base curve," that is, the basic recalculation of image brightness before other corrections occur. It needs to be defined only once per camera model. The following options determine the form of the output file: --shrink=<factor> sets a reduction factor, --size=<width x height> explicitly defines the size, and --out-type=<types> sets the output format (which is specified as ppm , tiff , tif , png , jpeg , jpg , or fits ).
Fourier and Wavelets
An important aspect of image processing is (mathematical) transformation known as Fourier transformation (Figure 11), without which many further procedures wouldn't be possible. You can apply Fourier transformation explicitly with the Fourier plugin [18]. The plugin provides two functions (under Filter | Generic ): Fourier Forward converts the current layer or selection into its Fourier representation, with which you can perform the desired editing. For example, you can introduce a copyright symbol that "survives" any scaling, rotating, or cropping. Fourier Inverse reverts to the visible RGB image that should hardly differ from the original.
 Figure 11: The original image (upper half) and its Fourier representation (lower half).
Fourier analysis is interesting mainly for specialists, but the wavelet filters based on it are useful for all kinds of effects. Wavelets [19] are curves used for displaying and editing different-sized details in images. Three plugins are available that use this method.
The Wavelet Decompose [20] plugin, which you can find in the Filters | Generic menu, creates an image copy with (by default) seven layers (Figure 12). The "Original" layer contains the original image for comparison purposes. The "Wavelet Scale 1" through "5" layers contain the image details in five different sizes. "Wavelet Residual" sums up the remaining image details. You can edit each later separately with special effects, or you can save copies of individual layers in the stack. Note that the layers lie on top of one other in the "Grain merge" layer mode to present the image as a whole. The Wavelet Denoise plugin [21] was developed especially for denoising images (Figures 13 and 14).
 Figure 12: Wavelet Decompose shows clearly how wavelets work and can be applied. The layers contain details of various sizes. You can modify each layer separately or remove them entirely.
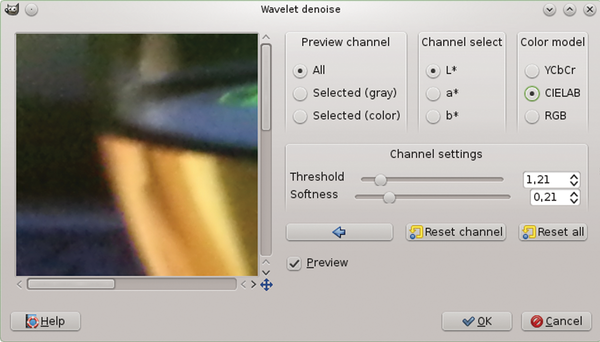 Figure 13: Wavelet-based denoising is applied to separate channels and therefore usually renders good results without color fringing. The "softness" acts as a threshold and controls the denoised region.
 Figure 14: Results of wavelet denoising are usually quite good because they're usually barely noticeable. Only with high magnification can you tell that the usual "snow" is missing (inside the highlighted region).
The denoising also implicitly affects sharpening of the image. Some images show that higher Threshold along with increased Softness can yield good results. This filter behaves quite differently from, for example, the unsharp mask . The marcor plugin is especially meant for sharpening with wavelets (Wavelet sharpen [22]).
The default settings for Sharpen luminance only (Figure 15) should typically be enabled because they prevent color aberrations. You can determine the "strength" and "radius" values based on the preview.
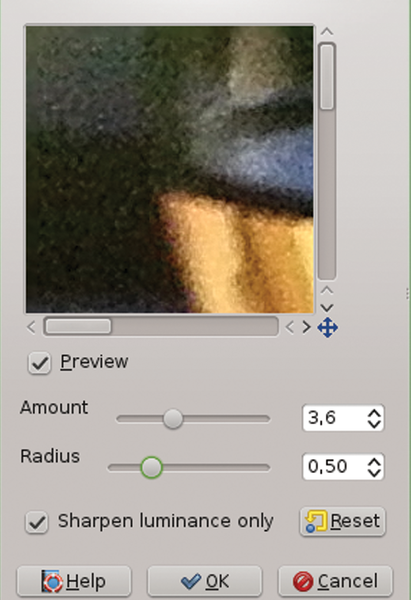 Figure 15: Pure wavelet sharpening also reduces noise. The results are even better with "denoise" applied beforehand.
 Figure 16: The Refocuse plugin can lead to very different results based on parameter settings. Because of the processing needed, new previews have to be refreshed manually.
Rescale, Texturize, and Synthesize
Rescaling images might be an easy action for users, but it can result in some quirks on closer inspection. One of these relates to so-called gamma errors [25]. A good solution for GIMP is ImageScaler [26] [27].
The Imagescaler plugin (Figure 17) is based on Python and C, but it is woefully slower in execution than the generic code. For interpolation, the plugin provides the existing GIMP algorithms from "none" to "cubic." Meanwhile, the "error" in the gamma treatment was reported as a bug and will be taken into account with the next version of GIMP.
 Figure 17: This plugin allows scaling considering the gamma value.
Two solutions to a different aspect of scaling are handled by Upsize [28] by Adam Turcotte. When enlarging images, either artifacts can be minimized or the sharpness can be optimized. Special algorithms exist for both methods: "Interpolatory Box Filtered Natural BiQuadratic Histosplines" for soft transitions and "Natural BiQuadratic Histosplines" for optimal sharpness, but they don't belong to the GIMP standard. The Upsize plugin implements them both.
Installation is easy with gimptool-2.0 --install upsize_0.c , assuming the required packages are present. The associated menu item appears as Upsize in the Image menu. The results of these plugins are readily apparent, as a direct comparison shows (Figure 18).
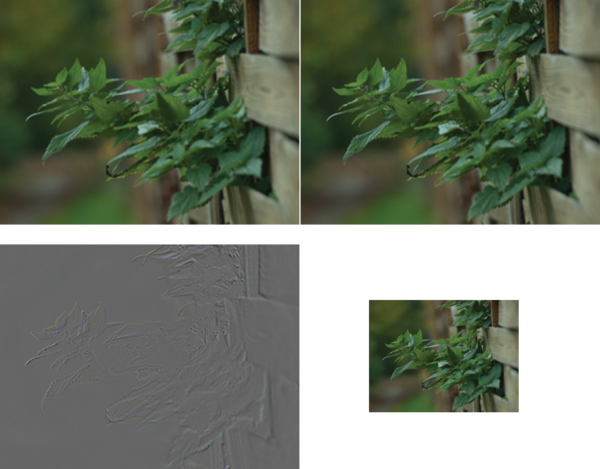 Figure 18: Soft scaling and optimized sharpness are shown compared with the original image.
For images in PPM format, there are two standalone programs of this plugin. The source code is at the same URL [28], but you have to grab the eanbqh.tar.gz file. The installation requires you to compile with GCC using the following:
$ gcc -o eanbqh8 eanbqh8.c -fomit-frame-pointer -O2 -Wall -march=native -lm
after unpacking for the 8-bit version and
$ gcc -o eanbqh16 eanbqh16.c -fomit-frame-pointer -O2 -Wall -march=native -lm
for the 16-bit version.
These applications are easy to use. Typing
$ eanbqh8 input.ppm output.ppm -h width
scales to the desired width, while
$ eanbqh8 input.ppm output.ppm -d width x height
scales to the desired format. Using
$ eanbqh8 input.ppm output.ppm -s factor
and
$ eanbqh8 input.ppm output.ppm -p percent
scales using a scaling factor and a percentage, respectively.
Scale2x [29] from Trialforce was specially developed for scaling smaller bitmaps to a factor of two. The project is currently hosted at SourceForge [30], which has further details.
The Liquid Rescale [31] lets you adjust the width of selected regions of an image and remove undesired elements unobtrusively. The plugin analyzes the image so that the regions with "minimal energy" are recognized as lines. You can find a full explanation of how this works online [32].
Creating Textures
Textures are patterns that – despite looking repetitive – don't have any periodicity. In the past, it was common to look to nature for suitably large images. Then, an attempt was made to mix different parts of the pattern to increase the size. Today, special algorithms do the job.
Manu Cornet [33] together with Jean-Baptiste Rouquier developed the Texturize plugin [34] especially for this purpose. The algorithm uses quite a bit of processing, so creating a pattern can sometimes take hours. The plugin omits a preview for that reason. It's best to experiment with smaller patterns first before graduating to larger ones.
The algorithm cannot create output images with alpha channels. If the margins are of uniform color, however – preferably a color not found in the motif itself – they can be quickly removed with the (global) color selection if needed. High values for the overlap have better results, but they also have a more pronounced tendency to periodicity, as Figure 19 shows.
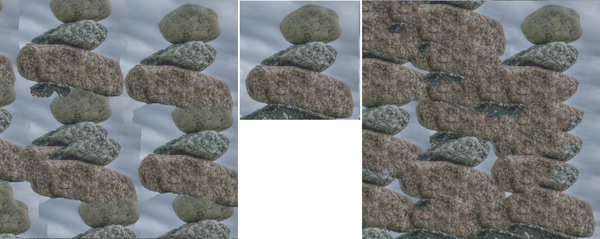 Figure 19: The influence of overlapping appears in this example: default value (100), output image, and increased overlapping (300).
A similar approach to that of the Texturize plugin is used in the Resynthesizer plugin [35]. This plugin has its own homepage [36] that describes its features. There are three basic applications for this plugin:
- Small textures can be enlarged virtually in any way, as with Texturize.
- Unwanted objects can be removed from images by being obscured by surrounding material.
- Textures can be applied to images so you can modify them.
The Resynthesize option can be found under Filters | Map . The plugin operates over a two-part interface (Figure 20). Figure 21 shows its effect and the influence of its parameters.
 Figure 20: The standard GUI of the Resynthesize tool displays all functions on two tabs. The options under "Tweaks" control the algorithm in detail.
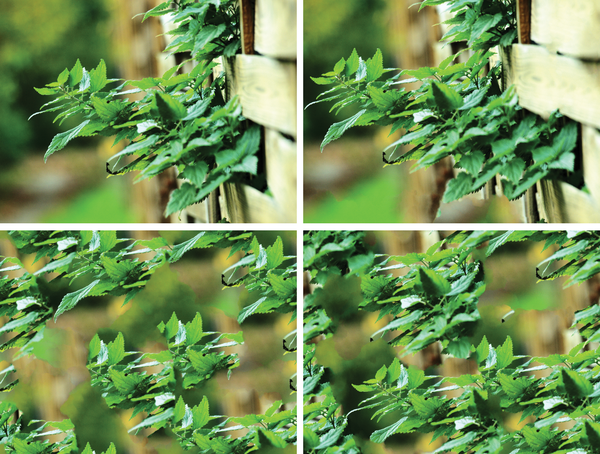 Figure 21: The Resynthesize tool in action. The original image is shown above left and next to it with the option Fit output to bordering pixels. Below left shows the Make horizontally tileable and Make vertically tileable options, together with Fit output to bordering pixels on the right.
The additional features are in several scripts: smart-sharpen uses Resynthesize to sharpen the image, smart-enlarge reduces and enlarges images and smart-remove allows removing image sections (Figure 22). This script adds the Heal Selection… to the Enhancements menu. The plugin version hosted by GitHub [37] includes a few extensions. A different approach to removing offending parts of images comes from Interpolate [38]. The application has a tutorial that can be found online [39].
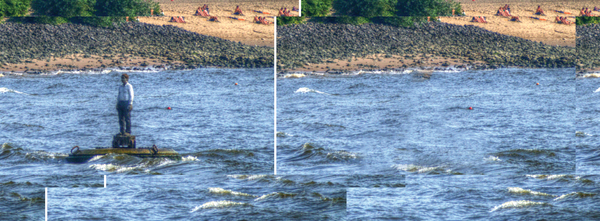 Figure 22: Heal Selection and other processes often create amazing results. Minor artifacts are still visible but only if you carefully compare the modified image to the original. These can often be eliminated with little handiwork (and with the clone, heal, and blur tools).
In Perspective
Perspective corrections, such as for landscapes or architectural photos, are usually done with the corresponding GIMP tools. For specific tasks, Nils Barth developed a slightly different method with EZ Perspective [40]. This tool's main disadvantage is its missing preview, so parameters have to be experimented with (remember that Ctrl+z is the undo function and Ctrl+y is the redo function). Ctrl+Shift+f refreshes the input window for making new parameter changes (Figure 23). The easiest way is using the arrows and Tab. Use the "fast" quality before you can use "good" for the final output.
 Figure 23: EZ Perspective is not very intuitive, but it is powerful.
Using EXIF data and the crop factor, you first set the 35 mm Equivalent Focal Length for the current image. The exiftool can provide the corresponding values in a line like:
Focal Length: 42.0 mm (35 mm equivalent: 84.1 mm)
The tilt and yaw angles are determined first, then the rotation. A grid can help, which you can get from the View menu as Show grid .
Before doing any perspective corrections, correct the pillow and barrel shaped distortions with GIMPLensFun… (found under Enhance ) or the Lens Correction filter (found under Distort , both in the Filters menu).
GimpLensfun [41] is a great little plugin that works largely automatically (Figure 24). In an ideal situation (normally with JPEG images), you'll find the information as EXIF data in the image file. GIMP provides access to this data from its File menu under Image Properties | Advanced (Figure 25).
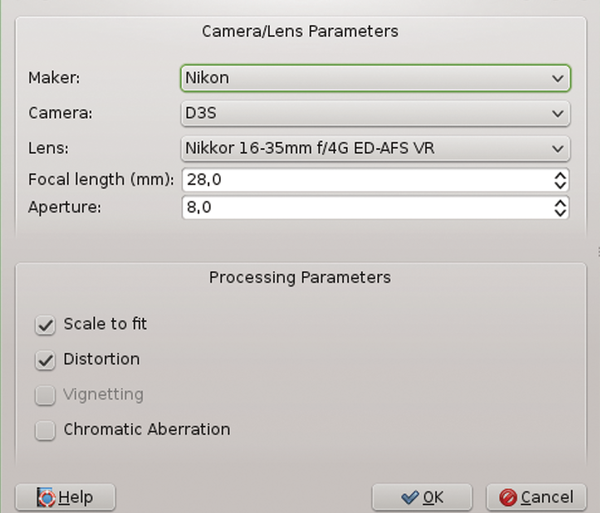 Figure 24: GimpLensfun allows largely automatic correction of pillow and barrel-shaped distortions caused by lenses.
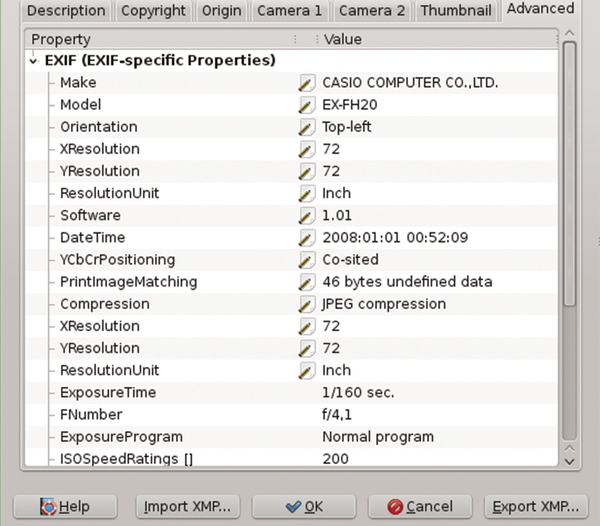 Figure 25: The EXIF data in the file properties reveals essential properties that depend on the lens manufacturer and the GIMP version.
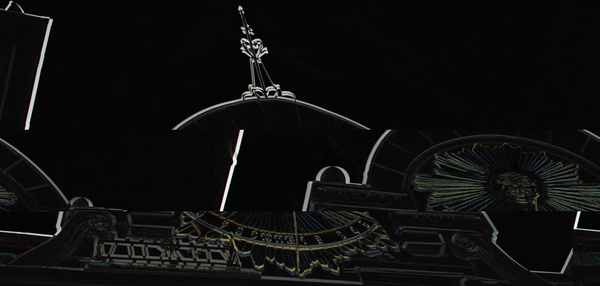 Figure 26: The effect of the GimpLensFun plugin becomes evident when you overlay the original image with the corrected version and show the differences in layer mode. The differences increase with the distance from the center.
 Figure 27: The Toy plugin creates the tilt-shift effect with just a few steps.
The Heatmap [47] plugin from elsamuko simulates images created with an infrared camera. A normal image is converted to the YUV color space, and the coordinate system is rotated by 30 degrees. The U channel is then transformed into an 8-bit integer range. The results are amazingly realistic (Figure 28). Typing the following command:
$ gimptool-2.0 --install elsamuko-heatmap.c
will create the Heatmap entry in the Color menu.
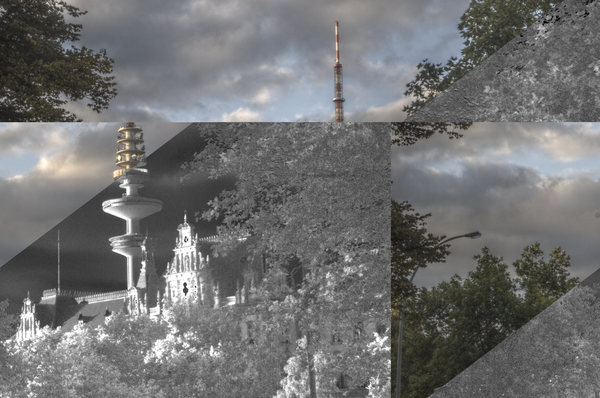 Figure 28: The images created with Heatmap look very much like infrared shots.
Conclusion
GIMP can be extended with plugins in many ways. The plugins often just take over the computationally-intensive functions. Scripts are then sometimes used for the GUIs. A second great advantage to plugins is the possibility of implementing a preview that often greatly simplifies using it.
It's worthwhile experimenting with the variety of plugins for GIMP that often provide useful and interesting functions. Additional information about GIMP and its functionality can be found in the GIMP Handbook [48].
Infos
- Plugin development: http://developer.gimp.org/plug-ins.html
- GIMP Extensions Pack for Windows: http://registry.gimp.org/node/27656
- G'MIC: http://gmic.sourceforge.net
- UFRaw: http://ufraw.sourceforge.net
- OpenRaster format: http://registry.gimp.org/node/18435
- WebP format: http://registry.gimp.org/node/25874
- Layer Effects: http://registry.gimp.org/node/186
- GAP for Linux: http://ftp.gimp.org/pub/gimp/plug-ins/v2.6/gap/
- Extrude for Windows: http://registry.gimp.org/node/1839
- Advanced Animation with GIMP: ftp://gd.tuwien.ac.at/graphics/gimp/manual/GUM/Animation.html
- ACE2: http://registry.gimp.org/node/20
- AUMASK: http://registry.gimp.org/node/25326
- Focus Blur: http://registry.gimp.org/node/1444
- Depth of field: http://en.wikipedia.org/wiki/Depth_of_field
- Beautify: https://github.com/hejiann/beautify
- David's Batch Processor: http://members.ozemail.com.au/~hodsond/dbp.html
- BIMP: http://registry.gimp.org/node/26259
- Fourier plugin: http://registry.gimp.org/node/19596
- Wavelets: http://en.wikipedia.org/wiki/Wavelet
- Wavelet decompose: http://registry.gimp.org/node/11742
- Wavelet denoise: http://registry.gimp.org/node/4235
- Wavelet sharpen: http://registry.gimp.org/node/9836
- Wiener filter: https://en.wikipedia.org/wiki/Wiener_filter
- Refocus plugin: http://refocus.sourceforge.net/doc.html
- Scaling and gamma: http://www.4p8.com/eric.brasseur/gamma.html#introduction
- Imagescaler: https://blog.hartwork.org/?p=1173
- Imagescaler download: http://hartwork.org/public/imagescaler-0.5.tar.gz
- Upsize: http://registry.gimp.org/node/19582
- Scale2x: http://registry.gimp.org/node/24746
- Info on Scale2x: http://scale2x.sourceforge.net/
- Liquid Rescale: http://liquidrescale.wikidot.com/
- Seam carving: http://en.wikipedia.org/wiki/Seam_carving, http://www.imagemagick.org/Usage/resize/#liquid-rescale
- Manu Cornet: http://manucornet.net/
- Texturize: http://registry.gimp.org/node/77
- Resynthesizer: http://registry.gimp.org/node/25219
- Info on Resynthesizer: http://www.logarithmic.net/pfh/resynthesizer
- Resynthesizer Github version: https://github.com/bootchk/resynthesizer
- Interpolate: http://stamit.gr/gimp/gimp-plugin-interpolate/
- Interpolate Tutorial: http://stamit.gr/gimp/gimp-plugin-interpolate/instructions
- EZ Perspective: http://registry.gimp.org/node/24537
- GimpLensfun: http://registry.gimp.org/node/25805
- Adding to GimpLensfun: http://libregraphicsworld.org/blog/entry/creating-lens-distorsion-models-with-hugin-lens-calibrator
- GimpLensfun: http://seebk.github.io/GIMP-Lensfun/
- Tilt-shift effect: http://en.wikipedia.org/wiki/Tilt-shift_photography
- Toy plugin: http://registry.gimp.org/node/25803
- Toy plugin download: http://registry.gimp.org/files/gimp-plugin-toy-1.0.4.tar.gz
- Heatmap plugin: http://registry.gimp.org/node/27651
- GIMP Handbook : http://www.linux-magazine.com/Resources/Special-Editions/16-GIMP-Handbook