Designing Celtic knots with Knotter
When Linux users think of vector graphics, Inkscape usually comes to mind. Knotter [1] is different: It was created especially to create Celtic knots (Figure 1). The application puts no limits on your creativity and is ready with various knot concepts to help you create a variety of patterns.
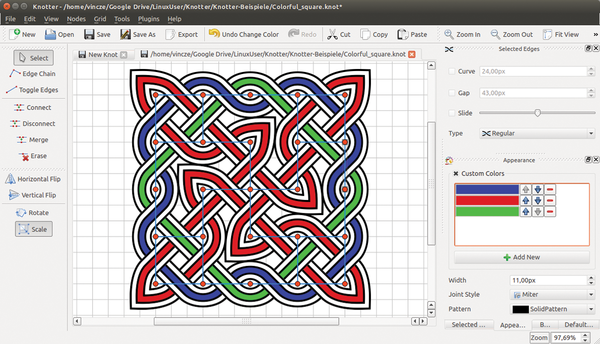 Figure 1: With a little practice, you can design complex, braided knot patterns with Knotter.
Installation
Knotter is downloadable as version 0.9.6b. Despite its beta status, the software proved to be fully functioning and stable in my test. Installation packages in DEB format for distributions such as Ubuntu and Linux Mint are available from SourceForge. Double-clicking on the package installs it.
If a suitable package doesn't exist for your particular distribution, you can compile it from the sources. Download them and unpack the tarball. Open a console in the newly created directory and enter ./configure.sh && make . Then, install the software with root privileges using make install .
First Steps
After startup, you can use Edit | Preferences to configure the program settings. On some systems, Knotter's interface might seem a bit dated. You can change this by clicking the Interface button at the bottom and changing the Widget Style selection to, for example, Clearlooks . Although localization is possible in Language , some languages are not available, so the program interface is mainly in English.
In my test on Ubuntu 14.04, the tooltips weren't working. However, clicking Toolbars | Toolbar Button Style | Text Beside Icon made things understandable.
You can start your first knot pattern with the Edge Chain tool that you can find in the tool palette on the left. To begin, position single points on the working surface clicking with your mouse to create a pattern. After setting a few points, the software automatically creates the first knot pattern and lines (Figure 2). To change the pattern, you can add another point on the line between two others.
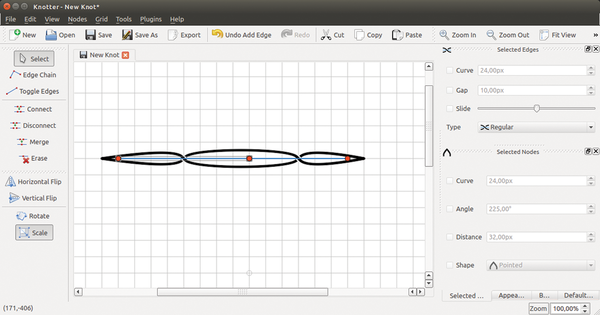 Figure 2: All you need are two points on the work surface to create a simple line pattern.
The resulting pattern can then be manipulated using other tools. With Toggle Edges , you can remove the edges between two points without losing associated nodes. With the Undo (Ctrl+Z) function, you can undo work steps.
If you want to connect two previously unconnected nodes, highlight them with the select function and click Connect . Alternatively, reduce multiple points to one with Merge or erase selected points with Erase .
Node and Edge Properties
You might quickly find that creating a beautiful pattern isn't all that easy. To enhance your first knots, Knotter provides a few useful settings, starting with the node and edge properties, which are located on the right side of the program window.
After selecting a node at the end or corner of a pattern, you can change its shape using Shape | Selected Nodes (Figure 3). Use other properties to control the Curve , Angle , and Distance of the pattern corner to the point.
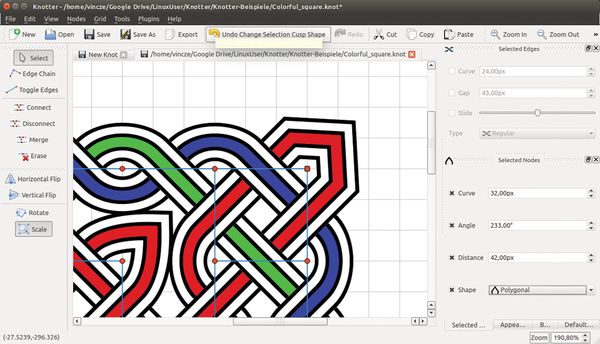 Figure 3: Modify your pattern using node and edge properties.
Setting the edge properties is similar. Using Selected Edges , you can again set the Curve property. Type lets you modify the edge lines. You decide if you want the lines to touch or if Knotter should separate them.
In the Action History , Knotter lists each task action you've taken. This allows you to revert to a previous step and start from there again. Be careful, though: All the steps following the reverted one will be lost.
To support the design process, by default, the work area shows a grid that can help you design symmetrical patterns. You can hide the grid or adapt it your purposes through View | Dialogs | Configure Grid . The Configure Grid dialog then opens on the right in the Action History area.
You activate or deactivate the grid with the check box next to Enable Grid . With Size , you can set the size of the grid units. Because complex knot patterns can involve minute details, it's a good idea to change the grid pattern. Under Shape , you can find two different triangle grids to set as an alternative.
To enhance your pattern further, add a customized background with Background . This opens another dialog in the Action History area. Here you can add a background color or image.
Formats
Knotter stores its graphics in its own .knot format. Optionally, you can save the knot images as XML. To continue using the artwork, Knotter provides an export function under File | Export or Ctrl+E.
In the Export Image that opens, choose whether you want the knot pattern to be exported as a lossless, scalable vector graphic or in the PNG, JPG, or BMP raster format (Figure 4). Regardless, the export lets you set two significant parameters that can affect the outcome.
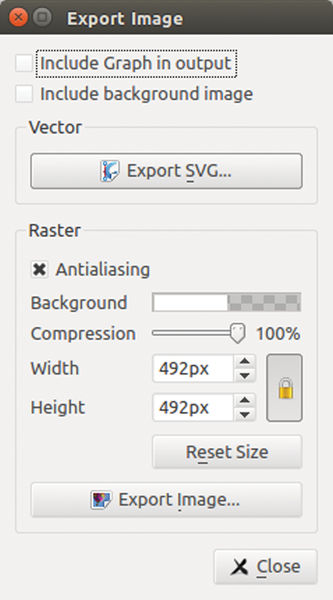 Figure 4: With the export function, you can save your designs as vector graphics or in a raster format such as PNG.
Using Include Graph in output , you can include the red points and blue lines that Knotter shows for creating patterns in the export. If you have a background graphic, using Include background image lets you export it as well.
Exporting as an SVG graphic requires no further settings. All it takes is clicking the Export SVG button and giving a storage location and filename. Because of a bug, you need to include the .svg filename extension or the export won't work. The same goes for raster graphics, where you need to add the appropriate filename extension.
A strange phenomenon occurred in openSUSE with Knotter version 0.9.5. Whereas Inkscape opened the save SVG file without a problem, Knotter aborted with the message Error while reading .
Exporting in raster graphic format allows some additional settings. First, it's advisable to set the Antialiasing option so that the export filter smooths the edges. In Background , you set the background for the knot pattern. If the background is transparent, be sure to choose a file format that supports transparency (i.e, PNG).
Finally, set the size of the exported image. You start the export with Export Image .
Extended Functions
Knotter functionality can be extended through a plugin interface. In Plugins | Other , you can find some interesting tools that often create unexpected results. In fact, it might not clearly define what the outcome is until you've experimented with them.
The Plugins | External menu opens an interface for other applications. Here, you can configure editing programs for raster and vector graphics under Set up external programs option.
Knotter considers GIMP and Inkscape external tools, regardless of whether they're actually installed on the system. You can start the other entries in the External menu directly in Knotter.
Selecting Plugins | Insert brings up functions that could be on the Inkscape menu bar, although they can produce quite different results in Knotter. For example, if you want to create a star or spiral, these appear as node objects in the Knotter style. Nevertheless, you can create nice starting patterns that you can modify as you go along (Figure 5). Among the functions is one where you can add text.
 Figure 5: Thanks to various plugins, Knotter provides extended functionality for easy creation of wider range of shapes and images.
The settings for the plugins are in Plugins | Configure Plugins . You can activate and deactivate plugins or change their behavior. The few nonactivated plugins don't provide much added value in that Knotter already has the functions they supposedly provide. You can also download additional plugins, although no new ones are currently available.
Conclusion
The developers of Knotter have made effective use of what could be a niche application. The functionality is intuitive, even when the settings follow the "trial and error" principle. Sometimes, a function isn't well-defined in terms of its outcome.
The question of what software like Knotter really achieves is easy to answer. It's fun from a design viewpoint and is a fine diversion, especially for kids, on rainy autumn days. It also provides useful application opportunities.
Infos
- Knotter: http://knotter.mattbas.org