Soft Music
The OpenAV suite of software allows musicians to create music on the Linux platform. It's made up of digital effects and software instruments, giving the user high-quality audio effects and instruments to create, mix, and master.

Vladimir Koletic, 123RF
The OpenAV suite of software allows musicians to create music on the Linux platform. It's made up of digital effects and software instruments, giving the user high-quality audio effects and instruments to create, mix, and master.
The OpenAV suite [1] is made up of several programs. The ArtyFX suite of plugins contains a variety of commonly used audio effects: reverb, delay, equalizers, filters, distortions, and beat smashers: They're all there!
Fabla and Sorcer are instrument plugins. You use them to create audio from MIDI notes. Fabla loads samples and plays the samples back to create rhythms and beats. Sorcer is a wavetable synth, designed especially to create dirty basslines.
Fabla, Sorcer, and the ArtyFX plugins are all LV2 plugins [2], so they can be used in your favorite digital audio workstation (DAW), such as Ardour or Qtractor (Figures 1-3).
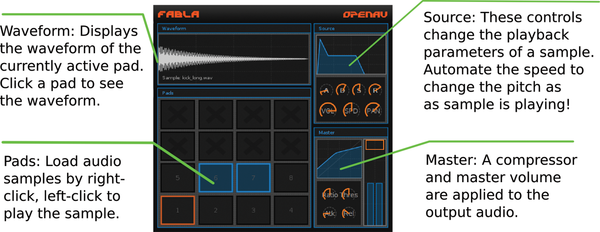 Figure 1: The Fabla sampler user interface allows you to play and manipulate sound samples.
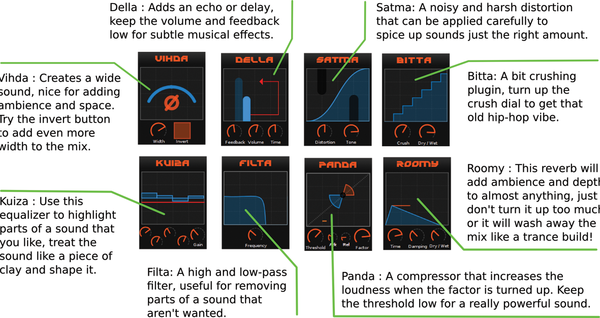 Figure 2: ArtyFX allows you to use filters and effects on the incoming sound.
 Figure 3: Sorcer is a polyphonic wavetable synth LV2 plugin that lets you create harsh, modulated, sub-bass-driven walls of sound.
OpenAV is packaged by various third parties. Check out the KXStudio PPA for audio software [3] for Ubuntu, for example. If you're interested in getting the latest stable release, you can always grab the source code: See the "From Source" box to get compiling.
From Source
All released OpenAV software is available from the website [4]. To download the latest source from Git, first make sure you have git , cmake , lv2-dev , and libcairo2-dev installed:
$ sudo apt-get install git cmake lv2-dev libcairo2-dev
Then, clone the NTK Git repository to get the UI library OpenAV uses:
git clone git://git.tuxfamily.org/gitroot/non/fltk.git ntk
Build and install the NTK library:
$cd ntk
$ ./waf configure --prefix=/usr
$ ./waf install
Clone the OpenAV ArtyFX source:
$ git clone https://github.com/harryhaaren/openAV-artyFX
Change to the ArtyFX directory. Create a build directory and configure using cmake
$ mkdir build
$ cd build
$ cmake ..
Compile and install:
$ make
$ sudo make install
Follow the same steps (except for installing NTK, which you only have to do once) to install the other components in the suite. You can download and build Fabla [5], Sorcer [6], and Luppp [7] using the same procedure by substituting the appropriate link in this command:
$ git clone <url here>
If you run into trouble, you may need to build some dependencies that are not yet present on your system. You can install all the dependencies for jalv with one command: sudo apt-get build-dep jalv . This command should fix compilation errors. You should now have all the libraries needed to compile jalv on your system. Go back and try the compile step again; it should work now.
The OpenAV plugins comes with presets making it easy to test them all. Before you can use them, though, you have to configure the system for professional audio production. If QJackCtl isn't installed yet, run the following to download it to your system.
$ sudo apt-get install qjackctl
To start JACK, run the QJackCtl program and hit the Start button. (If you've never used JACK before, check out the awesome JACK tutorial online [8]). Note that this will switch PulseAudio off, so you may find that the audio of some of your programs will stop working.
To test OpenAV software, you can use a tool that hosts LV2 plugins and lets you run them standalone. This tool is called Jalv. To install it, run
$ sudo apt-get install jalv
Launching Fabla in Jalv is done by running the jalv.gtk command and giving it the URI for Fabla:
$ jalv.gtk http://www.openavproductions.com/fabla
To hear the output of Fabla, you need to route its audio outputs to your speakers. In QJackCtl, click the Connections button and connect Fabla to System (the sound hardware on your computer). This tells JACK that you want to hear Fabla directly. This step might seem obvious, but in professional audio, it is often very useful to be able to route Fabla through some FX before playing it back. I'll be covering that later in this tutorial.
The presets menu provides several drum kits that are included with Fabla; try loading one into the program. Clicking on a pad in the UI will play back the drum sound. If you have .wav files on your computer, load them into Fabla by right-clicking on a pad and selecting the .wav file to load.
If you leave Fabla running, you can start FX to use with it, such as ArtyFX's Roomy. Open a new terminal and run Roomy:
$ jalv.gtk http://www.openavproductions.com/artyfx#roomy
You need to tell JACK that you want to route Fabla through the FX and then to the sound output. Do this by changing the Connections in QJackCtl like before: Disconnect Fabla from the System and connect Fabla to Roomy, and then connect Roomy to System. You've just put a reverb effect on the output of Fabla; it sounds much more spacious and open, right? Try Panda or the other plugins of the ArtyFX suite, connecting them just like before.
Back in the 1980s, samplers became the tools of choice for electronic and hip-hop producers to create their grooves. And, they're still a part of almost every electronic musician's toolkit. Fabla is a software sampler that allows triggering and playback of samples just like its hardware counterparts from the '80s.
To load a sample, right-click on a pad, browse to the sample, and click Load . The waveform shows up in the top right, and left-clicking the pad will play the sound. Each pad has Source controls; clicking a pad shows the values. The Source controls include an ADSR envelope, volume, pan, and speed.
The ADSR (Attack-Decay-Sustain-Release) can be used to shape the volume of the sample as it plays, whereas the speed control affects the overall pitch and speed of the sample. Try loading the same sample twice and play with the pan/speed controls: These few controls are surprisingly versatile for shaping samples! To fully utilize the Source controls, a DAW, such as QTractor, can automate the values of these controls for each pad individually. This technique is used a lot to have a snare-drum rolls gradually lower in pitch until the next downbeat.
Next, I'll put the OpenAV software to use and actually make a song using QTractor. The goal of this section is to build a song using OpenAV's plugins. You will learn to use Fabla to create drum beats and the ArtyFX suite of plugins for mixing and mastering the song.
First, you will use Fabla to create a drum beat and then record some acoustic guitar chords. A bassline, vocals, and a guitar lead will finish the project. Then, you will use ArtyFX to make the recorded material sound smooth and deep.
The steps detailed here are a guide. To become a true QTractor master, check out the manual [9]. Note that this guide has a project file [10], so you can download it and check out the final song. Or, you can grab the exported mix in OGG format [11].
Launch QTractor. It's big and imposing, isn't it? Don't worry, today, you'll only use the basic features, so follow closely and you'll be fine. Press Shift + Insert to add a track, then select MIDI (this allows you to use a synth on the track, like Fabla). Next, click the Plugins tab at the top and then click Add and search for Fabla . Figure 4 shows the steps to follow.
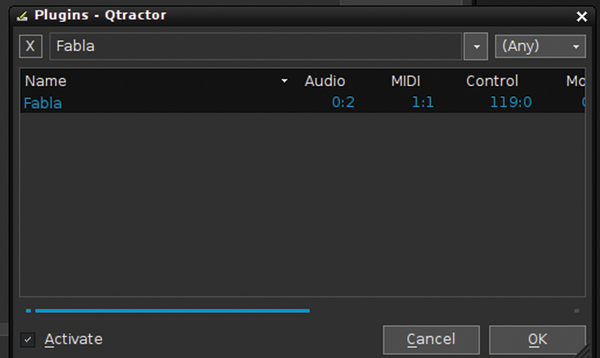 Figure 4: Adding Fabla to a QTractor MIDI track.
Loading a preset for Fabla is done by selecting the Direct Access dialog from a track and then using the drop-down menu at the top right to load a preset. Choose the Savage Drums preset (Figure 5). Its an acoustic drum kit sampled by OpenAV at Music Hub Studios with Stephen Savage playing.
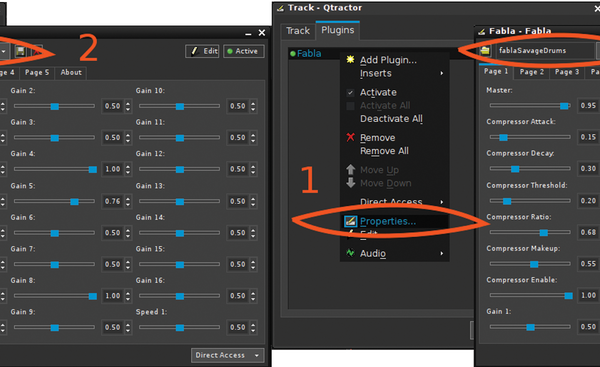 Figure 5: Loading the "Savage Drums" Fabla preset in QTractor.
Next, sequence the MIDI drum beat. Fabla will convert it to a chunky drum track. Create a MIDI click on the Fabla track (right-click, clip , new ) and then double-click the created clip: You're now in the MIDI editor! See Figure 6 to see how the drum beat gets inserted.
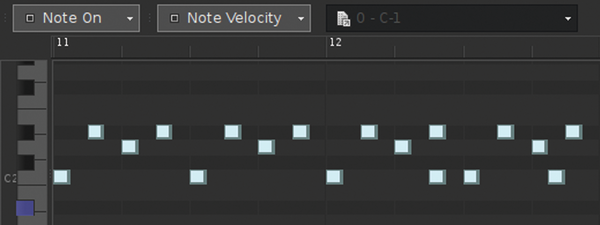 Figure 6: The MIDI drum beat: a simple kick-hat-snare-hat pattern.
Once the basic drum beat is laid out, you're going to record some guitar. If you don't have a guitar available right now, download the full project file. The recorded guitar is available there. It's a pretty laid-back drum groove, so to keep things consistent, the guitar should be mellow, progressing through the E minor key. A bass guitar backs it playing the same notes. A lead guitar part is then layered on top.
Now you can arrange the song (Figure 7). There are tracks for the drum beat, bass guitar, backing guitar, and lead guitar. Copy and paste the sections and arrange them into a song. The available project file has a guitar intro, and then the drums come in during the chorus.
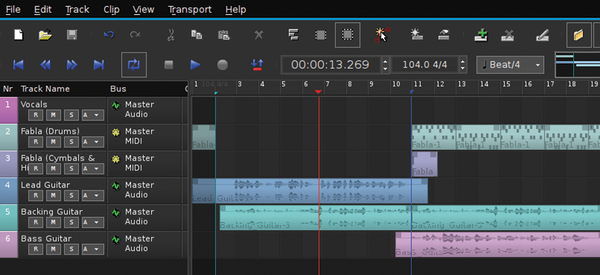 Figure 7: The song after it has been arranged: Note that the song starts at the marker on bar 2, and the loop point is used to listen to a section of the song repeatedly.
Next, I'm going to show how to "bounce" the drums. This involves recording the output from the software instruments and recording the audio. You use less CPU after bouncing tracks, which frees up your computer for the effects you're going to use at the mixing stage.
Connect the output of QTractor to the input of QTractor to record the output to a new track. Then, Solo the drums in order to bounce only the drum audio. Hit record and play the section you want to bounce. Mute the MIDI drum tracks, and the bounced drums will play from the audio track.
Next, you go to the mixing stage. This is where the ArtyFX suite of plugins really becomes useful. You want to make the mix of the song nice and spacious, but also punchy and clear. Without delving into the art of mixing too much, ArtyFX plugins can be used to create an open, vibrant, and powerful mix.
For an overview, take a look at Figure 8. It shows QTractor's mixer and all the plugins used on each track. Note that all FX plugins used here are part of OpenAV ArtyFX; so, if you followed the install guide above, they should be available.
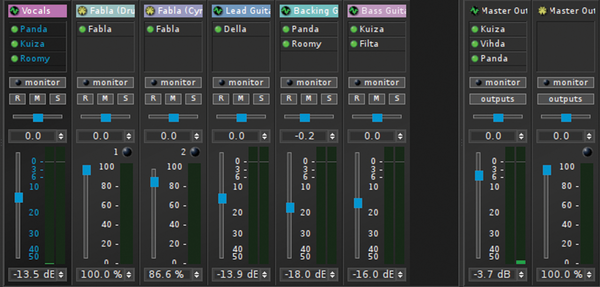 Figure 8: The mixer window, with each track showing the instruments and effects used.
To add plugins, open the mixer window (F9) and insert an effect by right-clicking and choosing Add Plugin . Based on the instrument playing in the track, you'll need to choose what effect you want to apply: Kuiza , Roomy , and Panda provide an equalizer, reverb, and compression, respectively. Listen to your inner artist and shape the sound and mold the song to the mix you desire.
The track is now ready for the final export; see Figure 9 for the arrangement and Figure 8 for the effects used in the mix. To export, from the file menu, choose Tracks , Export Tracks , and Audio . In the export dialog, select the Master bus for exporting and click OK . This renders the whole session to a file, ready for uploading and sharing. The track would benefit from a voice for the verse/chorus section. Why not add a track, record some vocals, and be the vocal talent for song?
 Figure 9: The arrangement and final version of the track, showing the intro, a verse/chorus section, interlude, and another verse/chorus section.
This article introduced the OpenAV suite of software for musicians to produce music using open source tools. Getting productive with Fabla, Sorcer, or the ArtyFX plugin suite doesn't take long, but you'll need to know your way around your DAW and have some experience in producing music, too.
I didn't cover all of the software by OpenAV in this article: There's also the live looping DAW Luppp and lots of work-in-progress projects. If you want to know more, contact me to find out what's going on, and let me know what OpenAV software you're going to ask Santa for: harryhaaren@gmail.com.
Infos