Running in Circles
Programming loops allow one-time or multiple execution of instructions. The condition for the loop can exist both outside and inside it.

tiero, 123RF.com
Programming loops allow one-time or multiple execution of instructions. The condition for the loop can exist both outside and inside it.
With loops, you can execute part of a shell script over and over until an ending condition terminates it. You can use loops in menu controls and data processing. Without loops, you would need to start the scripts every time you wanted to process a piece of data.
A loop begins with for , while , or until (the loop header). After that follows a do statement that ends with done . Between do and done are the statements to execute (the loop body):
for / while / until [LOOP HEADER]
do
  [commands] [LOOP BODY]
done
In the loop body, apart from the commands, you can also add some controlling elements for the loop.
For example, using the break command, you terminate the loop execution and let the rest of the script be processed. You use continue to terminate the current cycle and proceed to the next one. With both of these commands, you can indicate the number of levels you want to jump in nested loops.
If the script were expecting another program to run, you would use wait . With exit , you terminate the loop immediately and completely (wait and exit aren't typical loop commands, but they do complement their functions in meaningful ways).
A for loop requires a data feed. Each run-through is carried out for a single parameter that's extracted from a list, calculated from an increment or obtained from another data source. Basically, the for loop runs as long as the data is present. Of course, you can set a premature loop termination by using simple if or multiple case branching.
You can set parameters for the loop processing, in the following form:
for VARIABLE in PARAMETER1, PARAMETER2 ......
do
......
done
In practice, these parameters could be filenames, directories (backed up first!), users, applications, machine names, IP addresses, or anything else. Listing 1 shows a minimal example. Run it and see what it does. All code examples for this article are available online [1].
Listing 1
Setting Parameters
01 #! /bin/sh
02 for k in a  b  c
03 do
04    echo $k
05 done
Using the built-in math skills of Bash, you can create a counter, a feature missing in many other shells. Using counters, you can uniformly increment or decrement variables. Note that you should use #!/bin/bash as the first line of the shell script. Otherwise, you'll get error messages instead of counters. Take a look at Listing 2.
Listing 2
shellcounter.sh
01 #!/bin/bash
02 echo "increasing"
03
04 # "k=1" -> Variables initial value
05 # "k<5" -> Condition (k must be less than 5 to execute)
06 # "k++" -> Increment k by 1 in after each cycle
07 for ((k=1; k<5; k++))
08 do
09  echo $k
10 done
11
12 echo "decreasing"
13 for ((k=4; k>0; k--))
14 do
15  echo $k
16 done
17
18 echo "increasing with a larger increment"
19 for ((k=10; k<50; k=k+10))
20 do
21  echo $k
22 done
23
24 echo "increasing with a quadratic increment"
25 for ((k=2; k<50; k=k*k))
26 do
27  echo $k
28 done
The structure of the "calculated" for loop header begins with the definition of the variable's initial value. This is followed by a condition (minimum/maximum value of the variable) and the increment (or decrement) statement for the value. Figure 1 shows the loop's execution.
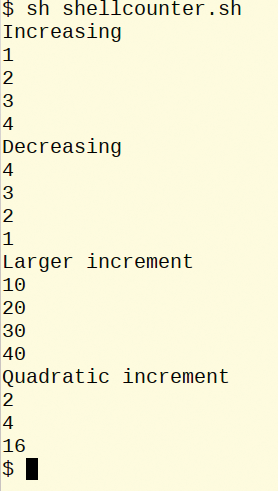 Figure 1: Execution of the shellcounter.sh script.
In the first two loops, the increment/decrement value is 1. The third loop shows the calculation method for a different fixed increment value. In the last loop, you get a quadratic increment by multiplying the variable by itself.
In this case, the initial variable value cannot be 0 or 1 , or you'll get an infinite loop. The parameters for the for loop can also come from other applications. The call takes the following form:
for VARIABLE in $([CALL APPLICATION])
Or the following:
for VARIABLE in `[CALL APPLICATION]`
You can use just about anything as the data source that produces unique values separated by spaces.
In Listing 3, you first determine the types for all objects found by ls -1 in the current subdirectory using file . The fold is simply for output formatting: It folds text at 50 characters.
Listing 3
datasource.sh
01 #!/bin/sh
02
03 echo "Determining the data type for a for-loop"
04 for k in $(ls -1)
05 do
06   echo "--------------------------------------------"
07   file $k | fold -sbw 50
08 done
09 echo "--------------------------------------------"
10
11 echo "  "
12 echo "Using a text file to derive values"
13 echo " "
14 for k in `cat input.txt`
15 do
16   echo $k
17 done
18 echo " "
19
20 echo "Database query (sqlite) as data source"
21 echo " "
22 for k in $(sqlite3 test.db 'select one from tbl1 where two<500;')
23 do
24   echo $k
25 done
You then read a text file that returns a name per line. Each loop cycle sets the k variable to one of these names. Finally, you read a filed called one from a database table for all the values in the two field less than 500. The database table has just four entries and registers 1, 2, and 4 meet the condition. Figure 2 shows the results.
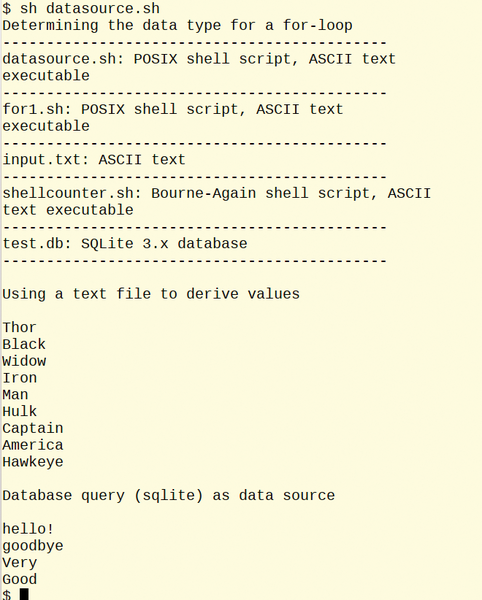 Figure 2: Result of the datasource.sh shell script shown in Listing 3.
A while loop runs as long as it meets the specified condition in the loop header. Of course, you could control the process independently of the header using continue , break or exit . The syntax is as follows:
while [CONDITION]
This type of loop, unlike a for loop, doesn't do any processing by itself.
Listing 4 shows a minimal example where the loop executes for as long as the $k variable is less than 5. It also shows you that you have to increment k separately in between do and done .
Listing 4
while1.sh
01 #! /bin/sh
02 k=0
03 while [ $k -lt 5 ];
04 do
05   k=$(echo $k + 1 | bc)
06   echo $k
07 done
The until loop runs until the condition in the header becomes true (i.e., the condition has to be false for the loop to run), otherwise the rules are the same as for the while loop. Listing 5 shows a sample script.
Listing 5
until1.sh
01 #! /bin/sh
02 k=0
03 until [ $k -eq 5 ];
04 do
05   k=$(echo $k + 1 | bc)
06 echo $k
07 done
The while and until loops are followed by a condition in the loop header. If you want an endless loop controlled from within the loop body, set the while loop to true or the until loop to false . The two statements set the conditions and return true as 0 or false as 1.
Endless loops are used, for example, in menu control or monitoring tasks. Listing 6 shows an application of both types of loops. Note the use of break and exit to quit the loops.
Listing 6
infinite.sh
01 #! /bin/sh
02 k=0
03 echo "while-loop"
04 while true;
05 do
06 k=$(echo $k + 1 | bc)
07 echo $k
08
09 # End loop with a >> break <<
10
11 if [ $k -eq 5 ];
12  then
13     break
14 fi
15 done
16
17 k=0
18 echo "until-loop"
19 until false
20 do
21 k=$(echo $k + 1 | bc)
22 echo $k
23
24 # End loop and program with >> exit <<
25
26 if [ $k -eq 5 ];
27  then
28     exit
29 fi
30 done
Listing 7
Exiting with Code 3
01 #! /bin/sh
02 echo "Applying an exit code value of 3"
03 exit 3
With continue , the loop is interrupted without executing any remaining commands and then restarted in the next cycle. Used inside nested loops, continue can even switch through several nested levels if you indicate the number of levels. The level number of the current loop begins with 1 and extends to the outside loops, the outer loop being the highest number.
A continue without an argument refers to the currently executing loop only. (An example of multiple nested loop levels, with the continue near the bottom of the script, is shown later in Listing 8).
Listing 8
exiting.sh
01 #! /bin/sh
02 a=0
03 b=0
04 c=0
05 while true;
06 do
07
08   if [ $a -eq 8 ];
09    then
10      echo "That's it!"
11      exit
12   fi
13
14   a=$(echo $a + 1 | bc)
15   echo "A: $a"
16   if [ $a -eq 5 ];
17   then
18     while true;
19     do
20       b=$(echo $b + 1 | bc)
21       echo "B: $b"
22       if [ $b -eq 5 ];
23       then
24         while true;
25         do
26           c=$(echo $c + 1 | bc)
27           echo "C: $c"
28           if [ $c -eq 5 ];
29           then
30             continue 3
31           fi
32         done
33       fi
34     done
35   fi
36 done
You break off a loop using break . Here, too, you can jump over nested loop levels by indicating the level number. Listing 6 shows an example of using a break .
If the script is to exit after a condition is met, use exit and the loop will end and no further commands executed. Listings 6 and 7 show some applications of a script abruptly ending.
You can give the command its own exit code in the script to be used at another location. The short example in Listing 7 shows how this works. You can ask for the exit code immediately after the command by using echo $? .
The sample script in Listing 8 will count three times within nested loops. The end of the script is triggered by a condition in the "main" loop (exit ). In the first level, the loop is interrupted and redirected to the main loop with a continue . The main loop then takes over again and continues counting until it meets an exit condition. Figure 3 shows the result of the script.
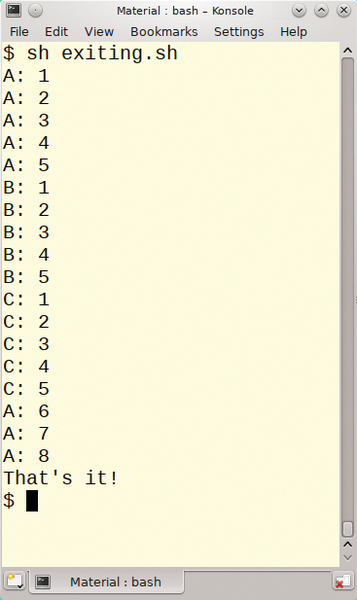 Figure 3: Output of exiting.sh.
You can use wait to pause execution of one or more background tasks before continuing. This command doesn't strictly belong to loop control, but it can be used in combination with it. Without this command, a loop would continue running after starting a background task, with some possible undesired results. Using wait ensures that the process stops and all necessary tasks are performed.
Immediately after starting a program, the shell provides its process ID, which you can query with the $! variable. If you want to wait on multiple processes, place each of the IDs in its own variable. You pass the PIDs to wait , and it pauses the loop until all PIDs are removed from the process table.
In practice, the background processes could be database daemons, web servers, or other entities. The two small shell scripts in Listing 9 use only one variable and are put to sleep (so that you can observe the process). Listing 10 shows the content of the shell script a.sh called by the script.
Listing 9
waitamoment.sh
m01 #! /bin/sh
02
03 d=0
04 a=0
05 b=0
06 c=0
07
08 while true
09 do
10 echo -n "Start the script: ";date +%H:%M:%S
11 sh a.sh &
12 PID1=$!
13 sh b.sh &
14 PID2=$!
15
16 echo "Waiting for processes $PID1 and $PID2."
17 wait $PID1 $PID2
18 echo -n "End the script: ";date +%H:%M:%S
19
20 # Applying and calculating the variables
21
22 a=$(cat a.txt)
23 b=$(cat b.txt)
24 c=$(echo $a + $b | bc)
25 d=$(echo $d + $c | bc)
26 echo "Subtotal: $d"
27
28 # Break when d > 30
29
30 if [ $d -gt 30 ];
31    then
32       break
33 fi
34 done
35 echo "Total: $d"
Listing 10
a.sh
01 #! /bin/sh
02 # a.sh
03 n=8
04 sleep 5
05 echo $n > a.txt
Listing 11
b.sh
01 #! /bin/sh
02 # b.sh
03 n=3
04 sleep 2
05 echo $n > b.txt
Listing 11 shows the content of b.sh . Inside the loop, a sum is calculated. When its value exceeds 30, the break ends the loop. Figure 4 shows the entire results.
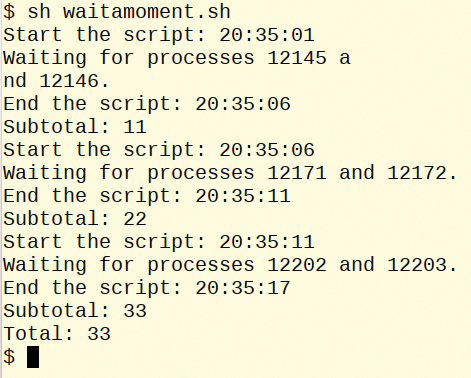 Figure 4: Result of waitamoment.sh.
Listing 12 shows a pure text menu for terminal sessions. It runs a while true endless loop that ends with a break , allowing further commands after the loop to be executed. You can use this script as a kind of building block and modify or enhance it as needed. Figure 5 shows the menu in action.
Listing 12
menu.sh
01 #! /bin/sh
02
03 while true
04 do
05 clear
06 echo "     1   nanoeditor"
07 echo "     2   htop"
08 echo "     3   root login"
09 echo "     4   disk usage /home"
10 echo "     9   END"
11 echo "     ---------------"
12 echo -n "     ";read pnr
13 if [ $pnr -eq 1 ]; then nano
14 elif [ $pnr -eq 2 ]; then htop
15 elif [ $pnr -eq 3 ]; then su -
16 elif [ $pnr -eq 4 ]; then df -h /home; sleep 3
17 elif [ $pnr -eq 9 ]; then break; fi
18 done
19 echo "Requested program end."
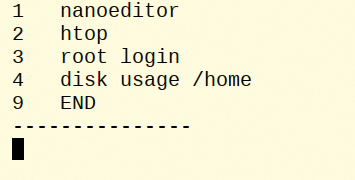 Figure 5: Menu for a terminal session.
You can create shell programs with GUI operations using Yad . The capabilities far exceed just menu control (you can, for example, use easy masks for database applications). The example shows a lot about the process even at a beginner's level. Listing 13 shows the example, and Figure 6 shows the GUI script in operation.
Listing 13
Example Using Yad
01 #! /bin/bash
02
03 while true;
04 do
05
06 # Determine menu entries, field separator="!", expandable!
07 actions="gedit!gnome-terminal!pcmanfm"
08
09 action=$(yad --title="HEADING_TEXT" --text="TEXT_ABOVE_MENU" \
10 --form \
11 --field="Action: ":CB $actions \
12 --button="Cancel":1 \
13 --button="Start action":0)
14
15 # End program with [CANCEL], use exit code 252 when ending with "X"
16
17 ec=$(echo $?)
18
19 if [ $ec -eq 1 ];
20    then
21        exit
22 elif [ $ec -eq 252 ];
23    then
24        exit
25 fi
26
27 # Read selected action
28
29 action=$(echo $action  | cut -d \| -f1)
30
31 # Call selected program
32
33 exec $action &
34 done
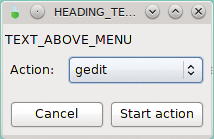 Figure 6: Shell menu using yad.
The menu is in an endless loop. Before the menu, you set a variable with the menu selections in the form MENUITEM1!2MENUITEM2 ….. . The yad GUI sets the action variable with the result of the selection. Its content after selecting the first item is PROGRAM| . The program name is disconnected from the separator symbol with the cut command.
The exec command starts the program in the background so that it's possible always to access the menu and start other programs. If this is not what you want, you can just remove the & character at the end of the exec line.
The yad --form presents the selection in the --field , leading to the CB (Check box) option. Ending the loop involves evaluating the exit code, which you derive using the button statement (here with preset values). If you want to end the script by using X , you need to add a 252 after the 1 .
For the example, the actions were defined as the gedit editor, the gnome-terminal , and pcmanfm . You can substitute your favorite programs and change the headings as you wish.
You may not always want to use at or cron to perform an action at a certain date or time. You might want a shell script to do it.
The example shows a solution where a web browser exits without discussion after an hour's time. You could take this further, for example, by ending your child's session or even shutting down their computer. This also works for a small Internet café on your premises.
Listing 14 shows how it works. The start and end times are first defined. For simplicity's sake, the shell script is intentionally unfair – that means someone starting at minute one gets more time than someone else starting later on.
Listing 14
closingdown.sh
01 #! /bin/sh
02
03 # Hour when application is launched
04 start_time=$(date +%H)
05
06 # An hour later (taking day transition into account)
07 if [ $start_time -eq 23 ];
08   then
09        endhour=0
10   else
11        endhour=$(echo $start_time +  1 | bc)
12 fi
13
14 # Start program
15 firefox &
16
17 # Read PID
18 pid=$(echo $!)
19
20 # Control loop
21
22 while true;
23 do
24
25 # Current hour
26 hr=$(date +%H)
27
28 # If hr matches endhour, quit browser
29 if [ $hr -eq $endhour ];
30 then
31     kill -9 $pid
32     exit
33 fi
34 # Wait 59 seconds
35 sleep 59
36 done
Next, the browser is started and its process ID is stored in a variable. In the while true loop, a time test is performed every 59 seconds. Then, if the "closing hour" and current hour match, the browser process and script are terminated.
As these examples have shown, shell loops can be very useful if you take the time to understand their syntax and applications.
Infos