Many developers were rather incredulous when GitHub announced Atom [1] in June of 2014. They were asking whether the world really needed yet another editor. The GitHub makers believed that the answer to this question was a definite yes. Although Sublime Text [2] and Textmate [3] are convenient to use, the programs don't leave much room for modification.
Emacs and Vi let the user make many modifications, but they are not so convenient for the beginner. Although not expressly mentioned by the makers, the Atom text editor also has the potential for bringing new users to GitHub, thanks to the good integration with GitHub.
The GitHub makers are acutely aware of how the open source world works. Up to now, they have not taken a wrong turn. Atom has become part of this successful track record. The Vi and Emacs projects work well primarily because they are open source and have a large community. The makers have let it be known that they are in it for the long run with the Atom text editor, which has an MIT license. This does not mean that GitHub won't fork the text editor at some point in order to offer an enterprise version; however, this was not yet the case with Version 1.0, which appeared in June of 2015.
The Atom Model
The Atom text editor is intended to enable the development of cross-platform desktop and web applications. The software includes grammars for various programming languages ranging from JavaScript, Perl, and Python to C/C++ and Java. In effect, this software is a specialized version of the Chromium browser. The windows are essentially web pages that have been locally rendered. The content displayed in the windows is allowed to access the Node.js API.
The editor consists of a straightforward core, called the Atom Core. Most of the other components are available as packages administered by the integrated Atom Package Manager (APM). The core and the packages run in an environment that goes by the name of Electron [4], formerly called Atom Shell. This environment takes care of automatic updates, has a Windows installer, prepares crash reports, and also delivers notifications. These functions are accessible via Javascript APIs.
In the interest of simplicity, developers recommend using CoffeeScript and Less as replacements for JavaScript and CSS, respectively, when working with Atom. However, it is also possible to use JavaScript and CSS to expand the editor.
Control Panel
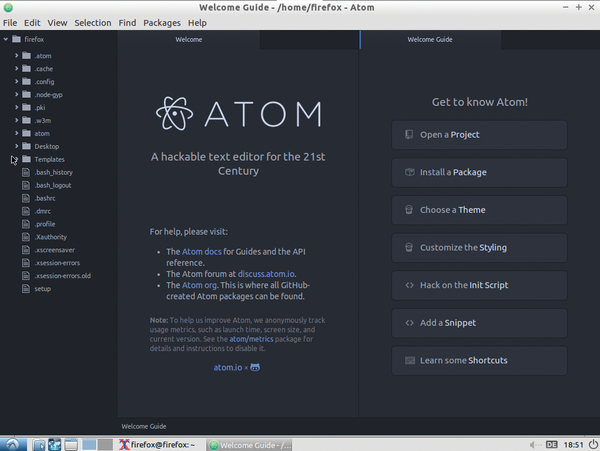
After installation, which could have been made more straightforward (see the "Installing Atom" box), you will land on a graphical interface (Figure 1). The interface consists of various areas, which are designated as panes. These can be enlarged and minimized or rearranged as desired. In Atom jargon, the individual file that is currently being edited is referred to as a Buffer.
During the test on Ubuntu 14.04 with an LXDE desktop, installation required a little effort. This is primarily due to the Node.js environment that Atom needs. Installation packages do exist. For users who want to compile the software by themselves, it will be necessary to install suitable files (Listing 1, line 1). The next step is to get the most recent version of Node.js from Nodesource.com [6] (line 2).
Basically, the series of commands in Listing 1 pulls in a setup script for the current version of Node and executes it with root rights. The more cautious users add a more
command after the pipe symbol for taking a quick look at the script before execution. After the script has run, the command from line 3 will install the most current version of the Framework.
If the which node
command does not display a result, then this is probably because the binary is called nodejs
but the Atom text editor is looking for /usr/bin/node
. The command from line 4 corrects this problem. The next series of commands clones the Atom repository on GitHub and then checks out the last release of Atom in the atom
directory. (Listing 1, lines 5 to 8).
Lastly, the routine will execute the build script and then start the JavaScript task runner Grunt [7] for installing the executable atom
file and the apm
package manager to /usr/local/bin
. This process requires that you have root rights. You can generate a Debian package via script/grunt mkdeb
if necessary.
$ sudo apt-get install build-essential git libgnome-keyring-dev fakeroot gconf-service libnss3
$ curl -sL https://deb.nodesource.com/setup | sudo bash -
$ sudo apt-get install -y nodejs
$ sudo update-alternatives --install /usr/bin/node node /usr/bin/nodejs 10
$ git clone https://github.com/atom/atom
$ cd atom
$ git fetch -p
$ git checkout $(git describe --tags `git rev-list --tags --max-count=1`)
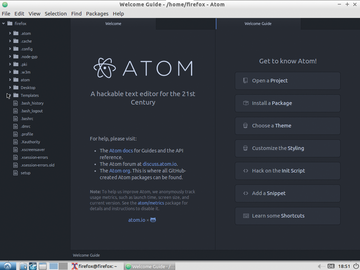 Figure 1: The Atom editor consists of various areas that allow for flexible arrangements. These areas are known as panes.
You will see the directory tree for the current project in the left area of the main window. The code is in the large field in the middle. The F11 key gets you into full-screen mode. Atom opens the settings options as an additional tab once you call them either by pressing the Ctrl+, keys or via Edit | Preferences
.
If you are not sure what to do next, you can look at the list of all commands found in the editor by pressing the Ctrl+Shift+P keys. A helpful Flight Manual [5] is available online, but only in English.
In the Reactor
When compared with veteran projects like Vim, this new editor includes several helpful features. It is possible to indent one or multiple lines of code to the right by highlighting and using the Tab key. Pressing the Shift+Tab keys moves a block of text to the left. The developers have also implemented an auto-complete feature. You can extend this feature with the Autocomplete-plus
package. The package also makes it possible to change the key combination required for utilizing the function.
If you call up the settings via Ctrl+, and select the Soft Wrap
feature, the editor will wrap lines at the edge of the display screen. An additional checkmark to select Soft Wrap At Preferred Line Length
wraps the code according to the corresponding number of characters. A visible line will indicate the edge of the wrap which is preset for 80 characters. You can change the number of characters as needed in the Preferred Line Length
line.
If the Soft Tabs
option is activated, then the software will automatically change tabs into empty spaces. You can determine the number of empty spaces per tab via Tab Length
. The folding feature lets the user simplify the structure of the code. The text editor collapses the code under a method, instruction, or function. This functionality is not really implemented well. The small triangles are difficult to select, and the editor jumps suddenly into another passage in the code.
Strengths and Weaknesses
This new tool also has a few deficiencies. The most noticeable of these is that Atom currently stutters when confronted with files that are greater than 2MB in size. The developers are working on a solution for this shortcoming. They are also constantly working on improving the startup speed for the editor and the reaction time of the graphical interface.
It was rather slow in testing, but this could be because of the surrounding virtual machine. On the other hand, it should be no surprise that the integrated code administration works better. For example, you can press the Ctrl+Alt+Z keys to restore the most recent version of a file. This command corresponds to the lines in Listing 2.
Restore Most Recent Version of a File
$ git checkout HEAD -- path
$ git reset HEAD -- path
If you would like to know which of your files Git does not administer, press the Ctrl+Shift+B keys. This key combination is equivalent to git status
. The language-git
package emphasizes the messages for the commit, merge, and rebase actions. Via git-diff
, the editor can graphically highlight lines that have been changed. If you look on GitHub for information about a file that you are currently editing, you will find a series of shortcuts that can help. See Table 1.
| Key
| Commands
|
|---|
| Alt+G+O
|
Open a file on GitHub
|
| Alt+G+B
|
Display GitHub information about most recent modifications to the file
|
| Alt+G+H
|
View the GitHub history for a file
|
| Alt+G+C
|
Copy the GitHub URL for the current file
|
| Alt+G+R
|
Compare branch with GitHub
|
Flexible Down to the Core
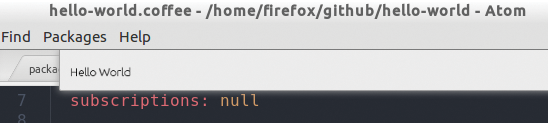
Another point in favor of the Atom text editor is its suitability for extensive modification. A package generator makes it possible to generate a framework for a package. In testing, this was the classic hello-world
, or a small window, which displays this greeting (Figure 2).
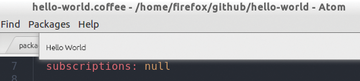 Figure 2: The hello-world package for the editor offers a singularly simple window, which just displays the greeting.
You should start the search for commands via Ctrl+Shift+P and invoke Package Generator: Generate Package
. The boilerplate code that is then generated lands in the github/<Project>
directory. In the Project
example, this is called hello-world
. The directory tree that gets generated appears simultaneously in the left side view.
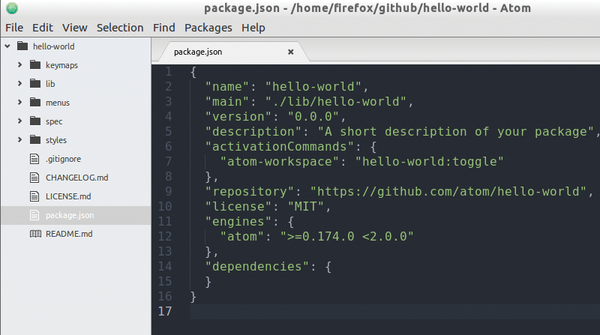
Figure 3 displays the basic framework of the hello-world
package. You can see that the next to last file from the bottom is named package.json
. This file contains various pieces of metadata for the package (Figure 4) including the version number as well as the path to the executable files in the subdirectory lib
.
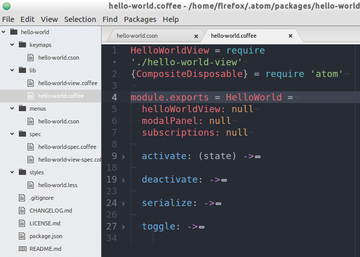 Figure 3: The left side view shows the structure of the automatically generated package. On the right, you will find the code that takes care of the program logic.
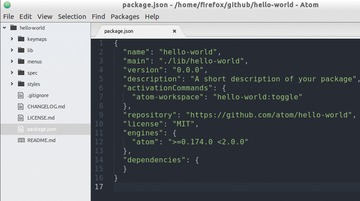 Figure 4: The file package.json is found in the root directory of a package and contains metadata like the path to the executable file and the version number.
The above is also illustrated in Figure 3. The subdirectory contains two files, hello-world.coffee
and hello-world-view.coffee
. The latter arranges the elements for the graphical interface (Listing 3). Figure 3 also shows the code for the package logic. The activate
, deactivate
, serialize
and toggle
methods have been abbreviated by folding in order to illustrate the structure. Listing 4 shows the invisible code.
01 module.exports =
02 class HelloWorldView
03   constructor: (serializedState) ->
04     # generate root element
05     @element = document.createElement('div')
06     @element.classList.add('hello-world')
07     # generate message element
08     message = document.createElement('div')
09     message.textContent = "Hello World!"
10     message.classList.add('message')
11     @element.appendChild(message)
12   # Returns an object when the user activates the package
13   serialize: ->
14   # Remove element
15   destroy: ->
16     @element.remove()
17   getElement: ->
18     @element
01 [...]
02   activate: (state) ->
03     @helloWorldView = new HelloWorldView(state.helloWorldViewState)
04     @modalPanel = atom.workspace.addModalPanel(item: @helloWorldView.getElement(), visible: false)
05     # It is easy to remove Atom-Events via CompositeDisposable
06     @subscriptions = new CompositeDisposable
07     # @toggle()-Connect method with'hello-world:toggle'
08     @subscriptions.add atom.commands.add 'atom-workspace', 'hello-world:toggle': => @toggle()
09   deactivate: ->
10     @modalPanel.destroy()
11     @subscriptions.dispose()
12     @helloWorldView.destroy()
13   serialize: ->
14     helloWorldViewState: @helloWorldView.serialize()
15   toggle: ->
16     console.log 'HelloWorld was toggled!'
17     if @modalPanel.isVisible()
18       @modalPanel.hide()
19     else
20       @modalPanel.show()
The code in Listing 3 first generates the root element, @element
, and then assigns the message element message
as a child in line 12. The code farther down determines how the element reacts to the calls getElement()
and destroy()
. The first three of the four methods in Listing 4 typically belong to every package. The activate()
method generates a modal element (ModalPanel
) and assigns it to the Atom desktop (line 4).
The subscriptions()
method, on the other hand, assigns the menu entry defined in Listing 5 to the @toggle()
method (line 11). The optional @toggle()
method (Line 22) is there to make sure than an entry for hello-world
appears under the Packages
menu entry. If you click in its submenu on Toggle
or press the Alt+Ctrl+O keys, you will see the window shown in Figure 2 appear or disappear.
01 'context-menu':
02   'atom-text-editor': [
03     {
04       'label': 'Toggle hello-world'
05       'command': 'hello-world:toggle'
06     }
07   ]
08 'menu': [
09   {
10     'label': 'Packages'
11     'submenu': [
12       'label': 'hello-world'
13       'submenu': [
14         {
15           'label': 'Toggle'
16           'command': 'hello-world:toggle'
17         }
18       ]
19     ]
20   }
21 ]
The details in the menu can also be adapted. Listing 5 shows a model that can easily be replicated. It is in the menus
folder in the hello-world.cson
file and generates an entry for the context menu and for the Atom menu.
Additionally, the possibility exists for changing the style via a "less" file under styles
, to set up a keyboard shortcut via keymaps
and to create specifications for tests via spec
. You can use the specs for performing regression testing [8]. The creators of Atom rely on the JavaScript framework Jasmine [9] for that purpose.
Conclusion
The Atom editor makes a good impression even though it includes a simple way to modify a lot of the software. Many of the elements should be familiar to users of the Sublime text editor. Apparently, the developers have taken a close look at the concepts behind the proprietary Python software.
The community for the project is constantly growing. The number of extensions has grown from 1861 packages to around 3300 since version 1.0. It appears that the editor does indeed fill an existing gap.