On the Safe Side
Qt4-fsarchiver can easily save and restore files and entire partitions plus completely write and restore hard drive images.

Igor Sokolov, 123RF
Qt4-fsarchiver can easily save and restore files and entire partitions plus completely write and restore hard drive images.
Several important differences exist between Linux and the major proprietary operating systems. Linux supports multiple filesystems, comes with secure encryption software, and handles a wide range of methods and formats for compression. It, therefore, has an excellent set of prerequisites, so that even in heterogeneous environments it can back up systems and data. Against this backdrop, the qt4-fsarchiver graphics tool is practically unlimited in its potential.
To install qt4-fsarchiver on Ubuntu, you should first attach the corresponding PPA [1] to the package source and then use the package administration for convenient installation.
Precompiled packages are available from SourceForge that work for Linux Mint, Debian (Wheezy and Jessie) [2] as well as openSUSE and Fedora [3]. The qt4-fsarchiver Live DVD is a special gem. It is about 960MB in size, is based on Ubuntu, and includes UEFI support (See the "Qt4-fsarchiver Live" box). Once installed, the location for the qt4-fsarchiver starter will depend on the distribution. Look in the main menu under either tools , system tools , or utilities .
Qt4-fsarchiver Live
The live CD from qt4-fsarchiver is primarily used to back up Windows computers and recover a system after a crash or a loss of data. Additionally, the program can be used in case you would like to restore a secure partition that would be mounted during static operations in the filesystem to a drive. Aside from the backup software proper, the live medium offers Rkhunter and Chkrootkit, which are useful tools for tracking down rootkits under Linux [5].
The program requires root rights so the system will ask for the administration password with each start. It is important to remember that the program sits on top of FSArchiver [4], which is a command-line application. Therefore FSArchiver also needs to be installed.
When installed via package administration, FSArchiver usually automatically ends up on the hard disk. If the software comes from a third-party source, you may have to manually deposit the tool on the disk.
Qt4-fsarchiver opens with an interface that looks complicated and not exactly intuitive. Therefore, it's a good idea to learn about the most important program functions. Existing knowledge of hard disk partitioning proves especially helpful.
When qt4-fsarchiver starts, an instruction window appears, which refers the user to the read me file. This reference points to the wrong directory since the file is actually found in /usr/share/doc/qt4-fsarchiver/doc/ instead.
You should definitely take a look at the content of this file because it contains various instructions for installation and tips for using the program.
Once the instruction dialog closes, the program window will open. You will see a menu bar at the upper edge of this window.
The icon bar sits underneath the menu bar. On the left side of the window is an area that contains various settings. To the right are two windows that display lists of all known partitions along with the system file structure represented in tree form.
The filesystem for each individual partition is included in the partitions list. Qt4-fsarchiver provides complete support for the Btrfs, ext2/3/4, and NTFS filesystems. It offers partial support for the outdated FAT(32) and VFAT. As a result, USB sticks are suitable for use as a source and destination medium only if they have been formatted with one of the supported filesystems. The ISO9660 filesystem standard is not supported at all.
At the very bottom of the program window is an area that displays information such as the time, the number of files and directories scheduled for backup, and the number of files already backed up. A progress bar rounds out the visual display (Figure 1).
 Figure 1: At first glance, the program window for qt4-fsarchiver appears complicated.
The program window for qt4-fsarchiver includes many settings for performing backups. Additionally, there are basic configuration options under settings | basic settings , which form the default configuration if you do not modify settings for a particular backup.
Using a straightforward dialog, the user can specify how the software should perform backups and recovery. There are also various options for backups on computers sharing the network. Once the selection of options is complete, the settings are saved via a mouse click on the save settings button (see Figure 2).
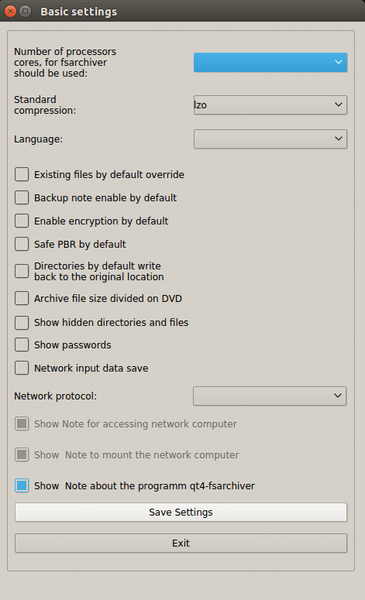 Figure 2: The basic settings are the default settings for individual backups when the user does not specify otherwise.
The graphical interface implements almost all of the commands for the FSArchiver command-line program. This requires that you change certain options in the left in the program window.
To back up a partition, first specify whether you would like to use encryption. You can select the Encrypt backup. Key: option by setting a checkmark. Then, you need to specify an encryption key consisting of 6 to 64 characters. The key is entered in the field to the right.
The backup process can be divided into several stages when large partitions containing huge volumes of data are involved. For example, the data in each stage could be equal in volume to the capacity of a USB stick or a CD/DVD. To also back up the partition boot record of a bootable partition, you should set a checkmark in front of the Back up PBR option.
The backup process can be made significantly faster on multicore systems by allocating several processor cores to the program. To perform this allocation, you should enter the number of cores at the end of the Number of cores to be allocated for use by fsarchiver: option. Then, you need to specify which data compression format qt4-fsarchiver should use for backing up data.
In the accompanying fold-out menu, you will find a wide-ranging collection of compression methods along with the different compression rate.
In the entry field below this menu, you should define a name for the backup. Then, in existing partitions: at the upper right, select the drive to be backed up. The final step is to look in the directory tree for the destination directory that will receive the back up.
One mouse click on the back up partition button in the middle of the program window starts the backup process. Qt4-fsarchiver will now first show a small window that contains a summary of the task (Figure 3).
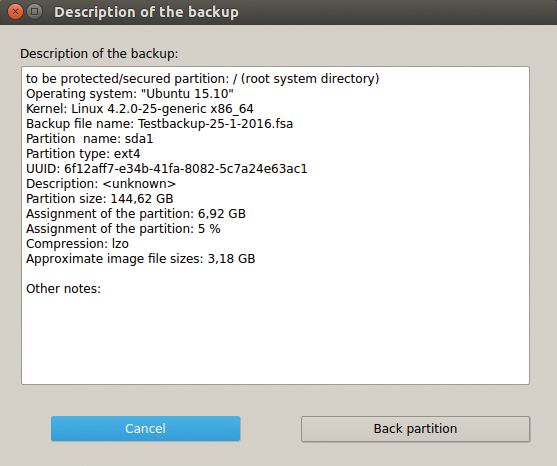 Figure 3: Before a backup process starts, qt4-fsarchiver displays all relevant settings separately.
After another click on the back up partition button, the tool deposits the compressed backup at the target location. After completing the backup, qt4-fsarchiver presents statistics on the number of directories, files, and links that have been backed up.
The software also places a small text file containing this information in the target directory.
In order to start, an operating system must have either a master boot record (MBR) or a GUID partition table (GPT).
A GPT is the next-generation partitioning scheme used for storage devices possessing more than two terabytes of capacity. Thus, it is a good idea to create separate backups for an MBR and a GPT. The corresponding backup and recover functions are found in the Actions menu under MBR/GPT back up as well as recover MBR/GPT .
For the backup, you use a dialog to specify the target directory and, in case the computer has more than one bulk storage device, also the hard drive or SSD whose MBR or GPT you would like to back up. One mouse click on back up MBR/GPT causes the tool to deposit a copy of the structures in the desired location. Similarly, you can use the same dialog to recover an MBR or a GPT that has previously been saved.
Qt4-fsarchiver can also handle fast backups and restores of individual directories that you can recursively back up and restore. The corresponding dialog for this action is found via Actions | Save directory . You should enter the source and destination in the dialog.
The program automatically compresses the backup according to selections you have made for compression format and the encryption option. One mouse click on the back up directory button then starts the backup (Figure 4).
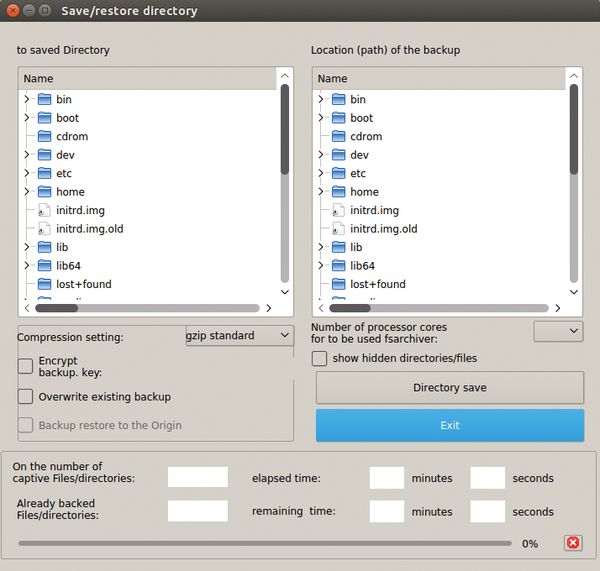 Figure 4: This is the dialog used in qt4-fsarchiver when backing up individual directories.
Qt4-fsarchiver makes it possible to perform complete backups on computers sharing an LAN. However, this only works if a Samba client has been installed on the system that you want to back up. This is because the target machine should be either a Windows computer or a Linux system where the virtual filesystem CIFS VFS allows access to the directory. It is also necessary to create access to a suitable destination directory for the backup.
If the prerequisites for backing up a remote computer on the LAN are met, you should then call the routine for performing the backup via Actions | back up partition on a network .
The software will automatically check for accessible devices on the network and present a short dialog for authentication at the destination computer. Subsequently, the qt4-fsarchiver mounts the accessible device, and then it presents the same dialog used for local partition backups.
Qt4-fsarchiver can also clone complete hard drives and SSDs. To start this action, click on the clone hard drive, create/restore hard drive image entry in the Actions menu. The subsequent window will display the bulk storage devices that are actually available. You now select the hard drive or SSD to be cloned, enter the destination drive, and then click in the lower left of the window on the clone hard drive button.
If you want to create an image file of the data of a bulk storage device, you can activate the radio button create a hard drive image found in the same window. Then, select the source drive and the file path where qt4-fsarchiver should deposit the image.
Now you should click at the lower right on create hard drive image . By selecting the restore hard drive image option found in the same window, you can restore the existing image onto bulk storage.
The corresponding dialogs do not permit any other options, such as selecting the number of processor cores or encryption mechanisms. However, the program compresses the image by default (Figure 5).
 Figure 5: You can clone a bulk storage device or create an image with just a few mouse clicks.
To recover a backup, you can click in the Actions menu on the recover partition entry. The program will show the same dialog used for creating a backup except that irrelevant fields have been grayed out. Additionally, the restore partition with fsarchiver option is automatically activated.
If you have encrypted the backup, you will need to enter the encryption key into the Decrypt backup. Key: field. Then, you will need to again define the number of processor cores that qt4-fsarchiver should use for decryption.
The final step is to enter the destination partition and the name for the desired backup in the Name of back up file: field. The target partition will need to be dismounted during recovery. Otherwise, the software will be unable to restore the data.
Overall, qt4-fsarchiver is very flexible. For example, it is possible for the filesystem of the destination partition to be formatted differently from the source filesystem.
The program deposits the data in the new partition and also restores the original formatting. Likewise, the recovery of data onto a partition smaller than the original device will work fine.
Here, the consideration is whether the uncompressed data fits into a smaller destination partition. Therefore, it is a good idea to save statistical information via a text file that accompanies each backup. This information can then be used to determine the original storage space required by the data in uncompressed form.
Restoring individual directories or backups from remote computers is done in an analogous fashion. The dialogs are the same as those used for performing a backup. The corresponding routines start via either Actions | restore partition via network or Actions | restore directory . You will see a rolling display of the recovered files in a list window.
When Qt4 is unable to restore one or more files, it will ignore these and continue with the recovery of the next file.
Qt4-fsarchiver is a very useful tool when it comes to uncomplicated backups and recovery of files and partitions. However, a learning curve is involved for getting started and for using proprietary transmission protocols or operating systems to perform backups on a remote computer.
Still, on a standalone Linux system, the tool is highly flexible and can replace numerous programs that only back up portions of a system. During testing, qt4-fsarchiver was extremely stable, absolutely reliable, and very fast.
Infos