Pydio is a free cloud solution
Most users only know about products like ownCloud and Seafile when the subject of local cloud solutions comes up. Pydio [1] has been scraping by like a wallflower, unnoticed by many. Even so, this software, like the more familiar solutions, has been under development for a considerable period of time, and it is based on similar underlying concepts.
Previously known as AjaXplorer, this product, which has intuitive operation via the web browser, is looking to win over small- and mid-sized working groups who are trying to figure out whether it is a good idea to use centralized data storage in the cloud.
Preparations
Preconditions for using a Pydio server include installation of a web server and database system. For purposes of testing, Pydio can be operated with out a database backend. However, the developers recommend explicitly that the user set up a database management system (DBMS) solution. Therefore it is a good idea to use an Apache web server, a MySQL database, and PHP. The Pydio server is written in PHP and also supports PostgreSQL and SQLite as a database backend. Additionally, the server can interact with other web servers such as NGINX and lighttpd. Using these two servers is far less well documented however, thus making configuration difficult especially for beginners.
The Pydio project provides its server in the form of a usable, distribution-independent tarball and as a ZIP archive. The project also has various packages for RPM- and DEB-based Linux distributions. The website contains a short set of instructions for installing the cloud server under diverse distributions. There are also instructions for integrating the Pydio package sources in the user's Linux system [2].
Installing on Ubuntu 14.xx
If you are using an older version of Ubuntu or Linux Mint all you have to do is to include the relevant repository into the /etc/apt/sources.list file. Working from the terminal in a text editor, open this file with root rights and add the line from Listing 1 at the end of the file. After saving the modified file, import the public key. Then update the package list and install the cloud software. The installation routine automatically resolves the necessary dependencies (Listing 2).
Listing 1
Adding the Repository
deb https://download.pydio.com/pub/linux/debian jessie-backports main
Listing 2
Importing the Public Key
$ wget -qO - https://download.pydio.com/pub/linux/debian/key/pubkey | sudo apt-key add -
$ sudo apt update
$ sudo apt install pydio mysql-server php5-mysql
Pydio installs both the Apache web server and PHP 5 at the same time. Additionally, the user should have the package manager install the MySQL server and the interface for PHP. At this point, the user should also set a special root password for the database.
Installing on Ubuntu 16.04
Installing on the latest Ubuntu is a little trickier because, at the moment, there are no prepackaged versions of Pydio for Xenius.
First install all the packages Pydio is going to need with:
sudo apt install apache2 php libapache2-mod-php mariadb-server mariadb-client php-mcrypt php-gd php-xml php-apcu php-intl php-mysql
Then download the current version of Pydio from [3] and decompress it with
tar xvf pydio-core-X.X.X.tar.gz
where X.X.X is the current version (6.4.2 at the time of writing).
Move the resulting folder to /var/www/html/pydio :
sudo mv pydio-core-X.X.X /var/www/html/pydio
The rest of the installation is the same regardless of your version of Ubuntu.
Post-Install
Afterwards, you need to change the owner for the installation directory /usr/share/pydio/ so that Apache has write permission for the directory (Listing 3). The final step involves activating the PHP module Mcrypt and Mod Rewrite for Apache and then restarting the web server.
Listing 3
Post Install
$ sudo chown -R www-data:www-data /usr/share/pydio/
$ sudo php5enmod mcrypt
$ sudo a2enmod rewrite
$ sudo service apache2 force-reload
Once the server restarts, the user should log in to MySQL as the administrator (Listing 4). After login, the user sets up the pydio database. Then the user pydiouser gets access to the newly created database with the password that was set previously (Figure 1). When these operations are completed, the installation is ready for use, and the user should leave the MySQL prompt.
Listing 4
Setting up Database
$ mysql -u root -p
mysql> create database pydio;
mysql> grant all on pydio.* to ,pydiouser'@'localhost' identified by ,Password';
mysql> FLUSH PRIVILEGES;
mysql> exit
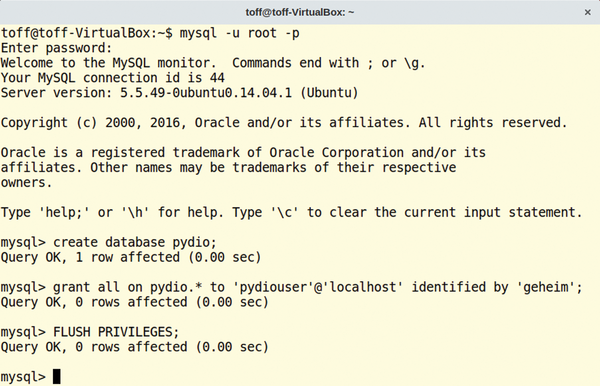 Figure 1: The database required by Pydio has to be set up manually in the MySQL server.
First Configuration
It is convenient to perform the remaining configuration tasks for Pydio via a web browser. In order to get to the homepage of the Pydio server, visit the URL http://<IP-Address>/pydio, where <IP-Address> is the IP of the computer running Pydio. This page contains an overview of all modules present along with their current status. Warnings appearing on the homepage, typically at the top, usually have nothing to do with the functionality of the server (Figure 2).
 Figure 2: The installation routine executes a check at the beginning of the first configuration.
The CLICK HERE TO CONTINUE TO PYDIO link sits above the diagnostic view. The link takes you to the initial steps for setting up Pydio. These include choice of language and starting the installation assistant with the Start Wizard button. Here you enter the access data for the future administrator. Then you specify the DBMS system in the list menu database connection , which will be used by Pydio. Here you enter the data for the MySQL database that you set up earlier.
Clicking on Test connection lets you monitor the connection to the database. As a final step in the initial installation, you can change the path to the server and modify the language and encoding in the additional settings area. Then click on the button that has the somewhat misleading label of Install Pydio .
User Interface
The Pydio homepage is straightforward. The work environment is to the left in a vertical bar. It contains just three menus in addition to the initial configuration. These include Public files , My files and Shared files . As soon as the user clicks on one of the entries, the corresponding list of files and subdirectories open on the right-hand side of the larger window area (Figure 3). In the middle of the main screen, Pydio also displays links for downloading various clients for file synchronization. Missing from these links is one for a Linux client.
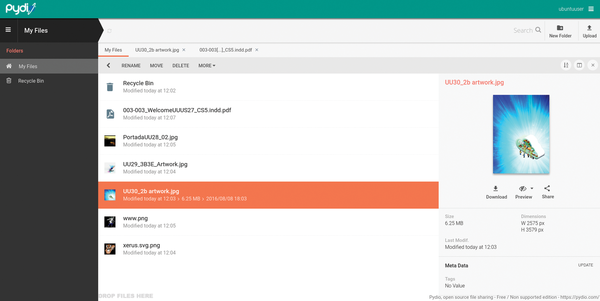 Figure 3: Pydio scores points with its straightforward and modern interface.
There is a menu at the top right next to your username. This menu contains an option for opening the Dashboard where you can administer your profile. This menu is also used for accessing the general settings in Pydio. However, these only become available when you log in with administrator rights, as is the case with the initial login. The settings menu consists of a screen that is divided into two parts with several options for managing the cloud. This is where you specify users and groups, define their roles, and modify their work environments.
In addition, the settings menu offers an overview and analysis of log files and a diagnosis function that reports on the status of various modules. You can choose themes and the general appearance in each individual dialog. This is also the place for performing technical modifications.
In order to integrate new groups and users into the system, first go to the settings menu on the left and click on the People entry on the left and then click on New users or New groups at the top of the panel. It is a good idea to first define groups, making it possible to assign users to them.
Once you click on New group , a window will open asking for the group ID and a label. The ID is the only thing that is absolutely necessary. After clicking on OK , the software will set up the new group and build a corresponding search path with the accompanying folder name appearing in plain text. Pydio immediately adds newly set up groups to the list on the left in the window. Click there in each main group and select the New group at the top in the middle. In the same way, you can also define subgroups.
After setting up the groups, add users to the system. This is done by selecting the New users option in the main People window and entering the user names and password for each in the window that opens. After this, Pydio branches into a user-specific configuration menu. This is where you specify the user role and accompanying rights. In addition, email messaging is set up, and the workspace and avatar image are defined.
If the new owner now logs in for the first time, it is possible to set up a file structure for the individual workspace by clicking on the New folder button at the top right. Finally, new content can be moved to each folder from the local file manager by dragging and dropping.
Retrofitting
If you intend to load high resolution images or large videos into the cloud, then the maximum file size should be defined from the beginning. Otherwise it could well be that Pydio refuses the data transfer to the server due to indications that the data volume is too large. You should specify the maximum file size and the number of loadable files as the administrator in the Application core | Uploaders options (Figure 4).
 Figure 4: Unless changes are made to the web server configuration, the maximum file size for uploading is 2MB.
The number of loadable files and the entire volume can easily be modified. However, the default settings do no accept values greater than the preset maximum file size of 2MB. In order to change this limit, edit the php.ini file that is located in the /etc/php5/apache2/ directory. Open it in a text editor as root and search for the lines that say post_max_size and upload_max_filesize (Figure 5). Replace the values in each with the desired file size, for example 1G (1GB). Save the changes and restart the web server with sudo service apache2 restart . Then you can adapt the size values in the configuration settings accordingly.
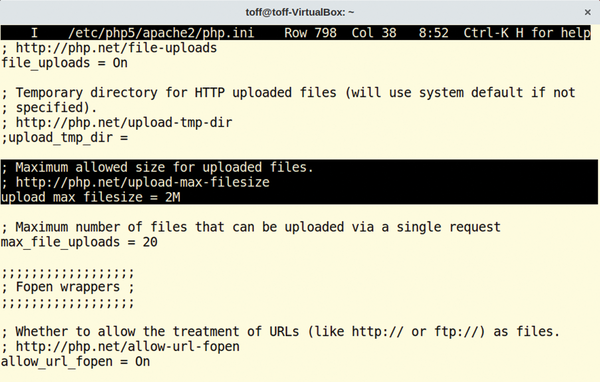 Figure 5: The maximum file size for data transfers to the Pydio server is limited by the PHP configuration for the web server.
After completing the modifications, load the first data onto the cloud server. Do this by clicking on the top right of the workspace on the Upload button and selecting the desired files from your local hard drive. Alternatively you can upload content from the local file manager by dragging and dropping into the web browser onto the Pydio page. The files loaded to the server automatically appear in the right-hand side panel of the workspace. Clicking with the mouse on one of the symbols displays more detailed information and a slightly larger preview to the far right of the window. This view includes a horizontal menubar running along the top. The menu contains basic editing functions.
Double clicking on a file opens a full view of the file. Here you can also watch images in the form of a slide show (Figure 6). PDFs also work, although there is no similar preview for ODT format documents. Instead, only a system dialog opens, offering the option of either saving the file locally or opening it with the help of a third application. Pydio is limited to opening simple text files in a simple editor when the user double clicks on the corresponding file symbol. This editor allows you to modify the text (Figure 7).
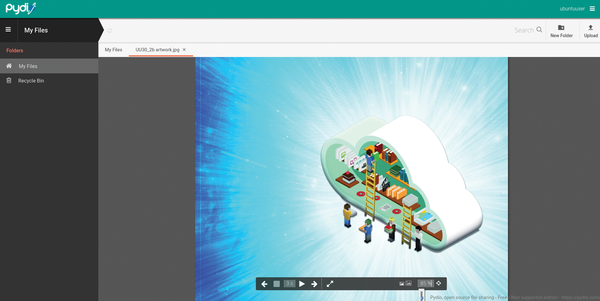 Figure 6: The integrated image viewer in Pydio offers a slideshow function.
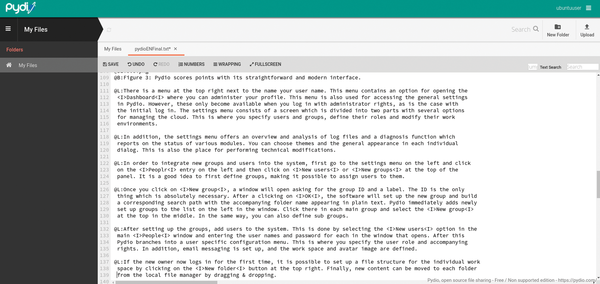 Figure 7: It is possible to view text documents and use the integrated editor to edit the documents.
Generous
Common access to content is essential for collaborative work in the cloud. Therefore, like all professional cloud systems, Pydio offers a share function. This lets you share files and folders either by generating a public link or through sharing the workspace with other users. You access the sharing function by right clicking on the file or folder you want to share. A context menu opens and you can select Share .
You can generate a URL in the dialog that comes up by putting a check mark in front of Enable public link . This can then be sent via email or IM to your contact. The dialog also lets you set the rights that apply to external users. Since the link generated by Pydio is usually long and complicated, it can be modified by clicking on Customize Link . You can also shorten the link as desired.
In a similar fashion, you can send an invitation from the User administration dialog to other Pydio users along with the file that is to be shared. The invitees can be chosen from the list of current groups and users. The invitees receive a message in their Shared files workspace so that they can open or edit the file according to their preset rights.
Synchronization
One of the essential tasks for every cloud service is prompt and automatic synchronization of data saved locally and in the cloud. Pydio left me with an ambivalent impression because the installation process for the Linux sync client is clumsy due to lack of distribution-specific packages. In addition, its sync agent is also error prone and is missing important functions.
If you don't rely on a graphical client and want to let synchronization run in the background, Pydio offers the option of installing a sync agent. However, the agent still has to be configured in the browser before it is used for the first time. Installation is performed by downloading the current Linux client from the project website [4]. The tarball is approximately 44MB and should be decompressed using the first command from Listing 5.
Listing 5
Installing the sync agent
$ tar -xzvf PydioSync-Linux-Binaries*.tar.gz
$ cd pydio-agent
$ ./pydio-agent --api_user=User --api_password=Password
The archive contains the subdirectories pydio-agent and pydio-ui . Switch into the pydio-agent directory and execute the command to start the agent at the prompt (line 3 from Listing 5). Typically the synchronization service will then start and prompt the user to open the browser for the initial configuration. During testing, the routine was frequently interrupted by multiple error messages.
Through research on the Internet, I discovered that the Pydio developers have known about the error for more than a year. Apparently, it has to do with Python 2.7 and the GLib object system libraries. To date, no patch has been issued as a remedy. During testing, I found that the problem occurs on all Linux distributions using XFCE for the desktop interface. The agent started without any problems on systems using the KDE desktop or Gnome.
As soon as the agent is working, open a new session in the browser using the URL http://localhost:5556 and from there log in again. As before, serious errors occurred during testing with version 1.2.2 of the sync client, which was the most recent version at that time. It was not possible to generate a connection to the server under either Fedora 23 (Gnome) or Mageia 5 (KDE). The sync client refused to accept the authentication data. On the other hand, the sync client started its task without any objection under Rosa Linux.
As soon as you open the configuration interface in the browser, it makes sense in the next step to prepare the basic settings for update frequency, the logs, and those for the local database. After saving any changes, log in again and continue the process by defining the directories to be synchronized. The dialog in the extended settings also offers the possibility of indicating the frequency of synchronization and the direction for the data alignment. In addition, you can specify if conflicts arise when two versions of the same files are saved on the local system and server, or when one of these versions is deleted.
After saving all of the modifications using the corresponding button and then clicking on the Continue button in the main window, you receive statistical details about the pending first synchronization. Start the process by clicking on the Start synchronization button. After completing the first data sync, you receive a message regarding the success of the action. The following synchronization occurs according to the selected settings.
The graphical Pydio client is limited to the display of an icon in the message area of the desktop environment (Figure 8). However, during testing, the icon only appeared under Gnome. The Unity interface under Ubuntu withheld the program symbol.
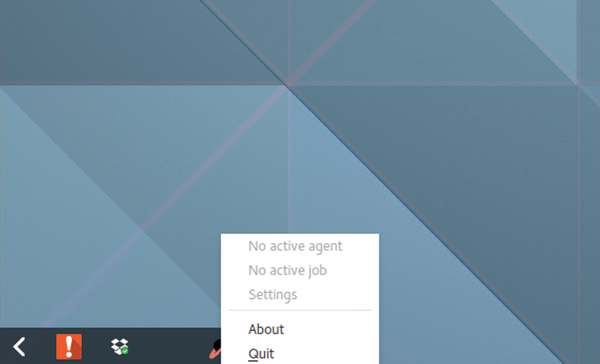 Figure 8: The graphical interface for the Pydio sync client is limited to indicating status.
Conclusion
Pydio has an interface that is intuitive to operate. However, this free cloud solution has only seen very limited use under Linux due to the error-ridden client application. In addition, the documentation is in serious need of various supplements and updates. It is still not clear why installation for the client application continues to require deep Linux knowledge and significant manual work in spite of multiple years of development. It is also not clear why Pydio continues to try and target end users and small work groups that operate without a Linux geek when their install process is so lacking.
Hopefully, the developers ultimately start testing the software more thoroughly prior to a release. Testing is especially important for cloud services holding data, something which is often valuable to the user. Ideally, the software for these services should be rigorously tested and free of errors. There is not much room for experimental solutions with either private or commercial users. As a result, Pydio cloud in its current state is not recommended for beginners and unexperienced system administrators.
The Commercial Version
Pydio does not only offer open source software; it also offers commercial services. These services are available free of charge for a 30-day trial run with a maximum of 10 users. There is however no support option during the trial period.
Unlike the community version we tested, the commercial product is supposed to have better security, an improved user administration and an extensive administrator dashboard. Additionally, Pydio makes preconfigured client apps available. Fee-based support exists for the commercial version and costs at least EUR1350 (approximately $1505) per year. In addition, Pydio offers support packages at EUR1500 (approximately $1672) per year that include five annual tickets for 30-minute support sessions for up to 50 users.
Infos
- Pydio: https://pydio.com/
- Packages and info: https://pydio.com/en/docs/v6/install-pydio
- Tar package download: https://sourceforge.net/projects/ajaxplorer/files/pydio/stable-channel/
- Download sync agent: https://pydio.com/en/products/downloads/pydiosync-desktop-app