Using GRUB 2
At one time, the first operating system on a hard drive was the only one. Today, users expect more. Not only should different systems run in parallel on a computer, but you should expect various boot media and individual configurations. Current Linux systems depend on GRUB 2 and its flexibility. With GRUB 2, you can customize the boot process, secure a system against unauthorized access, and make mobile devices distinct.
What is GRUB 2?
GRUB stands for GRand Unified Bootloader [1]. The program helps the user select an operating system from a memory device – be it hard disk, CD/DVD, USB stick, or SD card – and starts it up. On startup, GRUB first reads from the storage medium the boot information in the Master Boot Record (MBR; or in ROM in mobile devices). After a short welcome screen, GRUB displays a selection menu for your operating system then gives control to the (Linux) kernel of the system you select.
GRUB has been in version 2 since June 2012 – the pre-release since Ubuntu 9.10 appeared as version 1.98/1.99. Although you can theoretically continue to use GRUB 1 (0.97), which is now officially called GRUB Legacy, GRUB 2 was completely rewritten and is not backward compatible because the bootloader is not supposed to carry any old baggage around with it.
What Can GRUB 2 Do?
GRUB 2 is extremely flexible and supports booting partitions with the ISO 9660 (CD/DVD), NTFS, Ext2/3/4, ZFS, and Btrfs filesystems. It can also handle Logical Volume Managers (LVMs) and software/hardware RAID. The Linux kernel provided over the network (TFTP) can be integrated into the selection menu (PXE boot). GRUB 2 differentiates hard drives with Universally Unique Identifiers (see the "UUID" box) with the use of labels as well as shell-like scripts that handle entries in the boot menu.
UUID
Simply put, a Universally Unique Identifier (per RFC 4122 [2]) is a standardized sequence of characters that, among other things, identifies hard drives and partitions, including RAID systems and the Logical Volume Manager (LVM). It consists of a 16-byte hexadecimal number in five groupings. For example, the /etc/fstab file uses this to mount single partitions at the right location (Listing 1). Moreover, UUIDs ensure that hard drives get the same mount points after every boot. With the earlier notation, (e.g., /dev/sda1 and /dev/sda6 , commented out in the listing), the mount points were somewhat less defined.
Listing 1
/etc/fstab
# <file system> <mount point>   <type>  <options>       <dump>  <pass>
# /dev/sda1     /boot            ext3    defaults         0       2
UUID=0127f1e9-6401-44c0-ab71-1515795a473b       /boot           ext3 defaults        0       2
# /dev/sda6     /home            ext3    defaults         0       2
UUID=dddcee4d-69c3-401e-8c20-28ec531ebe60       /home           ext3 defaults,user_xattr        0       2
Among the highlights of GRUB 2 is that it loads individual components as modules at run time. Entries in the boot menu are easier to handle in this way than with its predecessor and occur through the central configuration file /etc/default/grub , which not only allows the use of a background image but also integrates a recovery environment. If something goes wrong at boot time, you can go into recovery mode and fix the problem.
Unlike its predecessor, GRUB 2 doesn't show the boot menu if there's only one resident operating system. To make the boot menu appear, you have to change the bootloader configuration. Open a terminal with Ctrl+Alt+T and open the configuration file in an editor:
$ gksu gedit /etc/default/grub
In the file, comment out the entry GRUB_HIDDEN_TIMEOUT=0 and set GRUB_TIMEOUT=10 to show the bootmenu for 10 seconds before Ubuntu uses the topmost system listed (Figure 1). Use the following command to make your changes:
 Figure 1: If only one system resides on the hard drive, GRUB 2 no longer shows the boot menu, although you can change that behavior with a configuration setting.
$ sudo update-grub
The boot menu now shows up at each reboot.
Installation and Configuration
The Ubuntu installer automatically installs GRUB 2. Thanks to the so-called "OS prober," GRUB independently recognizes the operating systems on the hard drive and creates entries for them. If you modify the /etc/default/grub [3] central configuration file (menu.lst no longer exists), the system has to read the settings in again, which – as mentioned earlier – you accomplish with the sudo update-grub command. You can also use tools such as Grub Customizer [4] or GRUB 2 Editor for the same purpose.
GRUB 2 Splash Image
One way to customize GRUB 2 is with a splash image (Figure 2), but to ensure that no harm is done, secure the entire /etc/grub.d/ directory with administrator rights. The directory contains all scripts that define GRUB 2 behavior, so the bootloader starts properly in an alphanumeric sequence. In a pinch, grab the original configuration by starting an Ubuntu Live CD and mounting the external hard drive by double-clicking it in the file manager.
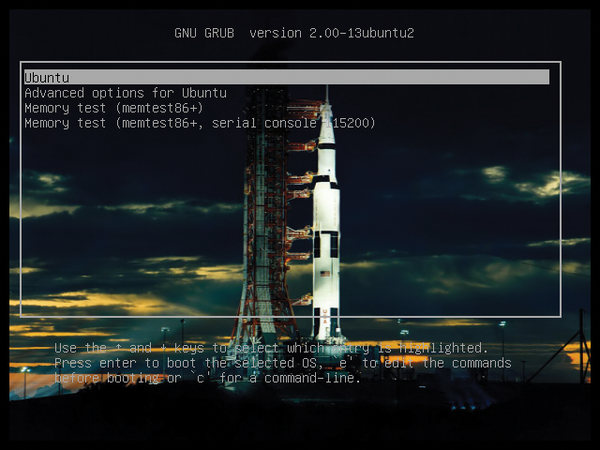 Figure 2: GRUB doesn't accept just any image as a splash image. You can install a few using a package.
Splash images have to meet certain criteria [5]. They must be in PNG, JPG/JPEG, or TGA format; consist of a maximum 256 RGB colors; and can't be indexed. Although you can set these criteria with GIMP, you have an easier way. To install a few sample images for GRUB 2, enter the command:
$ sudo apt-get install grub2-splashimages
Next, copy one of the images to the /boot/grub directory (e.g., an Apollo spaceship image):
$ sudo cp /usr/share/images/grub/Apollo_17_The_Last_Moon_Shot_Edit1.tga/boot/grub/
If GRUB finds multiple images, it takes the first one in alphanumeric order. To integrate the image permanently, use the command:
$ sudo update-grub
The image should appear as a splash image in the GRUB 2 screen output.
Securing GRUB 2
By default, you can modify the GRUB 2 configuration only if you have administrator rights; normal users do not have access.
You can increase GRUB 2 security further by applying a password [6] so that not just anyone is allowed to play with the boot options or start the system. To set a password, in the /etc/grub.d/40_custom file, add the following entry using your own password:
set superusers="felix"
password felix secret
Here, only user felix can alter GRUB by entering the password secret .
Because Felix's password appears as plaintext in the file, you can create an even more secret password by using the command:
$ sudo grub-mkpasswd-pbkdf2
The pbkdf2 function (password-based key derivation function 2) first requests the user's password and then spits out a very long hashed string (Figure 3).
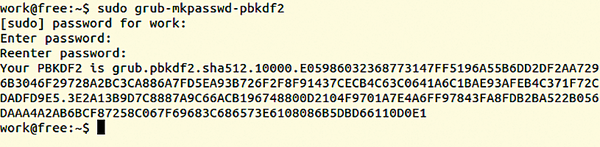 Figure 3: At the command line, you can create an encrypted password to access GRUB 2.
You can use this hardened password for Felix in place of $PASSWORD in the following command:
$ password_pbkdf2 felix $PASSWORD
Once again, enter sudo update-grub to generate a new configuration file for GRUB 2. By the way, using sudo grub-mkconfig shows you the modified configuration in advance.
Secure Boot
A new mechanism known as Secure Boot (the Unified Extensible Firmware Interface, or UEFI, specification) crops up in many discussions. It is a mechanism that Microsoft claims makes the boot process more trustworthy [7]. It first appeared with Windows 8 and applies to multiboot systems in particular. With UEFI, a certificate from a Microsoft-authorized certificate authority has to be applied at boot time.
If Secure Boot is activated on the computer (on ARM machines it can't be deactivated), the system starts up only if all the boot process modules have a valid certificate; otherwise, nothing loads on the computer. The posited advantage of this approach is that a computer loads only trustworthy – pre-tested – components from a reliable source, which prevents malicious code from creeping in.
However, Secure Boot makes development and testing of unsigned kernel modules more difficult. It's not the process itself, which is supposed to add security, that is the problem, but Microsoft's role that pushes Secure Boot through as a quasi-standard by virtue of Microsoft's market position.
Linux distributions each have a way of handling secure booting. Red Hat/Fedora, openSUSE, and Ubuntu use a signed bootloader, with Red Hat/Fedora also adding a signed kernel. OpenSUSE enhances the process with its own key management system. Debian developers meanwhile haven't made any statements on the subject.
Infos
- GRUB project page: http://www.gnu.org/software/grub/
- UUID RFC: https://www.ietf.org/rfc/rfc4122.txt
- Configuring GRUB 2: https://help.ubuntu.com/community/Grub2#Configuring_GRUB_2
- GRUB Customizer: https://launchpad.net/grub-customizer
- Splash image for GRUB 2: https://help.ubuntu.com/community/Grub2/Displays#Installing_Splash_Images
- "How to Password Protect Ubuntu's Boot Loader" by Chris Hoffman, http://www.howtogeek.com/102009/how-to-password-protect-ubuntus-boot-loader/
- "UEFI and Secure Boot" by Brian Proffitt, http://www.linux-magazine.com/Online/Features/UEFI-and-Secure-Boot