Zeroshell workshop
Wireless LANs (WLANs) have long since firmly established themselves even in private homes – at the expense of communication security. It's true that the WPA2 standard has made an important step forward from its predecessors; but, its pre-shared key (PSK) technology is still plagued with inadequacies in terms of preventing attacks. The IEEE 802.11i WPA2 Enterprise specification does in fact provide more security. Zeroshell [1] will help you get up to speed with relative simplicity.
Technology
Although WPA2-PSK uses only a single key for the whole network, authentication with WPA2 Enterprise uses various other methods together with a RADIUS server. The RADIUS server provides central user accounting, so that, for example, net access (and possibly de-access) for every client can be configured separately. With WPA2 Enterprise, the RADIUS server rather than the net access point does the authentication. If the login is successful, the access point unlocks the client's network access as determined by the RADIUS server.
Authentication via RADIUS server is based on a significantly enhanced infrastructure. You can choose among different authentication methods; the completely encrypted communication and registration with different keys and certificates makes for a high degree of security. With WPA2 Enterprise, the user registers with a username and password, which the RADIUS server encrypts, at the access point. Thus, asymmetric encryption per EAP-TLS specification secures the communication between the client ("supplicant"), access point ("authenticator"), and the RADIUS server.
Every client and the RADIUS server have X.509 certificates and private keys that help the devices communicate. Access points and the RADIUS server wrap up their communication with help from passwords ("shared secrets"). The access point uses neither certificates nor keys but, instead, works transparently. The certificates are usually generated by Zeroshell on the RADIUS server, and you need then to install the root certificate on the client computer.
Keyword PKI
Zeroshell is based on a so-called public key infrastructure (PKI). Public keys, first of all, secure the digital certificates against any possible falsification. The certificate is further protected by a digital signature that is authenticated with the sender's public key. Thus, PKI is based on a cascading authentication sequence that makes it virtually impossible for attackers to decipher the data traffic and access.
The focal point of a trusted PKI is the certification authority (CA) that generates the digital certificates. You can get such root certificates from service providers, but Zeroshell also provides an integrated root CA that generates certificates and keys. Depending on the security specification and service, these include user as well as host certificates. That means you can build a private PKI completely using Zeroshell without having to rely on third-party software or services.
RADIUS Server with Zeroshell
Setting up a RADIUS server usually requires a lot of effort under conventional Linux distributions, not the least of which involves editing a mass of configuration files and generating certificates and keys. The Zeroshell web interface, in contrast, provides all operations in a few convenient steps.
To configure the integrated Zeroshell RADIUS server, go to the RADIUS tab in the web browser's settings window. Zeroshell shows you that a certificate and key have already been generated (Figure 1). To import externally available root certificates and keys, use the Imported button at the right of the window and provide an appropriate search path.
 Figure 1: The initial Zeroshell screen for the RADIUS server.
Self-generated certificates are typical in smaller installations. First, switch on the RADIUS service by clicking a checkmark on the Status line next to Enabled . Then, click the Trusted CAs button a few lines down on the right, which opens a Trusted Certification Authorities window. In the large Trusted CAs List area, you'll find the ZeroShell (Local CA) entry. Click this entry.
In the upper right of the window, select DER in the drop-down list next to Export and then click Export . Zeroshell opens a file dialog and asks you where you want to put the generated X.509 certificate. Enter a path and save the certificate to it. It later will build the authentication framework for all clients and thus needs to be stored on each workstation in the WLAN (Figure 2).
 Figure 2: Generate an X.509 certificate with help from Zeroshell.
After placing the certificate, make the RADIUS server aware of the access point. Because the server doesn't send any requests through the net, you need to register every access point in the WLAN. To do this, click the Authorized Clients button at the top middle of the configuration window. Provide a name, IP address, and shared secret for the access point. With help from the shared secret, various selected characters, and digit sequences, the RADIUS server and access point will secure the communication.
After entering the values, click the plus sign at the upper right. Zeroshell then enters the access point in its list of authorized clients. Close the window and click Users in the menu down the left, then click the Add button in the middle. At the right of the window, a comprehensive configuration dialog will open where you enter the relevant data for each individual user. Be sure not to use any special characters; otherwise, Zeroshell will return an error message. For larger networks, be sure to note the relevant entries to enter them correctly for each client. Zeroshell automatically generates an X.509 certificate and public key for each user (Figure 3).
 Figure 3: Zeroshell creates a separate certificate for each user.
On the Router
You also need to configure the router. There, you need to change the security options for the WLAN from WPA2 Personal to WPA2 Enterprise. As a rule, the router also requires that you enter the shared secret defined on your Zeroshell system. Be careful of uppercase and lowercase.
The router then asks about the encryption algorithm used and the IP address of the RADIUS server. Only after the complete and correct configuration of the connection can the communication between the access point and the authentication server proceed successfully. This proceeds transparently to the clients so that they don't come in direct contact with the authentication service.
On the Client
You now need to configure all workstations on the network to use the RADIUS server. To do this, copy the certificate originally found on the Zeroshell machine to each client. Then, open the network manager on the computer and change the security setting from WPA & WPA2 Personal to WPA & WPA2 Enterprise .
In this example, I selected the Tunneled TLS option for Legitimacy to establish a connection through the EAP-TLS standard. In the CA certificate field, enter the certificate stored on the hard disk as originally generated by Zeroshell. With Debian and its derivatives, you can simply do a search in the data manager; on Mageia/Mandriva-based systems, you need to specify the entire search path.
Finally, enter the username and password stored on the RADIUS to get user legitimacy. Saving the settings completes the configuration (Figure 4). You can now easily register yourself on the net, where the entire communication is encrypted and digitally signed. A break-in by unauthorized third parties into the WLAN by capturing and decrypting the traffic is excluded in this environment. (Also see the "Accounting" box.)
Accounting
A further service that the RADIUS server provides in your WLAN is accounting. You can create user and class-specific accounts that are used for billing and restricting Internet access. Zeroshell not only provides volume and time-based billing models but also lets you set limits for data, time, and bandwidth.
You can get to the accounting settings by clicking Accounting on the left of the options window. Then, switch on accounting at the right of the window and define an accounting model with Accounting Classes | Add . These accounting classes will show up on the right as a list, and you may possibly need to activate the class depending the model used. In the area on the left, you also see a list of registered users. You call up their detailed accounts and accounting data by double-clicking each username.
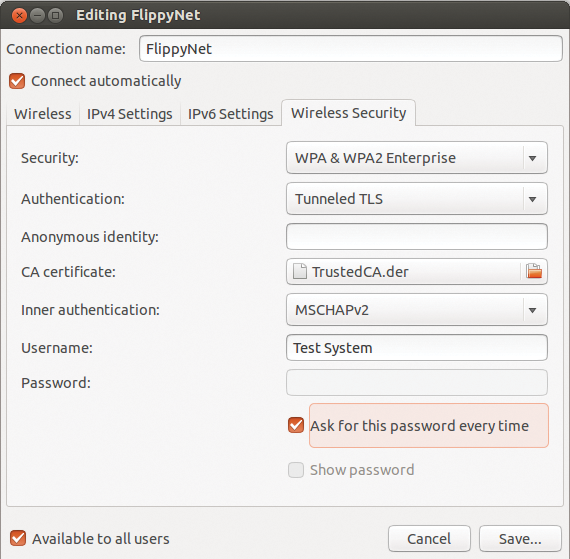 Figure 4: A few settings on the client are necessary.
Conclusion
With Zeroshell, you can protect your wireless LAN professionally against unwanted eavesdroppers and intruders. Zeroshell greatly reduces the configuration effort for conventional distributions in that it collects all necessary setting dialogs and controls in an easy-to-use interface. l
Infos
- Zeroshell: http://www.zeroshell.org/