Create searchable PDFs and optimize their use
Documents that are completely different from one another, like billing statements, books, scholarly works, and more, are regularly composed, transferred, and distributed with digital tools. Preferably, these transfers are made with the platform-independent PDF format. Documents that are searchable make it easy to quickly find a particular item inside of a file. Metadata contains additional information.
In addition to all these advantages, there are countless possibilities for working on PDF documents. As a means of fulfilling specific needs, you can do things like remove individual pages, add new ones, or take individual pages and add them to a new PDF file. You can also highlight passages, draw arrows and circles around text, and add comments to a PDF file, just as you would with a printed text.
Text Recognition
In order to fully exploit all of the PDF format's possibilities, the file should be searchable. This feature lets you browse through several PDF files for particular words, as well as use the search function on the PDF viewer to quickly find the correct passage inside of the file. Typically, you can search through files created using LaTeX and LibreOffice. The situation looks different though with PDF files created from scans. Once scanned, the files consist purely of image data. A text recognition program lets you add a text layer to the data.
A good text recognition program to use with Linux is the optical character recognition (OCR) engine Tesseract [1]. Most distributions have the program in their package sources. You will find it in the tesseract-ocr package in Debian and Ubuntu. In addition, you will need a package with the languages that the program is supposed to recognize. For English, use tesseract-ocr-eng . If you install tesseract-ocr-all , you'll install all language packages. Be aware this is a hefty install.
The program itself does not have a graphical interface. However, the contents of an image file can be translated completely into machine readable text via the command line. Listing 1 shows all of the languages that are available. The osd found in Listing 1 stands for "Orientation and Script Detection," which refers to automatic detection of the scan orientation and text recognition in columns. You should let Tesseract take a scan, such as a example.jpg , and have the recognized text appear as a text file of the same name.
Listing 1
Tesseract languages
$ tesseract --list-langs
List of available languages (3):
deu
eng
osd
$ tesseract -l eng image.jpg image
Now you should have a searchable text file (called image.txt if you followed the example) on your hard drive. The PDF itself continues to recognize only image data. Applications like OCRmyPDF [2] go one step further and embed the text found using the Tesseract OCR engine directly into the PDF. You can do something similar with LibreOffice Export.
The program can be installed under Debian Testing from the package sources. In Ubuntu, you can install it using:
sudo apt install ocrmypdf
If the version provided by your package manager is outdated, you can use the package management program Pip. You can use this program to install the Python package manager together with all of the dependencies for OCRmyPDF, update Pip, and then install the program (Listing 2).
Listing 2
Install Pip and OCRmyPDF
$ sudo apt install python3-pip python3-pil python3-pytest python3-reportlab zlib1g-dev libjpeg-dev libffi-dev ghostscript qpdf unpaper
$ sudo pip3 install --upgrade pip
$ sudo pip3 install ocrmypdf
In order to create a searchable PDF file from a scan, you should use the commands from Listing 3. Since Tesseract text recognition analyzes not just letter by letter but also by comparison with a language-specific dictionary, you will need to specify the correct language when calling. When no language is specified, Tesseract defaults to English.
Listing 3
Create a searchable PDF
$ ocrmypdf -l eng article.pdf article_ocr.pdf
$ ocrmypdf -l en -c -d -i --title "Sherlock Holmes: A Scandal in Bohemia" --author "Arthur Conan Doyle" --subject Scan --keywords "Crime, Short story" scan.pdf scan_ocr.pdf
Both of the options -c and -d prompt OCRmyPDF to correct scanning errors, such as dark bars. They also straighten crooked text. In order to accomplish this, OCRmyPDF uses Unpaper [3], a tool that has been optimized for this purpose. Unless you indicate otherwise, OCRmyPDF only uses the pages that have been corrected by Unpaper for internal text recognition. The option -i also puts the cleaned up scans in the output file.
Calling Unpaper as a cleanup expert primarily works well when the scan consists only of continuous text. If there are also images and graphical elements in the scanned document, then it is entirely possible that Unpaper will also see these as scanning errors and delete them. If in doubt, it is a good idea to avoid this option.
To finish, you should define metadata, such as the title, author, subject, and keywords, for the resulting PDF document. Enter individual words behind the corresponding switch. Several words strung together or an entire sentence should be put in quotation marks. The name of the input file is found at the end, followed by the name of the output file. The final result is a searchable PDF file.
Search and You Will Find
You can get to the desired passage in a searchable PDF file using the integrated search function in the PDF viewer. If you would like to look through multiple PDF files for specific phrases, you should use the program Pdfgrep [4]. Commonly used distributions usually list this program under the same name in their package sources. In Ubuntu, you can use:
sudo apt instal pdfgrep
to install it.
If for example, you want to find all of your scanned bills from 2016, then you would use the following command:
$ pdfgrep -i -n ,invoice|2016' *.pdf
The option -i lets Pdfgrep ignore the difference between capital and lowercase letters during a search, so Pdfgrep will return "Invoice," "invoice," INVOICE," and even "iNvOice." The option -n provides the specific page in the PDF file for each item found (Figure 1).
 Figure 1: Using Pdfgrep lets you search through the contents of PDF files from the command line. The command wc helps you achieve the correct text length when you are writing an article.
Author guidelines for magazines or for final papers written in an academic setting often include rules about minimal and maximum word or character count. These values are easy to determine when you use OCRmyPDF and issue the command wc (Listing 4). In Debian and Ubuntu, this is found in the coreutils package and often comes preinstalled. Replace the -m option (count characters) with -w to get the command to output the word count.
Listing 4
Using wc to count words
$ wc -m masters thesis.pdf
302605 masters thesis.pdf
$ wc -w masters thesis.pdf
13385 masters thesis.pdf
Click Through
If you would like to have more control over text recognition, then you will find that the command-line tools discussed thus far a bit lacking. This is where OCRFeeder [5] comes into play.
Most distributions have OCRFeeder in their package sources, and you can install it on Ubuntu with:
sudo apt install ocrfeeder
OCRFeeder analyzes layout and uses various OCR engines for text recognition. The supported engines include Cuneiform, GOCR, Ocrad, and Tesseract. You can select the program's OCR tool under Tools | OCR Engines .
When you fire it up, OCRFeeder will offer you the choice of scanning a new document or opening a selected document as a graphic or PDF. In order to correct scanning errors and straighten text, OCRFeeder also relies on Unpaper. You can call these Unpaper functions with Tools | Unpaper , as well as Tools | Image Deskewer .
Start the text recognition by clicking on Document | Recognize Document . Once this action is completed, the recognized text will appear in an editor window. There you can make corrections and even format the text (Figure 2). The results can be saved as a searchable PDF file. In addition to blank text files and HTML, the export function also supports output as ODT in order to continue work with the document in LibreOffice. The free office suite then opens the export as RTF, DOC, or DOCX.
 Figure 2: OCRFeeder also handles complicated layouts without any problems as shown here with an Ubuntu User article.
Metadata
Similarly to Exif data found in photos, PDF documents also contain optional metadata, such as title, author, document type, keywords, creation and modification dates, as well as the program used to create the PDF file. The information can be displayed with many PDF document viewers (Figure 3). The PDF toolkit [6] is available when you want to change or delete the metadata. In Ubuntu, you can install this with:
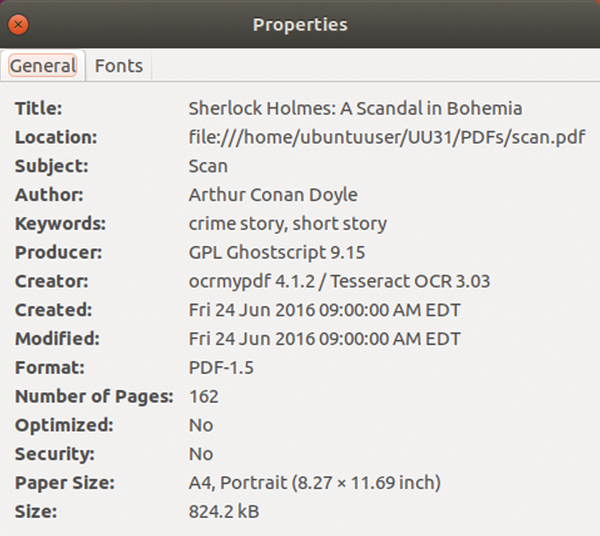 Figure 3: PDF files frequently contain additional metadata. Image viewers, such as Evince shown here, display these in the properties.
apt install pdftk
You can read out the metadata for the document scan.pdf with the commands from Listing 5 (first line), or alternatively you can write them back (second line). The metadaten.txt file serves as the buffer. Listing 6 shows how this kind of text looks. The data in lines 1 through 24 contain author, title, subject, keywords, date of creation, dates of modifications, the software program with which the original document was created prior to PDF conversion, as well as the program used to create the PDF file.
Listing 5
Reading and writing metadata
$ pdftk scan.pdf dump_data output metadata.txt
$ pdftk scan.pdf update_info metadata.txt output scan_updated.pdf
Listing 6
Metadata
01 InfoBegin
02 InfoKey: Author
03 InfoValue: Arthur Conan Doyle
04 InfoBegin
05 InfoKey: Title
06 InfoValue: Sherlock Holmes: A Scandal in Bohemia
07 InfoBegin
08 InfoKey: Subject
09 InfoValue: Scan
10 InfoBegin
11 InfoKey: Keywords
12 InfoValue: crime story, short story
13 InfoBegin
14 InfoKey: CreationDate
15 InfoValue: D:20160624090000+02'00'
16 InfoBegin
17 InfoKey: ModDate
18 InfoValue: D:20160624090000+02'00'
19 InfoBegin
20 InfoKey: Creator
21 InfoValue: ocrmypdf 4.1.2 / Tesseract OCR 3.03
22 InfoBegin
23 InfoKey: Producer
24 InfoValue: GPL Ghostscript 9.15
25 PdfID0: 4b6f80885c8cd32aa1ecfd450d73905b
26 PdfID1: 4b6f80885c8cd32aa1ecfd450d73905b
27 NumberOfPages: 162
This information is arranged in blocks of three. At the beginning of a metadata block (line 1), you will see the type of information (line 2: author) and then the actual value (line 3: the author's name). Lines 25 and 26 contain two hash totals that identify the file. The first (line 25) cannot be changed, and it corresponds to the second (line 26) when you create the document. The second hash total is always new each time you modify the document. The number of pages is found in line 27.
You can use your text editor of choice to edit the data in the metadata.txt file. If you want to delete individual pieces of metadata, remove the corresponding value from InfoValue so that the only thing remaining is an empty field. Next, you should save the change to the text file and use the second command from Listing 5 to add the modified metadata to the scan.pdf file. Then you should save the new PDF file under the name scan_updated.pdf .
If you find yourself doing this kind of work frequently, then you can automate the steps with a simple shell script. To do this, save the content from Listing 7 to a text file like metadata.sh . Then make it executable with the command chmod +x metadata.sh or set the execute bit with the file properties in a file manager. Then move the file to the ~/bin directory. Ordinarily this directory is included in your PATH variable, so the shell automatically finds the command.
Listing 7
metadata.sh
01 #!/bin/bash
02 pdftk $1 dump_data output $1.txt
03 xdg-open $1.txt
04 pdftk $1 update_info $1.txt output $1.updated.pdf
05 rm $1
06 rm $1.txt
07 mv $1.updated.pdf $1
You call the program with:
metadata.sh scan.pdf
The script first reads the metadata from the relevant PDF file and saves it to the text file scan.pdf.txt (line 2). The script then opens the file automatically in the text editor (line 3). xdg-open will automatically select the editor that has been defined for the desktop environment.
As soon as you close the editor, the editing process continues. The script transfers the modified metadata to the new PDF file (line 4) and then cleans up a little bit. The old PDF file and the text file with the metadata get deleted (lines 5 and 6). The new PDF file contains the same name as the old one (line 7). When all is said and done, you get a PDF document with the same name as the beginning file, but it contains modified metadata.
Tool Chest
The PDF toolkit provides you with an extensive set of tools for editing PDF files. It will let you read out metadata and edit multiple PDF files or chain them together. You can also extract individual pages from a PDF, rotate pages, and encrypt PDF files that also have password security.
If you are looking to scan a book and put each chapter in its own PDF file, then you can collect the individual files together to make a document using the commands from Listing 8. You should be careful to make sure that the collating sequence in the PDF file corresponds to the sort order of the file names.
Listing 8
Concatenating PDFs
$ pdftk chap1.pdf chap2.pdf chap3.pdf cat output book.pdf
$ pdftk chap*.pdf cat output book.pdf
Conversely, you can use PDFtk to extract specific passages from a larger PDF file. By way of example, assume that you want to put an ebook title page on page 1 of a slim PDF, and the ebook contents between the pages numbered 42 to 73. Here you should use the cat <1 42-73 option from the corresponding call in PDFtk (Listing 9, line 1).
Listing 9
Splitting, concatenating, and rotating PDFs
$ pdftk book.pdf cat <1 42-73 output chapitel.pdf
$ pdftk scan_quer.pdf cat 1-endeast output scan_hoch.pdf
Alternatively, you can do something like take a document scanned in landscape format and rotate it to the correct position (Listing 9, line 2). You can specify which pages get rotated and in which direction with the 1-endeast option. The first part, 1-end , refers to pages 1 through the last page, therefore all of the pages. The rotation applies directly to these pages. Here, the east is 90 degrees clockwise to the "east." The other rotational directions are south for 180 degrees to the east and west for 90 degrees counterclockwise to the west.
In addition, PDFtk offers the possibility of protecting a document from unauthorized viewing. The encrypt_128bit option encrypts the PDF file with a 128-bit key. You set the password using user_pw <password1> (where password1 is the password you set to protect your file). The call can be expanded with a second password with owner_pw <password2> . This would prevent anyone other than the owner from printing or editing the document unless the rights to do so are explicitly granted via something like allow printing (Listing 10). You should pay attention to the fact that only Adobe Acrobat Reader implements these digital rights management (DRM) functions (see the "Pseudo-DRM in PDFs" box).
Listing 10
Protecting a PDF document
$ pdftk file.pdf output file_encrypted.pdf user_pw <password>
$ pdftk file.pdf output encrypted.pdf user_pw <password> owner_pw <password2>
$ pdftk file.pdf output encrypted.pdf user_pw <password> owner_pw <password1> encrypt_128bit allow printing
Pseudo-DRM in PDFs
Only Adobe Acrobat Reader [10] makes it compulsory to pay attention to specifications delineating digital rights to a PDF document. For example, these specifications would include allow printing , allow assembly , and allow copycontents . KDE's document viewer Okular only complies with specifications when you activate the menu option Settings | Configure Okular… | General | Obey DRM limitations . Gnome's Evince document viewer completely ignores all DRM restrictions. Practically speaking, passwords do not add any protection value. The only genuine protection from undesired viewing comes with encryption with user_pw <Password> encrypt_128bit .
If you would like to avoid typing entries into PDFtk, then you can use PDF Chain [7], which has a suitable graphical user interface (Figure 4). This program has all of the toolkit functions in easy-to-understand dialogs. You will not have to remember any commands. You can find this program under pdfchain in Ubuntu's package repositories.
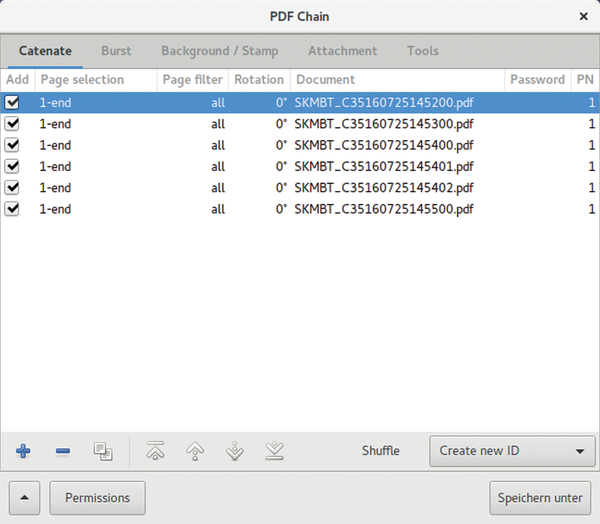 Figure 4: PDF Chain offers a simple but practical graphical interface for the high performance PDF toolkit PDFtk.
Pruning
If you scan books or magazines with a high performance scanner, then a double page frequently lands on a single page of the PDF document. Most of the time, it would be preferable to have each page of the original end up on just one page in the PDF file. This is where the program Krop can help. You can install Krop by downloading the latest deb file from [8]. Then use the following command to install and resolve dependency issues:
sudo dpkg -i krop_0.4.11-1_all.deb
sudo apt-get install -f
Krop offers a large number of possibilities for cropping PDF files, including splitting double pages in two (Figure 5).
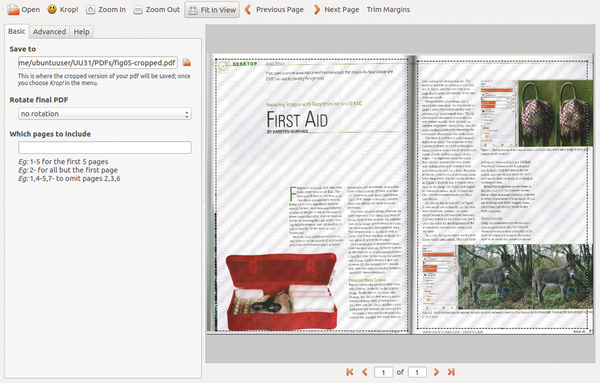 Figure 5: After scanning, you can quickly and conveniently divide double pages into two individual pages in the PDF document.
It is easy for scanned documents to get so large that they significantly increase load times and present problems for further editing activities. Also, the recipient often places a limit on the maximum permissible file size. Therefore, it makes sense to start paying attention to the resolution when you scan a document. A black-and-white scan with 72dpi usually suffices for reading but not for text recognition. Experience shows that a black-and-white scan with 300dpi results in a good compromise between high quality and ease of handling.
If a PDF file becomes too large, you can use Ghostscript [9] to scale down the resolution while optimizing the document for various uses (Listing 11). Many distributions come preinstalled with this program , including Ubuntu. If not, you can install it with gs using Apt.
Listing 11
Changing resolutions with gs
$ gs -sDEVICE=pdfwrite -sPAPERSIZE=a4 -r72 -dNOPAUSE -dBATCH -sOutputFile=output.pdf input.pdf
$ gs -sDEVICE=pdfwrite -dCompatibilityLevel=1.4 -dPDFSETTINGS=/ebook -dNOPAUSE -dQUIET -dBATCH -sOutputFile=output.pdf input.pdf
The command in the first line of Listing 11 causes Ghostscript to create the smaller PDF file output.pdf in A4 format with 72dpi resolution from the input.pdf PDF file. The option -dNOPAUSE prevents Ghostscript from stopping after each page and then waiting for confirmation that it is okay to continue. The option -dBATCH makes Ghostscript close automatically at the end of the process. The call in the second line contains the dimensions for the PDF file, but automatically uses the option -dPDFSETTINGS=/ setting to set a series of additional switches that optimize the document for various areas of application (see Table 1).
Table 1
Ghostscript PDF Settings
| Option | Resolution | Comments |
|---|---|---|
| /screen | 72dpi | Ideal for display on a PC. |
| /ebook | 150dpi | Good quality and small size; ideal for scanning credentials for job application |
| /printer | 300dpi | Optimized for print outs; however results in fairly large documents |
| /prepress | 300dpi | Intended for transfer to a printer; no reduction in the color index |
| /default | no information | Optimization for the optimal display on different output devices |
Mark Up and Comments
The PDF format is highly suited for exchanging documents independently of platform and application. The exchange works almost as well as if you had printed out the document and sent it. One disadvantage to the electronic version is that it is not as easy to highlight sentences and passages, place post-its with comments, or simply circle an item.
However, the PDF format also has a function for performing these kinds of actions. The function varies in scope depending on the document viewer. Okular offers comments, mark ups, and simple paint tools (Figure 6). Evince users have to make do with adding notes. The various types of markings for both programs can be displayed without any problems.
 Figure 6: Okular allows you to mark items in the text and add comments in several ways.
Conclusion
We use PDF files everyday. An extensive offering of useful programs available for Linux allow you to create searchable PDFs from scans and then modify them as desired. These programs provide the tools necessary for taking advantage of the many possibilities that the PDF format brings to the table.
Infos
- Tesseract OCR: http://github.com/tesseract-ocr
- OCRmyPDF: http://github.com/jbarlow83/OCrmyPDF
- Unpaper: http://www.flameeyes.eu/projects/unpaper
- Pdfgrep: http://pdfgrep.org
- OCRFeeder: http://wiki.gnome.org/Apps/OCRFeeder
- PDF Toolkit: http://www.pdflabs.com/tools/pdftk-server
- PDF Chain: http://pdfchain.sourceforge.net
- Krop: http://arminstraub.com/software/krop
- Ghostscript: http://ghostscript.com
- "Adobe Acrobat Security: PDF Security Development": http://www.locklizard.com/acrobat-security/