Managing an Inventory with PartKeepr
Planning ahead as a business person is the basis of commercial success. The more items you have in stock, the more important it becomes to maintain a current inventory overview. Manufacturers also have to stay on top of their parts inventories in order to figure out whether they have adequate quantities of every they need, or whether they are running out of certain parts. Linux and the free software PartKeepr bring organization to your inventory.
Because of the way it is constructed, PartKeepr is suitable for all inventories from small to large. However, this suitability depends on the presence of a professional environment based on LAMP (Linux, Apache, MySQL/MariaDB, PHP/Python/Perl). The LAMP software stack provides not only a database back end, it also lets an Apache web server issue queries and make entries on the company intranet from any workstation.
PartKeepr, formerly known as PartDB2, is available as free software under the GPLv3 license, and it comes with a large community of users and developers. The software is available in various forms on the project page [1]. In addition to ZIP and TBZ2 archives, there is also a virtual appliance for Oracle's VirtualBox. However, the virtual appliance does not host the current version of PartKeepr, plus it runs without a firewall. As a result, the virtual image, which is approximately 555MB, is suitable only for testing.
The software as such is not very demanding. There are no installation problems under Ubuntu 16.04 LTS . Lots of other inventory management solutions crash with the PHP 7 environment.
Installation
The current version of PartKeepr needs, as mentioned above, a functioning LAMP environment. First download PartKeepr as a ZIP file (around 71MB) from the website and decompress it in the desired directory [1]. Then move the folder with the decompressed data to the document root for your web server. As a rule, this will be /var/www/ . After this, activate the Apache modules userdir and rewrite :
# a2enmod userdir rewrite
Now change the Apache configuration and insert the lines from Listing 1 into the file /etc/apache2/apache2.conf with a text editor.
Listing 1
Add to apache2.conf
<Directory /var/www/partkeepr-1.1.0/>
  AllowOverride All
</Directory>
Next you should adapt the root directory by using administrator rights to copy the /etc/apache2/sites-available/000-default.conf file, as well as name your chosen virtual host. Using the text editor, then modify the DocumentRoot section so that it includes the path /var/www/partkeepr-1.1.0 . In order to access the site via an SSL connection, you should also modify the DocumentRoot section in the corresponding copy of the /etc/apache2/sites-available/default-ssl.conf file in the same way.
As part of the last step, modify the maximum run time of a script and enter the current time zone in the php.ini file. If you are using PHP 7, you can do this by opening and editing the /etc/php/7.0/apache2/php.ini file. If you are working on an older system that has PHP 5.6x on board, this file will be located in the /etc/php5/apache2/ directory. Once in the file, increase the value for the variable max_execution_time from 30 to 120 . In the date.timezone = line, enter the time zone for your location.
Next use root rights to restart the web server by typing service apache2 restart in the terminal. Now you can call the corresponding URL for the virtual host from the browser and attach /web/setup to the host (Figure 1).
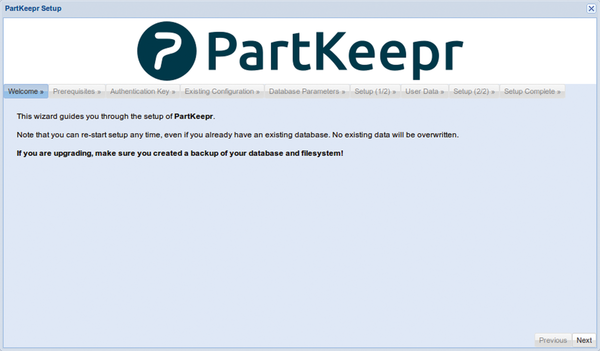 Figure 1: The actual set up of PartKeepr takes place in the web browser. The preparations are performed in the filesystem.
Setup
Once you click on the Next option in the lower left of the setup screen, the program will check to see whether all of the requirements are fulfilled. Under certain circumstances, it will display components that are missing or outdated, which you should then update. At this stage during testing, it was necessary to add several PHP modules as retrofits.
A single click on the Show Errors button yields detailed information on the missing modules and other problems (Figure 2). You can use the package manager to easily install these packages. Then you should restart the web server from the command line with service apache2 restart . Afterwards, check on the status again by clicking on Re-run checks within the browser.
 Figure 2: First the software tests to see whether the system has fulfilled all of the requirements. During testing, it was necessary to retrofit by installing some modules.
Authentication data goes into the additional setup tabs, and you must also configure the MySQL database. The name of the corresponding computer gets entered in the Database Hostname: field found under Database Parameters . Enter the name PartKeepr in the Database Name: and Database Username: fields. The password of your choice goes into Database Password: .
Then activate the option Show commands to create the database , which sits to the right of the entry fields, and copy the commands that are indicated to the clipboard. Switch to the terminal and log in to the database on the corresponding computer using mysql -u root -p with the original MySQL password. Copy the commands from the clipboard to the command line. Now the database has been set up with the password as specified. You can get out of the database interface by typing quit at the prompt.
Continue on to the next tab in the setup window. In this tab, the routine configures the system, a process that usually takes some time. Enter the data into the User Data tab that the software administrator will be using for authentication. When entering the password, make sure to enter uppercase and lowercase letters correctly. The configuration does not ask twice for verification.
After clicking on Next , the setup switches to a tab that suggests the possibility of securing the data via cron jobs. If you click on the Submit option in this window, you will land in the software's login screen. After entering the authentication data, the home screen for the program appears (Figure 3).
 Figure 3: The parts manager appears after login. Here it is already well accessorized.
Intuitive
The software offers a unified, intuitive operation that even beginners can master. Depending on your location in the program, you will see screens that are divided into two or three areas. To the left, there is a list area with a tree view of the currently active components. To the right is a large entry and indicator area where you can either view or collect detailed data about these active components.
In addition, PartKeepr offers corresponding masks with relevant data fields. These are oriented to typical warehousing categories for components. In the upper area of the program window, there is a horizontal tab bar. Above this, there is a small menubar with three entries, System , Edit , and View . Each of these contains all of the important submenus and groups.
The software displays multiple categories in parallel in the individual tabs. Therefore you do not need to constantly call individual groups via the menu. Instead you can click your way through the appropriate tabs to the desired page. Listing and managing components works in a similar way. There are buttons above each list to the left of the screen for creating and deleting individual entries.
Accessories
In the application's home window, you will find the Edit entry in the menu above the list. This entry takes you from the corresponding category to all of the important information pertaining to the components. The information includes everything, ranging from the manufacturer and distributor, to technical data, to storage location. The first order of business is to define the storage location. This is done by selecting Storage Locations , which will open a new tab with a three part dialog.
In the lower left of this tab, click on Add Storage Location to add a new entry to Storage Location . Then, to the right of the screen, indicate the name. You can also load a picture. Save your data by clicking on Save Storage Location in the lower left.
The new entry appears immediately in the lower left of the list screen. An empty table will open on the right. It will show the parts found in the given location.
The next step involves listing the reference data for the manufacturer and supplier. This data is then assigned to each individual component. To do this, first go to the Edit menu and open Manufacturers . An extensive, ready-made list of manufacturers will appear to the left of the window. If relevant entries are missing from this list, open a mask to create a new dataset by clicking on Add Manufacturer at the top left. This is where you enter all of the relevant data including a logo if you wish. Clicking on Save Manufacturer saves the new data.
It is important to make sure that the ready-made list of manufacturers contains the company's name and logo, but not individual data like the address, telephone numbers, or contact person. This information should be manually entered after clicking on the relevant entry (Figure 4).
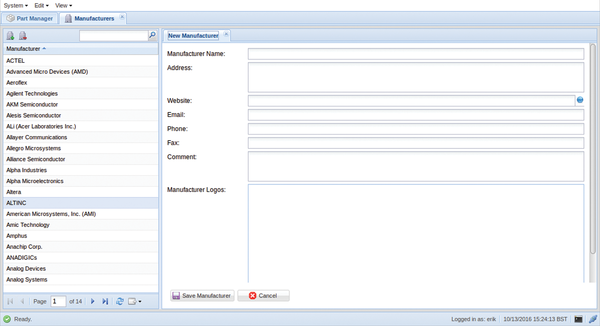 Figure 4: In order to maintain an overview of the sources for your parts, you collect detailed manufacturer information.
The list of ready-made entries consists of multiple pages. A search field above the list makes it possible to quickly find an individual provider. Similarly, you can create entries for distributors. The corresponding menu option is found under Edit > Distributors .
Categories and Parts
You in-stock components are managed in the Part Manager category. When you start using the program, the Categories list, located to the left in the window, will be empty. This is where you create new categories that include all parts of the same type. For example, this could be an electronic components category, which would include things like resistors, diodes, or transistors. The individual groups can extend across multiple hierarchies. They subsequently appear in a tree view.
In order to create a new group, first click on the Root Category option and then on Add Category , which is located in the middle above the list. Enter a name and brief description for the new category in a free text field in overlapping windows. After saving the entries, a new group will appear underneath Root Category .
In order to create subgroups in this hierarchy, instead of clicking on the Root Category option, click on the instance found underneath; afterwards, click again on Add Category . Remove obsolete categories with Delete Category in the small buttonbar located to the far right above the list.
Once you have built your structure for managing components, start listing the parts you have in stock. To do this, click on Add Part to the right in the program window. A new dialog will open with four tabs that include Basic Data , Distributors , Manufacturers , and Attachments . This is where you enter detailed information for each component (Figure 5).
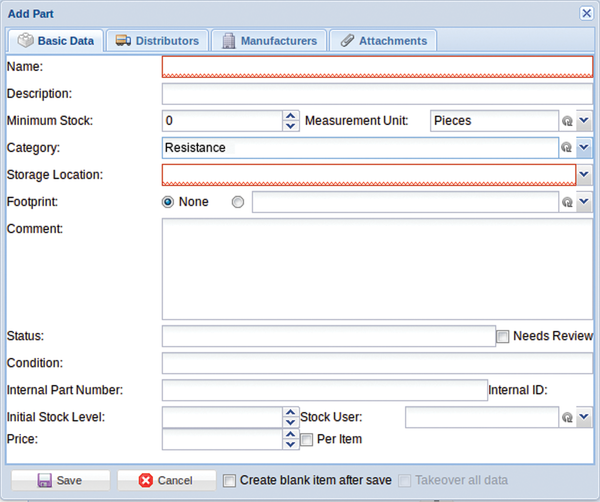 Figure 5: The dialog for the individual in-stock parts lets you link much of the data that you previously entered as independent sets when building the database.
In the Basic Data tab, you can collect data such as the actual label plus quantity, price, and a description. If necessary, you can also enter a definition for the condition and an internal parts number. Using the Category: and Storage Location: fields, you can link the article to a group of components and a storage location. When you click on the triangle to the right of each of these data fields, you will get a selection list for the data that has already been deposited.
The Distributors tab lets you link the entry to one or more distributors of the the corresponding parts. Click on Add and select the desired entry from the list. Then you can indicate the order number for the part, the packaging unit and the price of a single unit, and price per unit.
In the Manufacturers tab, clicking on the Add option lets you select the suitable entry from the list of saved manufacturers and enter the accompanying part number. You can include things like technical data, specifications, and the URL for a web site in the last tab, Attachments . If locally stored files exist, you can incorporate them, but the file size cannot exceed 12MB. After clicking on Upload , the software will accept the desired data.
You can take a picture of the parts with a webcam by clicking on the camera icon button. These pictures will then be available in the tab as a Thumbnail View to help identify parts.
Uniformity
PartKeepr is primarily intended for use with electronic components inventories. Some of these, such as CPUs or integrated circuits, have standard contact strips and grids for assembly. These components get soldered together or they are plugged into a suitable socket. Respectively, these are called Ball Grid Array (BGA) or Dual In-line Package (DIP).
PartKeepr's Footprint menu makes it possible to include the footprint for each item you list. In the dialog for each part, select the footprint in the Footprint: selection field. The individual entries are listed centrally via the Edit | Footprints menu. The dialog here corresponds to the dialog for creating categories.
Due to the wide array of existing units of measure in the field of electronics, it is easy to forget what size goes with what unit. Here you can call up a list of predefined units via Edit > Units . The program will display the appropriate prefix for each unit in the right hand area when you click on one of the entries in the list to the left (Figure 6). This helps prevent possible confusion that could be caused by incorrect interpretation of units.
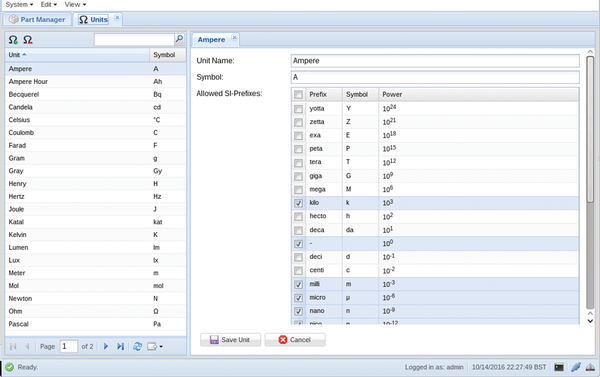 Figure 6: In order to maintain an overview of the dimensions that each entry represents, you can manage the units in the software.
If you find that some items you need are missing, these can be added by clicking on the list's Add Unit option. Delete a unit you no longer need via Delete Unit . You can manage quantities of the units saved in the system for in-stock items in Edit | Part Measurement Units . If necessary, this is where you can add units using the Add Part Measurement Unit option.
Projects and Reports
In addition to individual parts, you can also manage project parts with PartKeepr. This is done by displaying all of the parts associated with a finished assembled device. This function is located in the Edit | Projects menu. A click on the Add Project option lets you set up a new project.
Next enter the project name in the large area to the right and add information where applicable, such as description, necessary parts, and attachments. After clicking on the Save Project button, an entry will appear for the project in the list to the left of the program window.
The software offers the possibility of creating reports. These contain statistical data, such as the number of parts in stock, and they also let you manipulate the inventory. You can generate reports for individual projects with the menu option View | Project Reports . At the end of a project, you can automatically adjust the inventory by clicking on the Remove parts from stock button in the Project Reports window.
You can get an overview of developments in the warehouse using the Stock History option in the View menu. You will see a list of all parts that include the date on which they left the warehouse, the price, and the employees who processed the part. Here the software also offers the possibility of exporting the list in another format, such as the universal CSV format with the Export button (Figure 7).
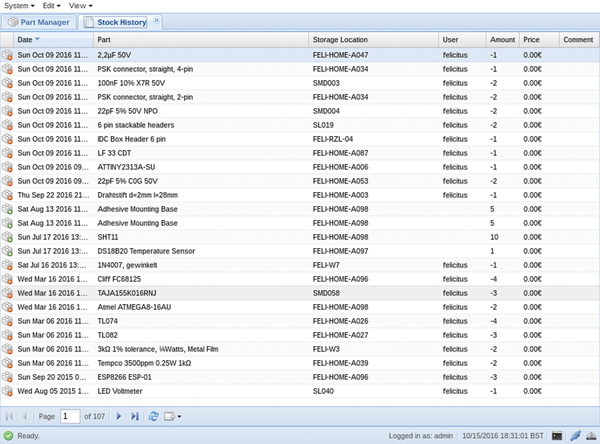 Figure 7: Using the report function, you can see how the inventory has developed over time, what is still in the warehouse, and what parts have been included in a project.
Conclusion
You can systematize your stock with PartKeepr. This software was primarily developed for use with electronic components, but it is also well suited for other branches that also deal with small parts, such as farm machinery repair shops. Shops like these have to keep track of everything ranging from gaskets, to lug nuts, to an engine block, and beyond. PartKeepr shines as a parts manager due to its convenient interface and speedy operation. Thanks to LAMP, it also has a stable and standard database framework working under it.
Infos
- PartKeepr project page: https://www.partkeepr.org