Working with Makagiga, the digital office
Unlike other operating systems, Linux desktop environments usually include a multitude of small applications that range from electronic notebooks and image viewers to RSS readers. All of these applications help to make daily work in an office setting easier. However, it is most often the case that the various tools have to be individually called, they are not connected to one another, and menu navigation frequently varies from one tool to the next. As a result, it can take some time to become familiar with how a tool works. Moreover, simultaneous operation of several tools can be inconvenient.
Makagiga [1] takes a different and integrated approach to providing tools for daily use. Distributed under the free Apache 2.0 license, the solution has a uniform interface covering a diverse selection of small programs. The programs dovetail into one another, thus making for efficient use.
Installation
Makagiga is available for download as a 7Z archive from [1]. The archive is about 33MB in size. Install 7Z with
sudo apt install p7zip-full
and download the Makagiga archive. Once the download is complete, decompress and extract the archive to the directory of your choice:
7z x makagiga-file.7z
Makagiga was developed as a Java application, and as a result, it requires a Java runtime environment. Here, both Java from Oracle and the free OpenJDK environment are suitable.
You may want to move the newly created makagiga-5.8.1 directory to the /opt/ directory where newly added software is usually stored. Next, you can set up a launcher in your menu structure. The developers have integrated a small shell script called makagiga.sh that allows you to launch the program instead of having to type out the inconvenient Java call.
Once launched, the main window opens quickly. The window contains a tree directory view for folders and feeds to the left and a large pinboard to the right. Tabs are used to show changing content in the pinboard (Figure 1).
 Figure 1: The Makagiga main window, here with an open Calendar tab.
A horizontal menubar sits at the top of the main window. The three pinboard tabs (Widgets , Calendar , and To-Do ) represent tasks and shortcuts that might potentially be helpful. You can switch Makagiga to full-screen view using the menu option View | Full screen or by pressing the F11 button. In full screen-view, the software gives the impression of a quasi-desktop.
Unconventional
Makagiga contributes an unusual interface to the desktop, as well as an unconventional settings menu. There is a settings dialog under the settings option of both the View (sometimes – see below) and Tools menu. You can use these dialogues to configure the software. Since the menu structure changes when a pinboard tab has been activated, you can find the settings dialog for designing the view if the Widgets tab is selected. The three context-sensitive menus (Wallpaper, Colors and Border, and Workspaces) are used to enhance the pinboard's visual appearance. Basic modifications, on the other hand, are performed in the Tools | Settings menu.
The General tab in this menu allows you to define the software's behavior during operation and when it stops. The Browser menu item lets you specify the browser that will start when links are called in Makagiga. You should select a theme with the Look and Feel option. The Tasks dialog is used for defining certain options for the visual appearance and notification function of the to-do lists. The Notepad area determines additional options for the notepad, such as the standard font and coloration. To the extent that you would like to modify the automatic update function, you can modify corresponding options accordingly in the dialog of the same name. If you are also using an RSS feeder, then it is a good idea to adapt parameters like the update interval or the period of time during which news should be locally saved (Figure 2).
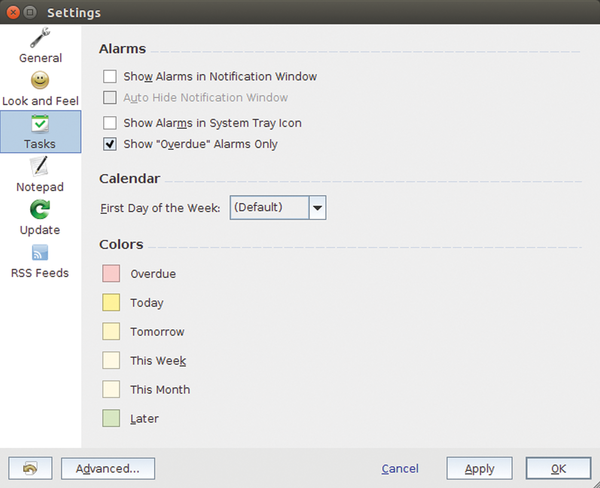 Figure 2: Makagiga collects all of the important options in the settings dialogs.
Widgets
By default, Makagiga opens the Widgets page on the pinboard each time the program starts. This segment displays the actual workspace, which can be filled with individual work elements. It lets you arrange and administer individual notes. You can also assign titles to each note, plus you can use the Settings button at the bottom edge of a note to create a customized look-and-feel for the note. The note's content can be printed out using the print icon located again at the bottom edge that appears when a note is selected.
There are two methods for adding additional widgets to the pinboard. The first is to select Add Widget in a context menu that you call by right-clicking in free space. This will cause four different alternatives to appear. The second method is to click on the Add Widget button sitting above the pinboard. This allows you to distribute the widgets onto two work areas, which are called using the 1 and 2 buttons directly above the pinboard.
Since Makagiga has been built with a modular design, you can add additional elements. The selection of different themes for modifying the visual appearance ranges from the display software for various file and image formats to clocks that can be placed on the desktop. Even small search tools are available. All of the widgets are compatible with the pinboard. In addition to notes, you can install images, clocks, and a calendar on your clipboard. Clicking on the Get More Widgets option in the Edit menu lets you download additional widgets from the Internet. To install a new widget, you simply mark it and then click on the Install button at the bottom left of the window. A download follows, and then comes installation. Afterwards you will need to restart the program (Figure 3).
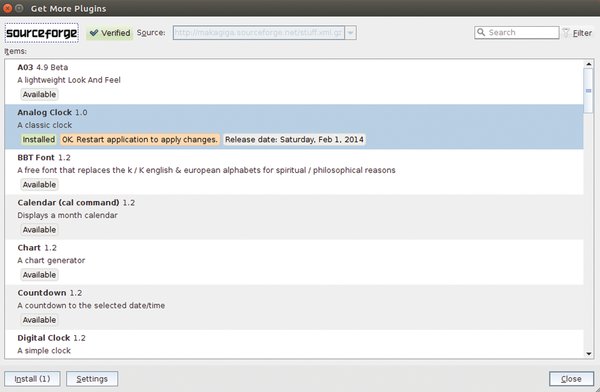 Figure 3: Numerous additional widgets are available for download from the Internet.
To remove widgets, go to the Tools | Plugins dialog and click on the red check mark found next to the relevant widget. The widget will be deleted after you have answered a security question that pops up.
Calendar
You can add a calendar tab for the current month by selecting Tools |Calendar . Right-clicking on a given date lets you enter an item. A control bar found directly above the calendar indicator lets you change the month that is displayed.
Task Planner
From the Files and Folders in the tree view on the left, you can choose To-do list to open a tab that allows you to take care of task planning and links this activity to the calendar. Task deadlines entered into the planner find their way automatically onto the corresponding date in the calendar. It is also possible to designate a particular time and define priorities for tasks. The various priorities can be displayed using a multicolored background in the task list. This provides the user with a quick overview of what needs to be done first. Completed tasks can be designated by crossing off the corresponding entry in the to-do list. In order to keep better track of what has been accomplished, it is also possible to delete individual entries. This can be helpful when a large list of tasks is involved. Removing a task from the list is accomplished by right-clicking on the relevant entry, then selecting the Selection option in the context menu, and finally selecting the Delete selection option.
In order to add additional tabs to the pinboard, click on the New button above the tree view and add another entry. Make sure that the new entry is added to the tree structure at the right location. You should definitely consider adding entries to prepare the tree view's basic level with new folders for projects and activities before using the software productively. This will permit you to make modifications later without having to rearrange entire hierarchies.
RSS Reader
Makagiga also comes with an internal RSS reader, which constantly updates your subscription news. The RSS Feeds entry is found in the tree view to the left of the main window. As soon as you click on it, you will see the existing feeds roll down. When the program is first installed, there are already some example feeds entered into the list. These can be easily removed by right-clicking on the feed you want to delete and then selecting the Delete option in the menu that opens.
You can integrate any desired feeds into the system using a corresponding dialog. All you need to do is copy and paste the relevant target URL for the website into the address line of the installation dialog. After this, click below and to the right on Preview . After a short wait, you will see the latest headlines and teaser content for the feed in the window's preview area. Clicking below to the right of the window on Create causes your system to accept the new RSS feed. As soon as you click on the RSS feed's entry in the tree view in the left area of the window, the individual feeds roll down. A click on one of the feeds brings it up to date. Right-clicking on the main entry RSS-Feeds and then selecting the Refresh Feeds: RSS-Feeds updates all of the feeds that have been integrated into Makagiga. After finishing the update, the program will show you the title of the most recent feed entry and the number of new notifications in the system tray at the bottom left. If you click on one of the feeds in the left part of the window, the program will display the title for the most recent notifications for this feed in the form of a list. When you click on the notification, Makagiga opens a new folder on the right of the workspace and displays the notification together with the available information (Figure 4).
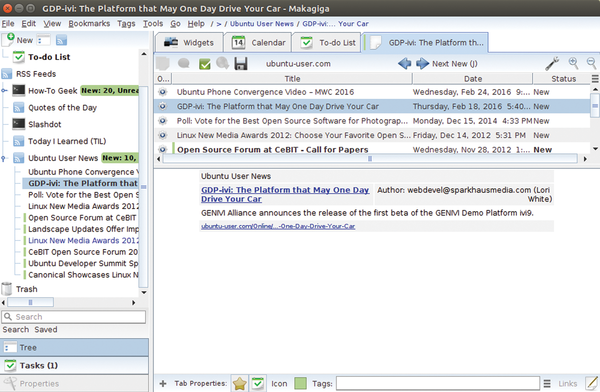 Figure 4: You will always know what is going on thanks to the built in RSS reader.
To close the tab once you have finished reading, right-click on the tab itself, and then click on Close in the context menu that opens. This causes Makagiga to close the tab and go back to the previous one. Individual feeds to which you do not want to subscribe are removed from the list by right-clicking on the relevant entry and choosing Delete in the context menu that then opens.
On Settings
It is especially important when frequently updated RSS feeds are involved to regularly delete notifications at frequent intervals. This cleans out the main memory. Therefore, Makagiga provides diverse settings for automatically dealing with RSS feeds. You find these by right-clicking on RSS Feeds in the tree structure on the left and then selecting Settings: RSS Feeds in the context menu. In the straightforward dialog that opens, you can now specify various settings for updating and deleting feeds. You can also modify the appearance of the indicator (Figure 5).
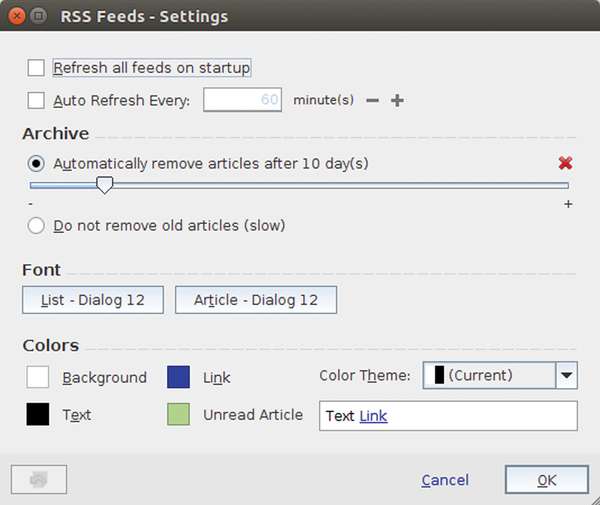 Figure 5: The dialog for specifying important settings for the RSS feeds.
Seek and You Shall Find
The tree view in Makagiga can become confusing especially when lots of functions are used repeatedly. This means that routine tasks like searching through RSS notifications can become noticeably more difficult in comparison to searching with a fresh installation of the application.
Makagiga seeks to avoid this issue with a search function underneath the tree view. This function lets you enter a random search term in the entry field. The software then lists the search results in the tree view, practically in real time. The Sort By option underneath the search field lets you choose various search criteria to filter the results (Figure 6).
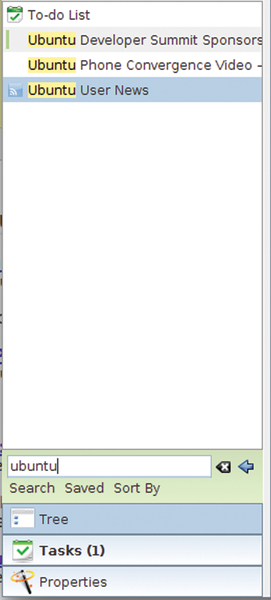 Figure 6: You can quickly find your way through larger volumes of data with the help of the search function.
Regularly recurring searches can also be saved making it unnecessary to enter the terms each time.
You will also find another Tasks button underneath the search field and the Tree button. The latter button determines the display of the left window segment. It is activated by default. Clicking on this button causes the program to switch from the tree view to the task list, which lists the individual tasks sorted by time period. This gives you an immediate overview of the tasks that need to be completed in the short run. The priority of each task can be displayed if desired.
Conclusion
Makagiga is an enormous help for users who primarily use a PC to organize their workload. Although it takes some time to get used to the software due to its wide-ranging potential, Makagiga does replace many useful programs that would otherwise be external, like an RSS reader, an electronic notepad, and calendar administration. The possibility of collecting various components in individual folders also makes Makagiga suitable for use as a small project administrator. The software is appealing for its brisk operation. The only shortcoming is found in the area of localization with some foreign countries. However, there are ways of getting around this. Users seeking greater ease in keeping an appointment calendar and keeping their desk clear of little pieces of note paper should definitely take a look at Makagiga.
Infos